Pamco Electronic ignition vs. high output?

pumps,

Yes, that is still a good idea. The fuse protects the PAMCO and you can jump it directly to the battery from under the seat if the main fuse blows or if the IGN or kill switch fails.

pablo, if you are listening, the recommendation is to run a wire from one of the red/white wires to under the seat through a fuse and back, connecting to both the coil and the PAMCO red wire. Use a 7 1/2 A fuse
 
I'm guessing the fuse opening would not be able to keep the coil from shorting though. Thought I had a picture somewhere of what I did.....must be getting old...
 
i was thinking of upgrading to the "green monster" but was wondering about burning up the motor anyone run this setup for along time any trouble? dont wanna put it on and burn a hole in the piston.
 
A hotter/longer spark won't burn a hole in your piston. Running lean will, which this might expose. If you're getting an excellent ignition/burn vs a weak one, i mean. And it definitely runs cleaner (if you've been running points, anyway) with the wasted spark igniting anything left in the cylinder on the exhaust stroke.
 
Pete or anyone can answer this. How many labyrinths do I use for an 81? And will it still be one brass on the pamco side and two on the other side. I also lost the screws and washers that hold the pamco in place. They are the same thread count as the three screws that fasten the housing down, just lookin for length of screw and washer size. THANks
Also on my advance unit, the weights do not want to spring back. I filed the in down on the plate, not sure if that would have anything to do with it? I just open the weights with my thumb and they stay open. Any ideas?
 
I believe , from my own experiences, that you can look up that fastener in the parts break down. When you get a part number , the middle part of the part number will give the size in mms and then the length in mms.
92503-06015-00 breaker plate screw
The middle part says an M6 screw @ 15 mms long. Try it.It has worked for me.
 
Haven't been on here in a while, but I put on the regular pamco ignition kit and I am very satisfied, very simple to install and the bike starts up like no one's business. :thumbsup:
 
Pete or anyone can answer this. How many labyrinths do I use for an 81? And will it still be one brass on the pamco side and two on the other side. I also lost the screws and washers that hold the pamco in place. They are the same thread count as the three screws that fasten the housing down, just lookin for length of screw and washer size. THANks
Also on my advance unit, the weights do not want to spring back. I filed the in down on the plate, not sure if that would have anything to do with it? I just open the weights with my thumb and they stay open. Any ideas?

Just install one brass bushing on the PAMCO side and two on the advance side. Do not install any labyrinths.

The binding can be caused by a number of things, including the locating pin for the advance mechanism being too long which causes it to press on one of the brass bushings and pinch the advance rod. This effect is made worse if you install the spanner nut that holds the advance unit backwards. The lip on the spanner nut must be towards to outside.

Take a look at the web site http://www.yamahaxs650.com/ in the advance installation link for a few tips and clues.

Edit: File the locating pin for the advance mechanism down so it will not press on the brass bushing inside the cam. The advance plate should be free to move a bit with the pin installed before you tighten it down with the spanner nut.
 
Ok, I've got the spanner nut on the right way. How much do you take off the pin? And also do you not seat the pin that goes into the camshaft all the way? Like even if I took 1mm off the pin and seated it all the way, wouldn't it still bottom out on the brass bushing. Should I just put the locating pin enough to get the plate on?
 
breahn,

It's not just the pin bottoming out. The other pin on the plate that keeps the locating pin from coming out pushes on the locating pin.

Other things you can try is to simply switch the brass bushing around, reverse them etc.

As a last resort, you can use some emery cloth on the shiny parts of the rod ends that ride in the bushings.
 
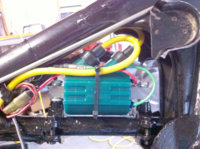
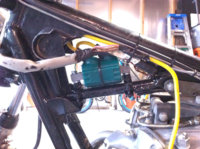
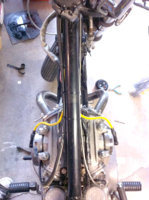
I thought I would post some pics of how I got the Green Monster to fit on my '73 TX650. Pete's instructions are great, but they don't work for this model. The plate simply does not line up with any combination of the ground clamps Pete recommends (I bought two of each from Home Depot). The good news is that you can simply grind that plate off and use two of the smaller clamps. Works like a charm. You also have to grind away some of the nuts that are welded to the clamp for the original condensers - the front clamp hits them - you'll see what I mean. I was able to accomplish this with a 4.5" angle grinder and a Dremel - you could do it all with a Dremel, it will just take longer.

Everything else went swimmingly!
 

Attachments

  • IMG_0137.JPG
    IMG_0137.JPG
    132.2 KB · Views: 657
  • IMG_0138.JPG
    IMG_0138.JPG
    133.5 KB · Views: 637
  • IMG_0140.JPG
    IMG_0140.JPG
    115.2 KB · Views: 631
I recently purchased a 73' XS650 hardtail with Pamco ignition on it. It ran but now ignition system fried (ign coil melted, board under cap left side of motor, burnt). Would like to go back to a point style ignition, any suggestions???
 
I recently purchased a 73' XS650 hardtail with Pamco ignition on it. It ran but now ignition system fried (ign coil melted, board under cap left side of motor, burnt). Would like to go back to a point style ignition, any suggestions???

Dude - I just pulled everything you need out of my '73 XS650. I'll give you a great price... I'll PM you about it.

All you will need to do is the reverse of the instructions on the pamco site. Should be easy!
 
I somehow fried my Pamco ignition system, coil and all. All this while sitting in garage. Any clue as to what the hell I did???
 
Something electrical :)

Depending on your coils, you may have done this by turning over the motor with power at the coils with one or both of the plugs ungrounded.

I have PM'd you about the stock 73 points and coils that I have.

- Adam
 
would be interested, seeing as how I will have to buy points set up. Thanks for the info, and your time.
 
JonDread,

Most likely you left the key and kill switch on with the engine not running. The PAMCO is covered by it's warranty in that case (believe it or not) so that will be replaced for free, leaving you just the coil to replace.
 
Back
Top