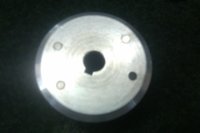
Pamco Ignition causing backfire through carbs.

dckareem

XS650 Member
Messages
16
Reaction score
0
Points
1
So took the off the points and installed the Pamco. Engine has great compression, but now the right cylinder is backfiring through the right carb.We used a timing gun as well still having issues. Carbs have been cleaned as well. Has anyone had this issue and a possible solution
 
dccareem,

It's not unusual to have a new advance rod bind in the bushings. Take a look at this video and check your advance rod for binding:

 
Thanks pete I found once you get them set they stay set. Hoped this solved his problem. The Gerber lid was great back in the day.:D

What? Did you actually build one? :yikes: Yes, those were the days. Just a Gerber Baby food lid and a shank from a bolt and about 6 beers and I had my very own electronic ignition!! :thumbsup:
 
Pete I would have I had all parts listed I followed original build Thread. It worked like a charm. By the time I time I got around to doing one you had the new model in production. I still can't get over someone stealing Mashers bike. Inventing was fun to watch, it had to be to do. Just to give some thing to think about in your spare time a crank trigered black box. Hmmmm. Not mutch spare time anymore I guess.:D
 
the picture on the yamahaxs650.com main page shows the magent set up in the first picture, the magnets on it look like they are equally spaced on the bolt circle, looks like 90 degrees, mine isnt equally spaced, i know you can rephase the motors, and just want to see if someone can confirm mine looks right, thanks
 

Attachments

  • pamco.jpg
    pamco.jpg
    181.5 KB · Views: 307
also checked the advance its working just like in the video. Installed it using the directions on your site as well
 
It looks like one of the magnets is missing from the picture. Pete can tell you better Than I can. Pete has made changes from the original magnet placement Yours is the newer version. I'm sure pete will have you up and running in no time flat.
 
dckareem,

Yes, it does look like there is a magnet missing. Can you confirm this? Did you install the large washer that comes with the kit used to help retain the magnets?

retainer2.jpg


That is the correct rotor. I changed to a 60 degree dwell angle about two years ago.
 
Last edited:
Hey Pete... I now have dckareems bike in my shop and have a few questions for you about your unit. I have not done anything with the bike yet as I wanted to have a 100% understanding of the system before I mess with it.

His unit did not have the washer installed when it came to me, but I found it in his pile of parts and put it on. I also made sure that all 4 magnets were in place.

However...

1) On the backside of the rotor with the magnets, are all 4 magnets supposed to be exposed? His unit only has 2 that are visible and 2 that are covered by the metal. On one of the 2, it looks as if a bit head went ALMOST through it, leaving a small point/peak in the metal.

2) Did the unit come with hold down screws on the rotor side? There is only one currently installed and it does not seem to be new.

Here is a more descriptive assessment of what his bike is doing.

Once started there is a sort of 'pinging' noise coming from the right side exhaust. The carb continuously backfires and the pipes seems to almost be sucking in air. When the throttle is cracked, the slide on the right does move and create vacuum, but there is still no exhaust.

My first guess is that whoever installed the unit checked for spark with the plug wire off and fried the coil (MikesXS 17-6803). If the coil checks out, where do I go next with this issue?

Thanks in advance! haha no pun intended
 
Klub Foot,

I briefly used a different design PC board with a part number of 1006. That board uses a different rotor, that is, the polarity of the magnets is the opposite of previous and current models. If the PC board has that number on it, then I may have sent the wrong rotor to replace the one with the missing magnet.

Other wise, the PAMCO is just a switch that turns the coil on and off, controlled by the magnet passing over the sensor. It either works or it doesn't, so if you are getting any spark, then the PAMCO is working. It should be the same for the coil. Both plugs fire at the same time, so it is unlikely that the coil is bad as well, but you could check the resistance to be sure.

So, that leaves the advance mechanism and advance rod, which has recently been replaced. If it was not installed properly, then all sorts of problems can result.

Check the installation instructions on the web site www.yamahaxs650.com for the advance mechanism. Note in particular that there are three locating pins, including one for the advance plate to cam. Sometimes, that pin is not installed at all, resulting in a random position of the timing.

Here is a check list to test the coil and PAMCO as well:

Testing the coil:

1. Using the lowest scale on the meter, measure the resistance between the primary terminals with the wires removed. Should read from 2.5 to 4.5 Ohms.
2. Using the highest scale on the meter, measure between one of the primary terminals and the center core of the coil. Should be infinite resistance. (open)
3. Measure between one of the primary terminals and one of the plug wire terminals. Should be infinite resistance. (open circuit)
4. Measure between one of the plug wire terminals and the core of the coil. Should be infinite resistance (open circuit)
5. Measure from one plug terminal to the other. Should be 15,000 to 20,000 Ohms

Testing the PAMCO

1. Use a voltmeter and check for battery voltage on each of the red/white wires with the key and kill switch are turned on.
2. The dual output coil has to have both spark plug wires connected to a spark plug at all times.
3. To test for spark, connect one of the spark plug wires to a spark plug that is grounded to the engine.

To test for spark without having to turn the engine over, do this procedure:
1. Remove the PAMCO rotor.
2. Remove the locating pin in the advance rod.
3. Reinstall the rotor, but without the pin.
4. Replace the nut holding the rotor on loosely. This will allow you to spin the rotor to produce a spark without having to turn the engine over.
5. Connect one of the spark plug wires to a spark plug that is grounded to the engine, but not installed in the engine.
6. Make sure that the other spark plug wire is connected to a spark plug in the engine.
7. Turn on the ignition switch and the kill switch.
8. Spin the rotor while looking at the gap in the spark plug for a spark.
9. Turn off the kill switch and the ignition switch.
 
I just got back from vacation and had a few minutes this evening to check out the bike.

Here is what I found:

1. Using the lowest scale on the meter, measure the resistance between the primary terminals with the wires removed. Should read from 2.5 to 4.5 Ohms.

3.0

2. Using the highest scale on the meter, measure between one of the primary terminals and the center core of the coil. Should be infinite resistance. (open)

1... sometimes I got a jumpy reading, but it was inconsistent

3. Measure between one of the primary terminals and one of the plug wire terminals. Should be infinite resistance. (open circuit)

1

4. Measure between one of the plug wire terminals and the core of the coil. Should be infinite resistance (open circuit)

1

5. Measure from one plug terminal to the other. Should be 15,000 to 20,000 Ohms

29.1 @ 200k

There is a fat blue spark coming from each side when the plug is pulled and grounded to the motor.

There is full power at both sides of the red wire coming from the Pamco.

There is not a 1006 on the PC board.


The bike starts right up. The left side seems to be running pretty well. The right side is still almost completely dead. Where do I go from here?
 
KlubFoot,

Well, that picture of the rotor above clearly shows one magnet missing. I'm not sure what happened since that. Is it possible that you replaced the missing magnet? If so, the magnets have a particular polarity. Opposite magnets are the same polarity.
 
Back
Top