Points Problems, imagine that.

Garrett411

XS650 Enthusiast
Messages
41
Reaction score
1
Points
6
Location
Fargo ND
Hey guys. Just put the motor back in my bike last night, came out this morning to do some little things before i try and start it. Trying to set my points and man what a headache this is. As i spin the motor i cant seem to get the points to open a measurable distance at all. Right nor left, ive tried adjusting to that the feet are touching the advance came lobe but so far no luck. Could this be worn out or is there something obvious i'm missing? I know the easy way is to go with the E-advance but i can't really do that right now, just trying to get these damn points to work. I know they need to be lean and i feel that i've cleaned them sufficiently. Any suggestions guys? i've attached pictures of the advance cam and the points. Any help is appreciated. thanks dudes.
 

Attachments

  • IMG_1516.jpg
    IMG_1516.jpg
    264.2 KB · Views: 351
  • IMG_1517.jpg
    IMG_1517.jpg
    157.2 KB · Views: 361
  • IMG_1518.jpg
    IMG_1518.jpg
    154.1 KB · Views: 372
  • IMG_1519.jpg
    IMG_1519.jpg
    146.3 KB · Views: 346
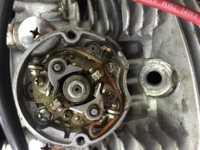
Turn the engine over while watching the points cam lobe. When the rubbing block on the points arm is about in the center of the high side of the lobe, adjust the gap.
You do that by loosening the screw that holds the points to the plate. On the end of the points there is a notch. By the notch is a pin. Use a flat blade screwdriver in the notch and against the pin to move the points. Watching the gap. It should open and close as you move the points. Use feeler gauges to adjust the gap to spec.
Now turn the engine 180 degrees and gap the other set. Once set you need to time them.
To time them pull the plugs. Turn the engine over with your finger tip in the right spark plug hole. As you turn the engine you will feel air blowing out around your finger tip. When this happens, start to watch the timing marks. Stop when the rotor mark lines up between the two lines by the F mark. This lines up the right side points for timing. To adjust the timing, you loosen the two screw that hold the full breaker plate. Again a notch is used to move the plate. I use a 12 volt light bulb for timing. I hook one lead to the points wire, the other to ground. With the key one, kill switch in run the light will light when the points are open. Move the plate one way or the other till the light goes
Very slowly move the plate back till the light just comes on.
Now turn the engine 180 degrees so the left cylinder is at the timing marks. The left set of points are the ones mounted to the half breaker plate. Adjust the half breaker plate for the light to just go out.
The instructions for doing this is in your repair manual.
It can be done with a ohm meter also. Just hook it the same as with the light bulb gut don't turn the key on. Points closed get very low reading, at or near zero. Points open infinity reading.
Leo
 
Okay so I got as far as getting the gaps set. Went to set the timing with the 12v light as you said but no power to be found, key on and off. Battery has juice. Checked all hook ups and grounds that were undone when I pulled the motor. Everything seems to be in order, at least to my memory. Any ideas? Thanks for the fast reply and helpful instructions by the way.

Posted via Mobile
 
As you slowly turn the motor over, can you actually see both points sets opening and closing? Because the light won't come on unless they open. You could also pry the points set open with a screwdriver to see if the attached light comes on. Be sure you are attaching the light to the points correctly. You must clip it to just the end of the points wire or it's mounting screw, not any part of the points set bracket. If nothing, it would be time to start back tracking through the wiring to see where you're getting (or losing) the 12v.
 
Okay so I haven't been around my bike to trace the voltage drain yet. In the meantime I actually bit the bullet and ordered a pamco from mkles XS. I'll attach the link, is this all I need? Hopefully? My bike is a '79 standard. Do I need the advance rod and bushings or is the stock useable? Here's the link: http://www.mikesxs.net/parts/yamaha-xs650-basic-pamco-standard-ignition-kit

Posted via Mobile
 
That's all you need. You can (and must) use your stock advance rod and advance unit.
 
I tried briefly yesterday with a 12v light. No luck, not sure if it was me or the lack of power. Just to see if the system had power I pressed the starter with the key on and the starter did not spin. Everything is hooked correctly to my knowledge. Going to grab the old multimeter and try and find the problem.

Posted via Mobile
 
Yep, sounds like you need to trace the power first....likely your points will work fine once they have power going to them.

Good luck.
 
So I found the power problem, forgot to check te one fuse right in front of me. Got that ironed out, 2 more questions. First of, this dual output could is much longer than stock and won't fit the mounts, do you guys have any sly locations that you've used? The second question is that in the pamco installation instructions there is no wire that I think would go to the capacitors mounted on the engine hanger, does this eliminate the need for them or am I missing something? Thanks guys

Posted via Mobile
 
Pipe clamps on the down tubes seems to be a favorite. Another is adapting a plate or strap to fit the original mounting and coil.
On a standard I've used 1 1/4 aluminum flat strap with holes on one side to bolt to the top of the original. Holes drilled to the inside to mount the coil. Stand-offs (ss tubing) to get it over the brace. It gives me about 1/8 inch clearance between the coil and tank.
But this was with the coil that has the side outlets. Not sure if it would work for the coil with the end outlets, what you have?
 
I had to remount my ignition switch but i got everything tucked away and secure. With the timing light and some new plugs the old girl runs! And like a champ at that! The pamco really seems to have made a big difference combined with the lapped valves. Really happy with how this is turning out, now just small electrical things and it'll be road ready. Thanks for all the help guys!
 
Back
Top