See if it's tall enuff to handle 21", or even 23", or the (*horrors*) 30"...
-
Enjoy XS650.com? Consider making a donation to help support the site.
XS650.com receives a small share of sales from some links on this page, but direct donations have a much greater impact on keeping this site going.
You are using an out of date browser. It may not display this or other websites correctly.
You should upgrade or use an alternative browser.
You should upgrade or use an alternative browser.
Question about wheel truing.
- Thread starter Mailman
- Start date
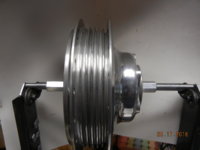
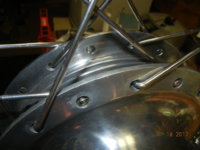
That looks good, base might be a bit light duty but someone thought about what's needed for sure! It's bit of a pain getting those cones tight into the wheel bearings. I changed to a threaded rod with the ends turned smooth to sit on the stand bearings. Now I can tighten the two run nuts with the ends machined as cones to hold the wheel centered.
2many; Just say no to

My ho-made stuff.
2many; Just say no to
My ho-made stuff.
Attachments
Last edited:
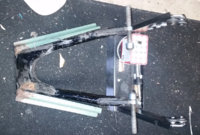
I balance wheels all the time in mine. I just use the axle and it works fine. To true the wheel, I put spacers and washers on the axle so the wheel can't shift side to side in the stand. You couldn't get consistent readings on the gauge if it did. For balancing, I use no spacers, just set the wheel and axle in the stand. In both cases, I level the axle first. I made one leg of my stand adjustable so I could do this. This is needed for stepped axles and to compensate for the surface the stand is placed upon .....

With the axle level, the wheel can be spun for balancing and not creep to one side or the other without spacers.
With the axle level, the wheel can be spun for balancing and not creep to one side or the other without spacers.
Rear wheel build.
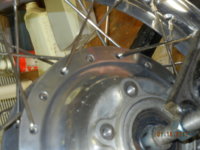
It's all apart no better time to get the hub cleaned up. I think use a bit of restraint wnen cleaning spoke marks, when you rebuild the new spokes will be in the same place as the old, don't try to completely remove those dents. You will end up making the flanges thinner than is good for them or you. Also the dents make setting up the new spoke pattern easy peasy.

Insert all the innners first. They go in the holes between the holes with dents and will lay in the opposite direction from the dents. Inners have less bend at the head. mikes has them separated in the package, if not sort your set into inners and outers. Once all the inners are in, cross them, watch your over under, all "top spokes " above all bottom spokes.

set the rim over the hub a couple 2x laid flat will set the offset fine for this part of the process. Rear wheels are easy, the angle of the holes in the rim makes getting the pattern going simple. Watch the spoke over under and crossing or you will be undoing spokes to free up a tangle in a bit.
Start threading on nipples, just a couple of turns, do NOT thread them on very far. Keeping the rim loose aids getting the last spokes in the holes without a fight. Shake the rim a bit to get room to insert the later spokes without a fight or bending.


All the inners in, ready for outers
It's all apart no better time to get the hub cleaned up. I think use a bit of restraint wnen cleaning spoke marks, when you rebuild the new spokes will be in the same place as the old, don't try to completely remove those dents. You will end up making the flanges thinner than is good for them or you. Also the dents make setting up the new spoke pattern easy peasy.
Insert all the innners first. They go in the holes between the holes with dents and will lay in the opposite direction from the dents. Inners have less bend at the head. mikes has them separated in the package, if not sort your set into inners and outers. Once all the inners are in, cross them, watch your over under, all "top spokes " above all bottom spokes.
set the rim over the hub a couple 2x laid flat will set the offset fine for this part of the process. Rear wheels are easy, the angle of the holes in the rim makes getting the pattern going simple. Watch the spoke over under and crossing or you will be undoing spokes to free up a tangle in a bit.
Start threading on nipples, just a couple of turns, do NOT thread them on very far. Keeping the rim loose aids getting the last spokes in the holes without a fight. Shake the rim a bit to get room to insert the later spokes without a fight or bending.
All the inners in, ready for outers
Last edited:
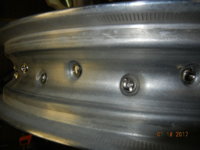
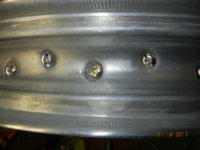
Now the outers, move the hub out near the edge of the bench, insert and start the nipple, one spoke at a time. Outer spokes come up from below, correct rim hole will be obvious. These spokes will lay on the dents you left in the hub.


Install one side's outers, flip the wheel over do the other side. Shake wheel a bit as needed to get room to insert the spokes in the right rim holes.


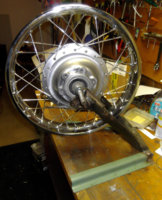
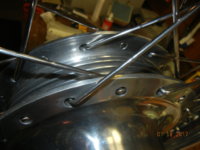
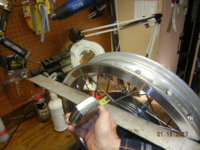
They are all in, ready for the truing stand, next slide please.
Install one side's outers, flip the wheel over do the other side. Shake wheel a bit as needed to get room to insert the spokes in the right rim holes.
They are all in, ready for the truing stand, next slide please.
Last edited:

Exploding Coffin Emporium
Day tight compartments
Thanks for all the good information, I've been meaning to get one for years, my good friend does an excellent job for a few beers, but I'd like to be able to do it at home
This is all very cool. We have some very talented people here. Makes me feel like such a hack! Haha
This is all very cool. We have some very talented people here. Makes me feel like such a hack! Haha
Everybody is learning - is all fun (plus it gives us an excuse to buy more tools!)
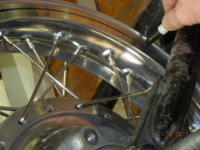
And it's ready for a tire.
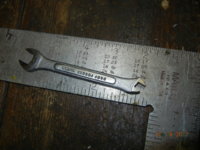
I have several spoke wrenches, but prefer the one I made to precisely fit MikesXS stainless spoke sets. The angle lets me turn all the spokes from one side of the wheel, really speeds things up.
I have several spoke wrenches, but prefer the one I made to precisely fit MikesXS stainless spoke sets. The angle lets me turn all the spokes from one side of the wheel, really speeds things up.
Attachments

Very nice! I would probably spend two days on that! Do you think that could be done one handed? Or would I have to put my beer down?
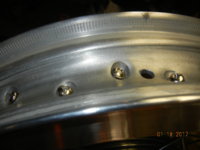
I just want to stress the importance of good fitting spoke wrenches. If you look at a spoke nipple, you'll see it's half rounded off to begin with. You want a nice fitting, thick wrench, one that will cover all the flat area available. A thin open end won't do.
Posilutely! A bad spoke wrench is an absolute menace in a tool box because these things can be tight and the flats on a spoke nipple are small.
Come to think of it - who the heck wants to see the words "flats" or "small" when they are associated with the word "nipples"...?
")
Come to think of it - who the heck wants to see the words "flats" or "small" when they are associated with the word "nipples"...?
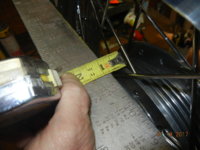
Gary, for setting/checking rim offset on the drum rear using a stock flanged alloy rim, you can just lay the straight edge across the open drum. It will just touch the outer edges of the rim. If you're using a wider aftermarket rim then of course, this won't work.
Exploding Coffin Emporium
Day tight compartments
It's a motley bunch, I got Facebook a few weeks ago and have been enjoying the xs650.com group on there a bunch as well, only forum I regular besides chopcultThis is all very cool. We have some very talented people here. Makes me feel like such a hack! Haha
Dammit Exploding - FaceBook!!! => now you've raised ANOTHER $#@%#@!!!GD internet thingy I have to learn about.
Sh!t.

Why can't we just mail letters to each other or pick up the frickin' phone the odd time?
Sh!t.
Why can't we just mail letters to each other or pick up the frickin' phone the odd time?
BTW - I just went on-line and bought one of those Rowe spoke wrenches. With all this talk of wheel truing I went to check my tool box to look at my old wrenches...and there they were - GONE!!
Congrats on finding one. They're not that easy to come by anymore. I've had my first one for many, many years, so long I even forgot where I got it. It dawned on me that it's so small it would be very easy to lose. When I saw another a few years ago hanging on the tool rack at a local dealer, I grabbed it, lol.
Thanks....I don't have it yet....so, we'll see.
As Grama used to say - "Don't count yer chickens before they hatch boy!!"
As Grama used to say - "Don't count yer chickens before they hatch boy!!"
Tomterrific
XS650 Junkie
For those of you just starting with respoking:
I don't respoke often so I make a drawing of one side of the wheel. I used colored pencil for the innie and outie spokes. Draw two circles, one small inside the large. Number 18 \ 36 positions starting at the valve hole. Draw in the spokes using the original wheel before disassembly.
The XS isn't bad but some bikes have offset rims to the hub. A jig can be made from scrap wood and plywood to fit the original wheel. The new wheel is much easier to get right as it fits the jig.
Watch those spokes poking through the nipple. I've heard of spokes puncturing the tube after a few miles but it's never happened to me.
Tom