Removing seals and bearings

59Tebo

59Tebo
Top Contributor
Messages
1,425
Reaction score
6,197
Points
513
Location
Oswego County, NY
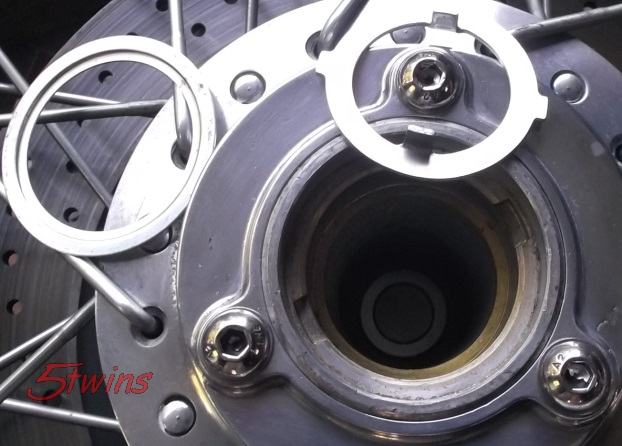
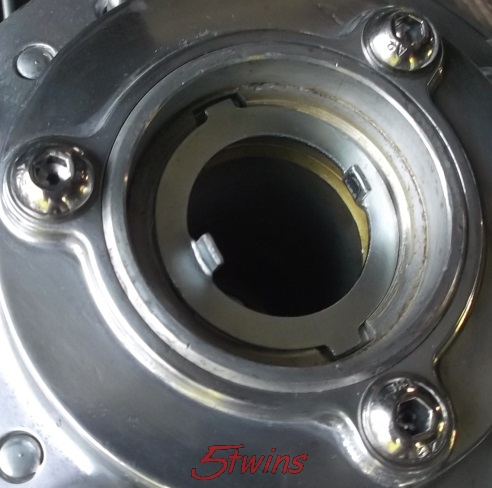
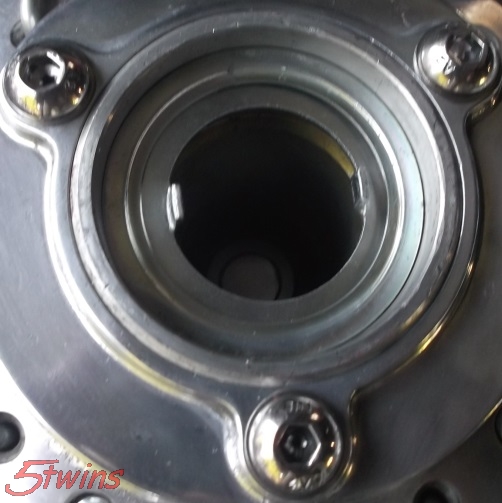
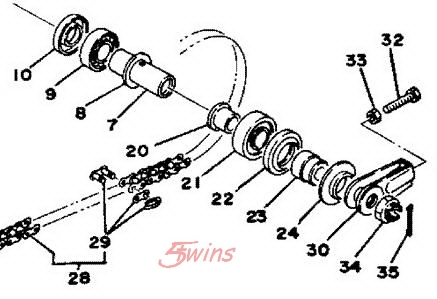
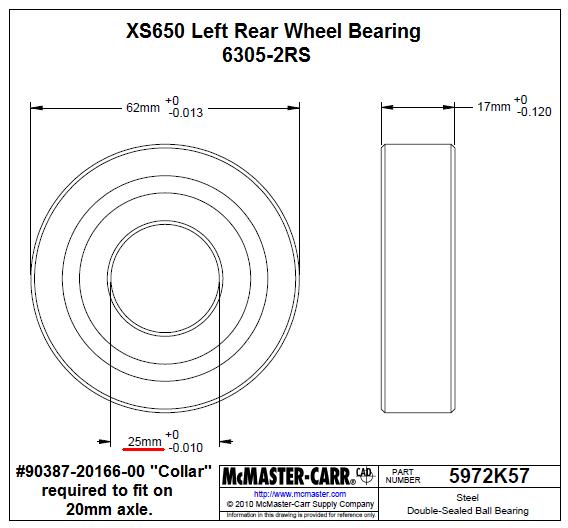
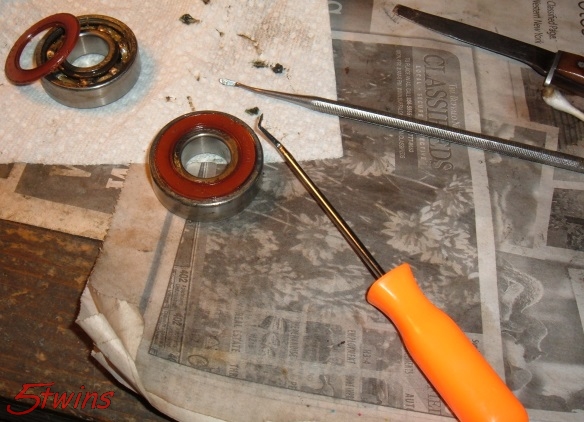
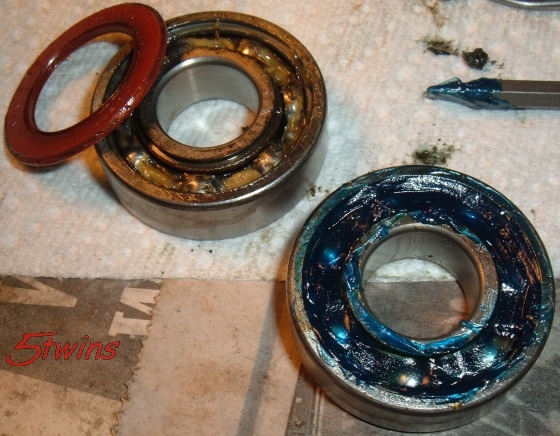
Is there some sort of trick to removing wheel bearings and seals (besides 'punching' them out like it shows in the Clymer's manual)? Yeah, I get it. You move the spacer to the side and hit the bearing with a punch (or curved tool in the hole in the spacer). But, how hard do you have to hit the thing? Do I have to go Medieval on the damn thing to get it to budge? And do the seals pop out when the bearing comes out? Or do the seals need to be removed first? I don't want to damage hard-to-find hubs by using the BMFH removal tool. Or do I just pound away? Someone please help me before I break something! :yikes: :banghead: :cussing: :umm: :wtf:
 
I recently did a set of mag wheels. I removed the seals first, but yeah, I had to get a little mid evil on them. I used a 3/8 socket extension to hammer mine out. Just work your way around the bearing alternating sides after each blow. After I was done I had to clean up the spacer with a file but no biggie.

Oh, and be sure to save any spacer parts too. Some people have accidentally thrown away crucial “top hat” piece from the rear. Not sure what year your wheels are, but just check it all out before throwing anything out.
 
Thanks willis. I didn't think it was going to be easy. I just need to use a bigger hammer. :laugh: 
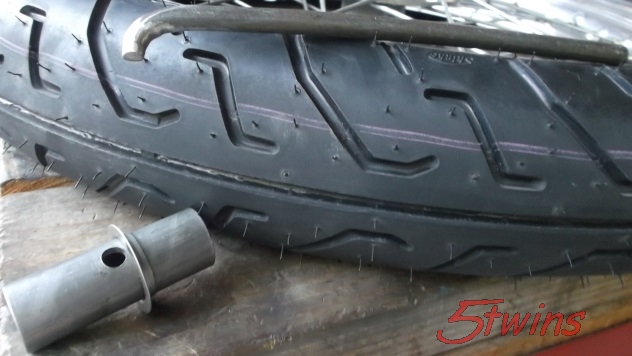
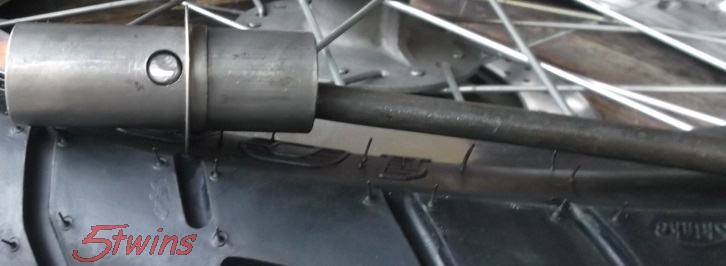
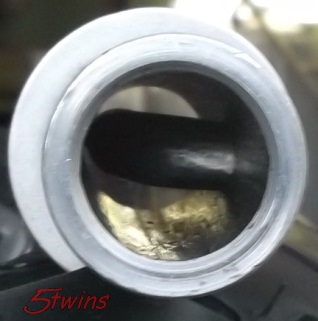
The wheels are off a '75 (see my thread "The Basketcase" - A Slow Motion Build), and they are really corroded. I had to cut the old (original?) tires off to unlace the rims. It appears, once upon a time during its tortured life (before I bought it), it held up the outside wall of a shed, sitting on flats, allowing water to get in. The rims were almost as corroded on the inside as they were on the outside. But, they're not bent or cracked, and I'm pretty sure I can salvage and restore them.
 
It would probably help to remove the seals and clean up any corrosion in the race area where the bearings need to slide past. Just hit it with some fine sand paper and wd-40 to try and get a smooth surface for the bearing to slide on. Obviously it’s easier to press them out with a smooth surface rather than a corroded one.
 
If the hub is unlaced, you could heat it in the oven.
Hmmmm.... the wife would never go for that!:cussing: How about the heat gun? Would that get it hot enough, fast enough? Next time I work on "The Basketcase", I'll be sure to take some before & after pictures of the hubs. After degreasing, they're gonna get soda blasted (and the rims. And everything else aluminum).
 
So I take it you are replacing all the bearings? You said the wheels were pretty crusty so I'm assuming so. If that's the case then you needn't worry about damaging any of the bearings during removal. That's good because there's just no way around possibly damaging one on each wheel, the first one you extract, because you will be pounding it out by hitting on it's inner race. You can let the bearings push the seals out for you if you like. The only one I don't do that with is the left front, the speedo drive side. I like to take that seal and speedo drive parts out first. The drive parts are just thin sheet metal or tin, so I don't want to risk damaging them by driving a bearing out against them. The seal on that side is what holds them in place so pop that out and they lift right out. You might want to measure that seal's inset before removing so it can be re-installed at the proper depth. It's what holds the speedo drive parts in place and is tapped down into the hub tight against them.

full


full


full
 
Mention has been made of that tophat spacer tapped into the left rear wheel bearing, part #20 in the drawing below. It must be reclaimed and used in the new bearing for the assembly to work right .....

full


The lip on the spacer combines with the long spacer tube between the bearings to give the correct spacing between them. The 20mm I.D. of the spacer adapts the 25mm I.D. bearing so it fits the 20mm O.D. axle.

full


This tophat spacer makes rear wheel bearing removal quite simple. Find a socket that just fits on the spacer and drive it into the hub. That will push the tube spacer along with the opposite side's bearing and grease seal out of the hub.

For the front wheel, there's no choice but to either slide the tube spacer over or use the hooked tool on it if it has the hole in the side. Not all of them have the hole. If I encounter one that doesn't, I drill a hole in it once it's out so I could use my hook tool on it in the future if need be.

full


full


full
 
A word on your new "lubed for life" rubber sealed bearings - often they don't put very much grease in them at all. I like to inspect them before install, adding more grease if need be. The rubber seals can be popped out using a pick or small pocket knife stuck in under the outer edge .....

full


full


If they need grease, I fill one side only, basically filling the bearing about halfway overall. Filling it completely is too much, the excess will just ooze out and make a mess once the bearing is put into service .....

full
 
I’ll add that in my experiences recently that you should check both sides of the bearings. I’ve noticed they seem to only to grease one side of new bearings and it squished through to the other side. If you open one side and it appears dry, chances are they may have grease on the other side, so check before filling it up.
 
Yes, check both sides. The only time I don't is if I'm adding fresh grease to an old bearing still in the wheel. I often do this if the old bearing is still good and I plan to keep using it. When I refurbish a wheel, I only replace the bearings if they're bad or the older steel shield or open style.
 
Thanks for all your help, guys! I'm beginning to see this job is just going to require a little more brute force (..."Beat it, or I'll call the Brute Squad"...) than I've been applying so far...
5twins, what diameter round stock did you use to fab your bearing tool? I've got some stuff laying around that might work (I'd rather not have to go out and buy something to fabricate with, cuz I'm cheap. But I'm not easy. No, wait... I'm cheap and easy) :laugh:
...pictures to follow in my build thread... :wink2:
 
I used about 3/8" dia. rod, with the bent end ground/filed down to about 1/4" or 7mm to fit the hole in the tube. Since you'll be pounding on it, thicker is better. I'm not sure 1/4" rod, even though it would nicely fit the hole in the tube without much work, would hold up to the pounding.
 
Right, I got back to "the shop" today and got all the bearings out. I forgot about "the top hat" being stuck in the rear bearing. Fortunately, I haven't thrown anything away, so I still have it. But, what about the thin (tin?) "hat brim" looking things on the spacers (part # 8 in the diagram, and in 5twins photo with the hooked tool) between the bearings (front and rear)? What is their purpose, and how bad is it that I bent both of them? Can they simply be bent back/straightened (inasmuch as I can)? Darned if I forgot to take pictures today... :doh:
 
Basically, they just help keep the spacer centered side to side in the hub. It's not critical that they be in perfect shape.
 
A word to the wise or a quick note of caution.

The oil seal on the brake pad side of the spoked rear wheel of of the 78-79 model is 5mm wide (oil seal size 27-52-5 part No 93104-27026 ) whereas the oil seal on the Alu Tri spoked wheel is 7mm wide ( 27-52-07 )

If you bought your parts as a bearing and seal kit , make sure that it is specifically for the spoked wheel not the ally wheel.

I was sent the wrong kit and my rear wheel jammed up solid once assembled which caused me a little head scratching.
 
Thanks peanut. The bike I'm working on now is a '75, so there shouldn't be any confusion, but in the future, I'll be working on a '79 and an '81, both with the alloy "mag" wheels. I'll keep this information in mind, and pay special attention to the '81, because it has the "mag" wheels, but a drum rear brake. I hope you got yours squared away!
 
Back
Top