Smiles' Top End Rebuild Thread

smiles79

XS650 Addict
Messages
276
Reaction score
62
Points
28
Location
Northwest Missouri
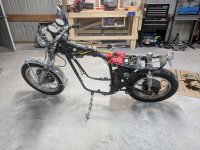
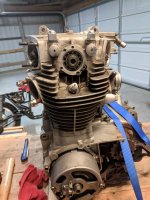
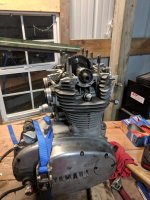
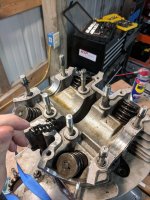
Yet another top end rebuild thread! I've been on and off with this bike for quite some time, and finally decided to pull the trigger on that cam chain guide replacement. 5twins was a huge help in helping me figure out all the parts and tools I needed. The thread can be found here: http://www.xs650.com/threads/cam-chain-guide-replacement-parts-list.52845/#post-561251

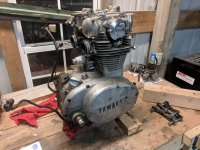
I purchased a top end seal kit and cam chain guide from Mike's, a chain breaker and valve spring compressor from eBay, and a cam chain with master link from Partzilla. I wanna say this was about $130 in parts.

Anyway, this is meant for me to document my progress, get some info along the way, and provide resources for anyone else doing the same. Here we go!
 
Unfortunately I get pretty busy, and haven't had a ton of time to spend on this at once. Day 1 involved me and two buddies removing the motor from the bike. This thing is heavy, but it was a piece of cake with all the help.
 

Attachments

  • IMG_20180928_201915.jpg
    IMG_20180928_201915.jpg
    224.7 KB · Views: 255
  • IMG_20180928_201922.jpg
    IMG_20180928_201922.jpg
    222.4 KB · Views: 239
The next stage happened in two short sessions. I removed the rocker covers, and points and advance unit covers and housings, and the rocker box.

Funny story, when I was removing the advance unit housing I thought I was being smart by using my drill to remove all the screws quickly. Ended up stripping the shit out of one of the heads of one of the screws! I ended up tack welding a Phillips bit to it and twisting it out. It worked well, but I'm going to have to take a close look at that housing to see if it needs to be replaced. Here's some questions:

I found a local machine shop that will charge will $60 a cylinder to bore, $10 a cylinder to hone. No charge to measure cylinders and pistons. This seems like a great deal, or am I off base?

He said he would have to see the parts for a quote on bead blasting. Is bead blasting used to clean up the parts? What parts do I want to have bead blasted?

What should I be looking for on the rocker arm cam followers and cam lobes to decide if they need to be replaced or not?

Last question for the night: I figure that if the cylinders are worn enough that I need to bore it, I might as well bore to 700cc. Are there other modifications that would need to be done to get this to run well? It seems to me to be a no brainer if a bore job is needed anyway.
 

Attachments

  • IMG_20181003_202739.jpg
    IMG_20181003_202739.jpg
    191.2 KB · Views: 250
  • IMG_20181003_202833.jpg
    IMG_20181003_202833.jpg
    213.3 KB · Views: 253
  • IMG_20181003_205850.jpg
    IMG_20181003_205850.jpg
    187.8 KB · Views: 253
  • IMG_20181003_205858.jpg
    IMG_20181003_205858.jpg
    203.9 KB · Views: 239
  • IMG_20181003_211312.jpg
    IMG_20181003_211312.jpg
    192.2 KB · Views: 223
  • IMG_20181003_211316.jpg
    IMG_20181003_211316.jpg
    223.6 KB · Views: 222
You shouldn't need to cut the chain.... first yr XS units yes.. later.. no... remove the cam bearings.... I mark them in order and direction for replacement... and then the chain is slack enough to work the cam off.... media clean the cylinders and heads once the valves are removed... insure the valve guides are plug'd. Rockers on these things are usually bullet proof.. get the surface for galling.. pitting. As for 700cc....owners desecration …. cost Vs return... 700cc Vs 2nd over bore kit... more photos... !
 
Bead blasting should be used for cleaning external surfaces only. Don't bead blast any of the internal engine areas. The glass beads can and do embed themselves into the alloy. Washing afterwards won't get them all out. What will release them is heat, like when you run the engine. They will be released inside your motor into the oil where they can wreak havoc on moving parts and bearings. The parts I do are the cylinders and head, but I block off all openings to the inside first .....

sJtAs3O.jpg


DE8H9fa.jpg


uW4dhaf.jpg


Boring and honing charges sound about right. I've heard it can be touchy boring to 700cc because the liner walls get pretty thin and can warp. Personally, I'd go just the amount needed. 2nd oversize is very common. Oversizes go up in 1/4 MM increments. Many times the 1st oversize isn't enough to clean the bores up so you skip right to the 2nd oversize. The machinist will tell you what it needs.

I like to replace the cam chain on a 1st time rebuild as well. They can and will go many tens of thousands of miles if properly cared for but there's the rub - most weren't. They weren't checked and/or adjusted frequently enough.
 
5twins to the rescue again! Thanks for your input.

Who knows if the PO maintained the cam chain, might as well replace it!

Edit: Your comment on boring to 700cc seems like what I've seen elsewhere as well. I'll probably just bore as much as is needed.
 
If you're lucky you may just need a hone and new rings. You can usually get away with that the first time if the cylinder wear isn't too bad. But the next time you go in there, you will most likely need to bore it. I just re-ringed mine when I rebuilt the topend. It was close to the wear limit so I know the next time I will need to bore it. But, it's given me many years (10+) of good service with just fresh rings. Compression is still very good (near 150).
 
I've run two XS650 motors with 77.5 mm. pistons with no issues. A number of others here have also built 700 cc. motors with no problems reported. If anyone has seen warped cylinders after a 77.5 mm. bore, please post--but let's talk cases and experience, not speculation.
 
My engine guy commented he would start charging more for the 700 cc bores compared to 2nd oversize because he had to drop down to rather thin cuts, the liner was flexing where it it extended past the aluminum casting at his normal boring feed rates. All I know. But it sounded logical, believable to me. The local racing small aircraft engine builders use him so I think he can be trusted. I don't think this matters in engine operation, the heavy loads are up higher where the walls are supported by the casting. Might be worth mentioning to the shop when having a 700cc bore done.
Maybe this winter I'll finally build up one of the 700's. :confused:
 
Yes indeedy, Gary! It's best to get any bore job done by a pro who does enough on a regular basis to know the ins and outs of the work and keeps his equipment in peak condition, rather than getting it done on the cheap at a bike shop where the guy might do three or four jobs a year on a clapped out boring bar with old cutters. Cylinders on my current motor went to Bill Moeller at Bore Tech, in Ohio, for boring and silicon carbide treatment--not cheap, but worth every penny..
 
Got some more work done today! Man, I'm better than I thought at taking pictures of everything.

Got the head and jugs off today. The right side cam bearings came off no problem, but the left side was a little more difficult. I'm replacing the cam chain anyway, so I broke and then removed the cam. Luckily I have a set of gear pullers and those got the bearings off no problem.

Keeping the cam chain from dropping down into the crankcase while removing the head and jugs was a little difficult by myself, but I got it done without too much problem. I have a wedding to get to so i didn't have time to look to close at anything, but there doesn't seem to be any damage on the pistons or cylinders. There's definitely plastic missing from the chain guide, so I guess this was all worth it! Some questions:

Should I replace the camchain tensioner?

What compound do you all use for lapping the valves? Any good how-to's?

Recommendations on sealer for use with the gaskets (why does this need to be done anyway?)?

I've seen some people use copper spray on gaskets, thoughts?

Thankd all!
 

Attachments

  • IMG_20181006_141740.jpg
    IMG_20181006_141740.jpg
    220.7 KB · Views: 249
  • IMG_20181006_142006.jpg
    IMG_20181006_142006.jpg
    237.3 KB · Views: 263
  • IMG_20181006_142643.jpg
    IMG_20181006_142643.jpg
    242.6 KB · Views: 274
  • IMG_20181006_143241.jpg
    IMG_20181006_143241.jpg
    142.1 KB · Views: 266
  • IMG_20181006_144131.jpg
    IMG_20181006_144131.jpg
    221.6 KB · Views: 272
  • IMG_20181006_144135.jpg
    IMG_20181006_144135.jpg
    190.6 KB · Views: 267
Last edited:
Yeah.... base gasket looks like an Athena.
Smiles, at the risk of looking like a pompous ass...:rolleyes:.... I'd suggest you have a read here.

Pompous arse.pompous arse......:D

Not at all JD......taking the effort to document wasn't just for your own purpose, (unless you were just showing off your photography skills), and tis never a shame to re-post or point to the "look at my photography" posts........I do it all the time:whistle:
 
I've never replaced a rear tensioner. They don't fall apart like the front guide. Granted, they'll show some chain rub wear, but I haven't encountered one yet that I felt was too badly worn to keep using. And if I did, I probably would replace it with another used one in acceptable shape.
 
Way to go, 5twins!!! :rock: 
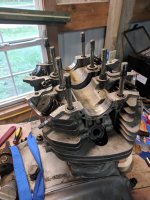
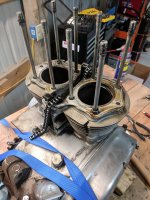
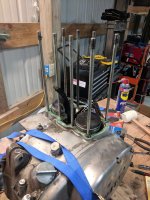
Those plywood plugs are exactly what I need for "The Basketcase"! How did you make the templates? Beer (shirt) cardboard? :cheers:
 
Smiles, at the risk of looking like a pompous ass...:rolleyes:.... I'd suggest you have a read here.

As Jim's first appointed 'Crash Test Dummy' after he completed this 'Top End Buildup' thread I can unequivocally attest to the fact that this is 'The' go to resource for doing this job. Gave me a lot of peace and confidence when approaching this seemingly overwhelming job as a first timer.

Once again Jim, you are a great teacher and communicator.

Thank you again!
 
Back
Top