Smiles' Top End Rebuild Thread

The valve guide seals just snap on and off of the guides. There's a rubber rib inside the seal that snaps into a groove in the guide. You can pop the old ones off now if you like. Sometimes you'll need to do a little prying against them with a big screwdriver. Before starting your clean-up operation, protect the insides of the guides with strips of rags soaked in oil and threaded through them.

gsvv0u9.jpg


And here's a thread on valve lapping .....

http://www.xs650.com/threads/valve-lapping-did-i-do-it-right-video.10173/
 
You can also use the paint stripper to remove the old stuck on gaskets. The ones on the points and advance housings are usually badly stuck on because Yamaha used sealer on them. Coat the old gasket with the stripper and let it soak for 10 to 15 minutes .....

bg9HnhE.jpg


Then gently scrape off the softened portion of the gasket .....

jBiKrkm.jpg


A 2nd application and soak, and most of the remaining gasket should come off .....

4b8NEDH.jpg


A little more stripper dabbed on the remaining bits will remove them.
 
Thanks 5twins! I even happen to have some paint stripper. Is there anything to be careful of when using chemicals on these parts? Can I just soak them in paint stripper for a while to loosen the carbon or is it better to put some on a paper towel or something and go that route?

Jim, we're you asking about ball gauges and micrometers because there may be a need to check the head for flatness? I think I'm going to try to do the cleaning, lapping, and valve stem seal replacement on my own. The machine shop charges $50 for a valve job so if I can save that and get more experience with the fun stuff then I will.
 
The mic and ball gauges would be to check your valve stems and guides for wear.The book way of doing it calls for a runout indicator.... which I suspect you don't have either. You're looking for .004-.005" clearance. You could check by feel and eyeball I suppose, but keep in mind... the thickness of your average sheet of paper is about .003-.004"..... That's what you're trying to judge.
To check flatness, just use a solid flat straight edge and see if a .001-.002" feeler gauge will slip under it...

13.jpg
 
Last edited:
Thanks Jim.

Can someone recommend valve lapping compound? I've gathered that I want 120 and 280 grot. Is this correct? There seem to be a lot of choices.
 
Just "paint" the paint stripper on and let it soak. Give the area you're cleaning a good, heavy coat. Here's a piston top, 1st application .....

jShY1bR.jpg


..... and here it is with that 1st application and the carbon it has softened scraped off. It's now ready for a second application .....

XQ0xuv9.jpg


After the carbon has been removed, I usually finish up with some chrome polish. That will remove all the carbon discoloration. I'll do a little Dremel wire wheeling as well to get any little carbon remnants off .....

HXzhrUE.jpg
 
Mama Yama's method for checking guide to valve stem clearance is as follows. Lift valve 10 mm. from seat (I use a spacer for this) and rock the valve back and forth, measuring movement at the valve edge (I prefer a dial test indicator that senses with a horizontal lever for this). When measurements repeat (they're meaningless they don't), measure again at 90* from first measurements. Can't recall recommended clearances off the top of my head, but if you'll scroll through the Tech menus to Miscellaneous you'll find a site that will give you a free download of the 1978 factory service manual and all later supplements, with engine data that applies to all 447 motors from 1974 forward. Specs for guides are good for all years.
 
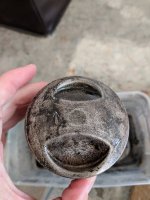
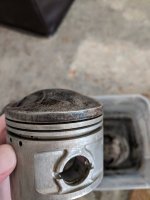
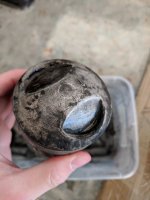
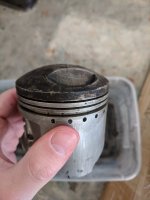
How clean should my pistons be? I've been using lots of paint stripper but there's still some stubborn spots.
 

Attachments

  • IMG_20181013_164930.jpg
    IMG_20181013_164930.jpg
    173.6 KB · Views: 152
  • IMG_20181013_164933.jpg
    IMG_20181013_164933.jpg
    120.8 KB · Views: 200
  • IMG_20181013_164940.jpg
    IMG_20181013_164940.jpg
    109.8 KB · Views: 171
  • IMG_20181013_164943.jpg
    IMG_20181013_164943.jpg
    105.3 KB · Views: 196
Looks like you ain't touched the ring grooves yet. Gotta clean them out.
 
Tips? A busted ring with the end ground flat works. Careful with that though.... you can easily chew into the metal. A red scotchbrite pad and your solvent of choice works. Slow.... but it works. I'd hit the tops a little more if it was me. You can bead blast the chambers. Be sure and block the valve guide openings and don't blast the inside where the oil resides. If I bead blast, I'll pour boiling water (yes boiling) all over it. Scrub everything with soap and a scotchbrite... and then numerous rinses with the boiling water again. The boiling water opens the pores of the metal so the bead residue washes out.
 
You're almost there but not quite yet. You can help the stripper along after it's soaked for a while by scrubbing with an old tooth brush. That especially works well on the sides and in the ring grooves. After wiping it off you can also gently scrape with a small pocket knife. Do it right after the stripper soak while the carbon is still somewhat soft. You usually do need to finish up with a pick of some sort to get into the square corners at the bottoms of the ring grooves. Also in those fine grooves above the top ring. A wire wheel in a Dremel will clean some of these last remnants away too. And finally, as I mentioned earlier, a scrub with chrome cleaner and the old tooth brush. And the final step, a good washing with hot, soapy water to clear away any remnants of the paint stripper and chrome polish.
 
Hey all,

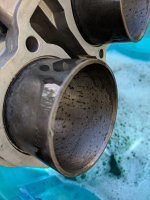
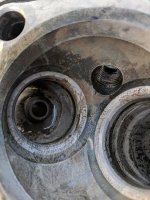
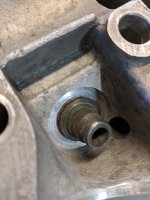
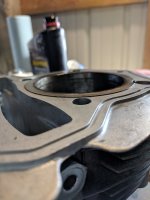
Parts are back from the machine shop. I power washed thet at the car wash and then scrubbed them with some real hot soap and water. I've got a few more questions:

What is this discoloration that I'm seeing in the cylinders and the combustion chamber? It didn't seem to scrub off or have any thickness to it.

What's the red stuff coming out from underneath the valve guide? Is this indicating something needs to be replaced?

Lastly, it looks like one of the sleeves is no longer flush with the head mating surface. I imagine this is a problem. How does this happen and how do I fox it?

Time to order some rings and a valve spring shim because I lost one. Is it ok to reuse the other three?

Thanks!
 

Attachments

  • IMG_20181028_163312.jpg
    IMG_20181028_163312.jpg
    168.5 KB · Views: 182
  • IMG_20181028_165150.jpg
    IMG_20181028_165150.jpg
    200.8 KB · Views: 185
  • IMG_20181028_170403.jpg
    IMG_20181028_170403.jpg
    163.4 KB · Views: 185
  • IMG_20181028_170433.jpg
    IMG_20181028_170433.jpg
    124.3 KB · Views: 192
Was the motor in service before you took it apart? If so you can be very sure that the liner wasn't sitting proud of the cylinder before that machine shop got their monkey paws on it! The liner has a flange on it that holds it level with the cylinder. If the motor were mine I'd take the jugs back to the shop and point out the defect. But if you want to try a DYI fix, block up the cylinders so that the bottom of the liner hangs free, put in an oven, and heat to 375*F. The liner has a flange that stops it level with the cylinder's gasket surface, and it should drop into place. If not, give it a few taps with a block of wood and a hammer while still hot. Then make sure the cylinder and liner are flat. Tape 320 grit paper down on a piece of thick plate glass and move the cylinder on it with light to medium pressure in a figure-8 pattern until sanding scratches are even over the whole surface.

Edit: Written while Jim was posting, this doesn't add a thing! His tried-and-true heat spec is 300*F--good enough for me!
 
Last edited:
Hey 650Skull, thanks for the thought. I went back to the car wash and made sure to rinse it all real well and washing again. Still had the spots. Some of it cleaned up with some carb cleaner, some didn't. Anyone else have any ideas? Will it be alright if that don't all clean up?

Jim and grizld, thanks for the how-to's, I might give them a try. Is this kinda heat too much for using a block of wood to support the cylinders? Don't want to start a fire!

Jim, you mentioned that you've used a 20T press, does that work pretty well? I've got one of those, what's the best way to go about pushing the sleeve back in with a press?
 
Go back and re-read my article. Make a wooden box like I showed there. You could use that in a press or for the heat method. Wood is safe at 350-400deg. 250-300deg would most likely be enough to tap it back in with a block of wood and a hammer.
 
Back
Top