-
Enjoy XS650.com? Consider making a donation to help support the site.
XS650.com receives a small share of sales from some links on this page, but direct donations have a much greater impact on keeping this site going.
You are using an out of date browser. It may not display this or other websites correctly.
You should upgrade or use an alternative browser.
You should upgrade or use an alternative browser.
Sorry Yamaha but that was dumb!
- Thread starter prmurat
- Start date


Yeah I never really got that either.
hotdog, I think they used that rotor on the XS2, TX650, TX650A, XS650B and XS650C, so 1972-1976
EDIT: I stand corrected. It was only the XS2 had that exact rotor
hotdog, I think they used that rotor on the XS2, TX650, TX650A, XS650B and XS650C, so 1972-1976
EDIT: I stand corrected. It was only the XS2 had that exact rotor
Last edited:
It may have been dumb but at least they realized it quickly. That's the 72 only "free floater". Somewhere in early 73 production (I think) they bolted the rotor to the hub and lost all that complicated crap!
But to your specific problem, there is an answer. You are missing part # 36 in the diagram, they are rubber dampers. the parts list does NOT list #36 so it's unobtainable. I think I have some and can try to give you an idea of the size and type of rubber used. I threw away a couple when I was going through a "box O parts" bike purchase (you know the type, mostly motorcycle parts in the boxes but enough "ringers" to keep you guessing) and didn't recognize that they were XS650 related!

Note the revised assembly in the upper RH corner with the rotor bolted to the hub.
But to your specific problem, there is an answer. You are missing part # 36 in the diagram, they are rubber dampers. the parts list does NOT list #36 so it's unobtainable. I think I have some and can try to give you an idea of the size and type of rubber used. I threw away a couple when I was going through a "box O parts" bike purchase (you know the type, mostly motorcycle parts in the boxes but enough "ringers" to keep you guessing) and didn't recognize that they were XS650 related!
Note the revised assembly in the upper RH corner with the rotor bolted to the hub.
Saggs
XS650 Enthusiast
My 73 and a 76 rotor I have do not have the funky recess cast in it. Good luck with it
So there were rubber pads in there, They look like this now. About two or three times as thick as an innertube of fairly hard rubber. I am guessing when new the pads came further up the sides of the recess. I don't have the manual passage that deals with adjusting this engineering marvel but tightening the axle nut draws the wheel and rotor together smooshing the pad in place. You for sure don't want it TOO thick.

Punkskalar
Hugh's HandBuilt
Yep. I have a 71/72 that we are building into a Cafe' - and it had that terrible stupid godforsaken system. We swapped it all out for 35mm front end and a different hub...
vr3506
vr3506
Maybe if you make a spring load to get rid of the free play in the breaking direction?
I never saw this part, but I will try to use this idea on our XS2
We already tried to add some aluminium by welding, but this helped only for a short period.
Thanks anyway to gggGary for the information. Is it possible for you to send me a parts list in a higher resolution? Or put it in high res on this side?
Do you perhaps have the part number?
Jan
That part #36 isn't listed on the parts fiche at boats.net so there isn't a part number.
I would just slip a 73 up front wheel in there and enjoy it. If I wanted to show it at some fancy show then slip the 72 wheel in for the show.
As far as resolution goes, that's about as good as you get. Those pics are copies of copies of copies of copies of the originals.
Leo
I would just slip a 73 up front wheel in there and enjoy it. If I wanted to show it at some fancy show then slip the 72 wheel in for the show.
As far as resolution goes, that's about as good as you get. Those pics are copies of copies of copies of copies of the originals.
Leo
The photo in my post above AFAIK is the actual as supplied by Yamaha part #36 as installed on a 72 rotor. I guess I could pry one out for greater detail......
If I were desperate to recreate this part I would strongly consider using some climbing shoe rubber sole some very dense very tough rubber. I used to have some but might have tossed it.
If I were desperate to recreate this part I would strongly consider using some climbing shoe rubber sole some very dense very tough rubber. I used to have some but might have tossed it.
Just looked in my 70-74 Factory book and the pics it has looks slightly better than gggGary's, but it doesn't show part #36.
Leo
Leo
Yeah I never really got that either.
hotdog, I think they used that rotor on the XS2, TX650, TX650A, XS650B and XS650C, so 1972-1976
EDIT: I stand corrected. It was only the XS2 had that exact rotor
Thanks for that info - I had no idea they even made one like it.
As someone earlier said they were used just on the 72 XS2. in very early 73 the TX650 they changed to the bolt on rotor. They used that rotor untill 76. In 77 they changed the rotor to the one piece.
Leo
Leo
jayel
#9 Guru 74 TX650A
part number was 306-25837-01-00 (needs 2) looks like thin rubber to avoid metal to metal, I'd get out the modeling clay to see how much space you need to fill with every thing snugged up, might be as easy as cutting a piece of inner tubeMaybe if you make a spring load to get rid of the free play in the breaking direction?
I never saw this part, but I will try to use this idea on our XS2
We already tried to add some aluminium by welding, but this helped only for a short period.
Thanks anyway to gggGary for the information. Is it possible for you to send me a parts list in a higher resolution? Or put it in high res on this side?
Do you perhaps have the part number?
Jan
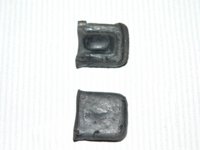
Pics of the bumper.


You can see where one side has been worn away. With these in place and the axle nut tightened there is no slop between the rotor and the wheel. You can see the indentation where the tang from the wheel pushes into the bottom of the rubber.
I suppose I should go out take apart again and measure and draw it too?
vr3506
vr3506
Thanks for the pics and the information
always interesting!
Jan
always interesting!
Jan
CalsXS2
XS650 Guru
- Messages
- 1,006
- Reaction score
- 52
- Points
- 48
I just knew mine was missing. I've only rode my bike about 5 miles. As soon as I hit around 40 mph, the front wheel shook violently. I pulled over and checked it, there was a lot of slop. in the front wheel. Then I read this thread and thought maybe it was related.
I just pulled it apart, and to my surprise my rubber's are there. But I did find a really loose axle nut.
So anyway. Mine seem to be in really good shape. It's hard to get a good measurement because of the way it is shaped,,,but Gary could probable to it because his is cut,,, but I came up with around 2mm. Maybe more if it was new. But my bike only has 13,000 mile's on it.
So that should give you guy's a rough idea on what to shoot for. Hope this helps.
I just pulled it apart, and to my surprise my rubber's are there.
But I did find a really loose axle nut. So anyway. Mine seem to be in really good shape. It's hard to get a good measurement because of the way it is shaped,,,but Gary could probable to it because his is cut,,, but I came up with around 2mm. Maybe more if it was new. But my bike only has 13,000 mile's on it.
So that should give you guy's a rough idea on what to shoot for. Hope this helps.