Knobzilla
XS650 Enthusiast
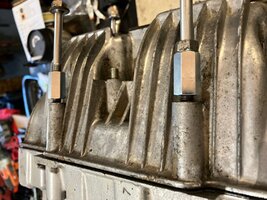
Hey guys, I'd thought I'd share the technique that worked for me in splitting the cases, in the hopes of helping someone with their project. The engine had been taken apart in the past and there was a healthy amount of Yamabond or similar holding the cases together. I didn't read anything about having the engine upside down before I did this and I'm sure I did some other cringe-worthy things in the process (including leaving the stator on while splitting, which doesn't seem to have hurt anything, fingers crossed).
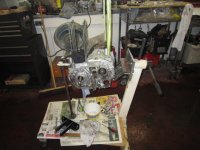
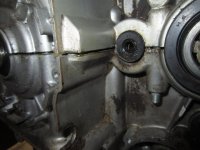
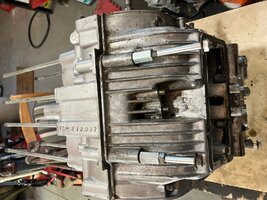
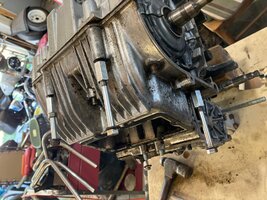
I cut a 12' piece of 2x4 in half and drilled holes to attach them to the sides of the engine, using two of the engine mount locations and a few feet of threaded rod. Then I slipped the short end under the lower beam of my engine hoist, leaving the longer lengths of wood to provide leverage on the other side. I used a 1" jack handle to lock that end down. Then I slowly pulled the engine up with the hoist until the case popped open, pretty darn evenly. The materials cost about $20 but there's a good chance I'll use them again someday.
View attachment 101821 View attachment 101822
CAN THE DRIVE CHAIN BE TAKEN OUT OF THE PROCESS WITH YOUR CHERRY PICKER METHOD TO PROTECT THE ENGINE SURFACES?Hey guys, I'd thought I'd share the technique that worked for me in splitting the cases, in the hopes of helping someone with their project. The engine had been taken apart in the past and there was a healthy amount of Yamabond or similar holding the cases together. I didn't read anything about having the engine upside down before I did this and I'm sure I did some other cringe-worthy things in the process (including leaving the stator on while splitting, which doesn't seem to have hurt anything, fingers crossed).
I cut a 12' piece of 2x4 in half and drilled holes to attach them to the sides of the engine, using two of the engine mount locations and a few feet of threaded rod. Then I slipped the short end under the lower beam of my engine hoist, leaving the longer lengths of wood to provide leverage on the other side. I used a 1" jack handle to lock that end down. Then I slowly pulled the engine up with the hoist until the case popped open, pretty darn evenly. The materials cost about $20 but there's a good chance I'll use them again someday.
View attachment 101821 View attachment 101822