Starter Gear Fix!

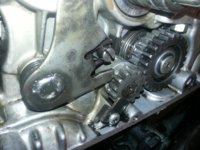
Another way to test the pounds to turn the spring on the gear is to use water. Remember the old saying "A pints a pound the world around"? That means a pint of water weighs one pound.
Use a gallon jug. Tie a string to the jug. Hook this string to the spring loop. Now fill the jug with water by the pint. At some point the spring will start to turn on the gear. It should take at least 5 pints to get the spring to slip.
The more pints the better.
Leo
 
Finally! Clear pictures and techniques explained in both theory and application. Bravo!
I've read 5-6 threads on this fix. Have the original reference from 650 rider bookmarked but some things weren't exactly clear. Tried this fix this summer to no avail because I didn't squeeze the damn spring enough. Now I know how to test it without reassembly. Spent all summer kicking my bike with a sore ankle. It will be such a pleasure to start next year with a bump of the button on cold mornings and after a long day walking miles at work. With a new ignition, 750 kit and new mikunis planned...all that raw new power at the push of a button has me very excited. Thank you gentlemen!
 
Around 1975, the drag clip was updated and the new one was make from heavier wire. It wouldn't fit in the original groove any more so it was positioned just to the right of it.

StarterClipPositions.jpg

Hi 5twins,

I have a 75, how do I tell if I have the beefier clip or the old style clip? Im assuming if the current clip is in the top notch is the older style clip? If I buy a replacement from Mikes does it go in the lower postion as shown in your image? And the only special tool I need is clutch basket holder right? Anybody know the torque rating form the clutch bolt and the clucth spring screws? For the spring screws is hand tight enough?

Looking to do this project, this weekend.
 
Once you observe where the small end of the drag clip will fit, that will tell you whether that clip is the new or old style. I've never dealt with an old style clip and gear but be aware that it's very possible the new heavier wire clip won't fit on the old style gear. The clip groove may not be big enough to accept it. I'm not saying it's so, just don't be surprised if it turns out that way. The upgraded parts were issued as a kit containing both a new gear and clip.

The only other tool I'd recommend is one of those hand impact drivers you hit with a hammer. The clutch spring screws are Phillips heads and easy to bugger up by hand. They are also the large #3 size tip. That's why many are so buggered up, guys try to use the normal smaller sized #2 Phillips screwdriver on them. It doesn't fit right (too loose) which makes buggering up the heads even more likely. Here's the torque values from the factory shop manual .....

VUuzgwc.jpg


If you fit a #3 Phillips tip into the right sized socket and then fit that on your torque wrench, you can properly torque the spring screws.
 
Last edited:
Once you observe where the small end of the drag clip will fit, that will tell you whether that clip is the new or old style. I've never dealt with an old style clip and gear but be aware that it's very possible the new heavier wire clip won't fit on the old style gear. The clip groove may not be big enough to accept it. I'm not saying it's so, just don't be surprised if it turns out that way. The upgraded parts were issued as a kit containing both a new gear and clip.

The only other tool I'd recommend is one of those hand impact drivers you hit with a hammer. The clutch spring screws are Phillips heads and easy to bugger up by hand. They are also the large #3 size tip. That's why many are so buggered up, guys try to use the normal smaller sized #2 Phillips screwdriver on them. It doesn't fit right (too loose) which makes buggering up the heads even more likely. Here's the torque values from the factory shop manual .....


If you fit a #3 Phillips tip into the right sized socket and then fit that on your torque wrench, you can properly torque the spring screws.

You the man, perfect. I have a hand screw impact driver, thanks for the heads up. I ordered the mikes xs kit just in case which comes with a new gear. Im ashamed to admit but I have the factory service manual, but where did you find all the torque specs? I have a factory manual that has all models combined... A-D that I bought off ebay, with the tech bulletins in the back.
 
In the back of the manual, at the beginning of the "Appendices" section, you should find the torque chart. The excerpt I posted came from the '78E manual on-line here, but the values apply to your model as well .....

http://www.biker.net/650_service/650service main.html

Bookmark the biker.net site. It's got all sorts of good parts and service manuals on it. It's a good idea to look through and compare things from the various year manuals. Some of the torque values changed over the years and if you compare them, you can choose what you think is best. One in particular that wandered all over was the countershaft sprocket nut value. You'll find it as low as 36 ft/lbs some years to as high as around 90. Accepted practice is to use the higher value as the seal is less likely to leak that way.
 
okay sooo i replaced the gear and got everything back together tried my electric starter and nada.

It definitely sounds like its engaging much more but doesnt kick over. My battery is pretty weak right now. I noticed that with the light off in neutral, the green light goes almost completely out when I try the starter, then if I click the button again it barely works. Im guessing at this point its my batter? I too have a fish scale and got the tension to ~6lb. Which is crazy since it was a mikesxs it was mailed to me at just 2lb. Try to make sense of this to prevent removing everything again.

The first pic is my "Before", the next two are my "After"
 

Attachments

  • 20141025_113053.jpg
    20141025_113053.jpg
    199.2 KB · Views: 916
  • 20141028_205443.jpg
    20141028_205443.jpg
    224.2 KB · Views: 1,007
  • 20141028_205452.jpg
    20141028_205452.jpg
    175.7 KB · Views: 900
Yes, it's probably the low battery causing the problem. The starter motor uses lots of juice, so much so in fact that if the battery is too low, it may use all the power available which leaves none to power your ignition. The bike may crank over but not fire up.
 
got the battery on a trickle charger now....i seem too lose alot of distilled water. Think it got fried before I took ownership of the bike. May just buy a new sealed battery.

Lets hope thats all the issue is as I created a kickstarter problem for myself when i put my case back on :banghead:

Anyways my first pic shows the original small clip in the housing incase anyone was interested. The mikesxs was substantially thicker than my original, just not tensioned down enough.
 
Hi all, I have just applied the starter gear fix.

It's definitely better but I'm not 100% that it's working as it should as the gears don't return fully up the bendix and you can hear that the gears aren't meshing well at around the 15s mark. I've uploaded a video of the result here. Be good to get feedback.


Need to be careful too as I might be expecting too much out of a retrospective electric start on a bike with technology that's 30+ years old!
 
Question:

Does this repair procedure solve the problem of the starter "over running" or "spinnng" after engaging and starting the motor?

Or... is this to repair the symptom of a non functioning starter only?

79 Special of mine, the starter works but continues to spin and make an unpleasant noise after it's done it's intended job.
This fix is to repair the symptom of the #4 starting gear not engaging properly prior to the bike starting and is not a fix for over running/spinning after the engine has started.
 
Do you still have the starter safety relay in place and hooked up? That's supposed to cut power to the starter which allows it to disengage as soon as the motor fires.
 
Good question, thanks.

New to this bike in the past two months so was not aware of this. The previous owner did a very complete job on refreshing nearly all aspects so I would think that the relay is in line.

That being said, it's worth a check for sure.

I can find the location of the relay in my Clymer manual I suppose?
Where abouts is the relay or where should it be on the bike.
 
The relay is located under the right side cover, attached to the side of the battery box just under the starter solenoid .....

mGg3RE9.jpg


It is actually two relays, the other being for the headlight. Yours may look slightly different, having two separate little square tin covers (one over each relay) instead of the one long rectangular cover housing both.

I guess a quick and dirty way to test it would be to hit the starter button (for just an instant) while the bike is idling. If the relay is working, the starter shouldn't engage. Nothing should happen. If it tries to engage then the relay isn't doing its job.
 
Last edited:
Back
Top