Great thread ! Thx for that as I've found a similar ufo about 2 yrs ago. Scooter huh, ya if a guy could replace the front wheel with a ski & chain up the rear well, riding season would be back on ! RT
 
Yes, the sump plate and corresponding gasket surface on the motor need to be totally clean, eat-off-it clean. You don't want any little bits of old gasket left on there. I use multiple applications of paint stripper to get every last bit of the old gasket off. It can take a while, especially if the motor is still hot. The stripper dries quickly in that case, before really getting a chance to do it's thing.

Since you're planning some engine work sometime in the future, you have the chance to shop for good deals on some of the parts you'll need. Some things of course you won't know if you need until the motor is apart but other stuff like gaskets, cam chain, front guide may pop up for a good price.
 
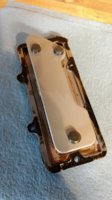
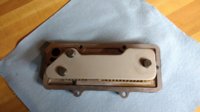
At Sunday's oil change I put in a fresh sump gasket to address Stella's tendency to mark her territory. Now I have quite the leak.

I'm going to start the usual checks for this situation. Remnants of old gasket? Sump plate flat? Raised surface around threaded holes?

Before I do so, I'm going to double-check the torque on the six sump plate bolts with an inch-pound wrench due in today's mail. I had used my foot-pound wrench, but 7ft-lbs is hardly within said wrench's most accurate range.

On another note: I've been neglecting the ol' 150cc scooter since upgrading to the 650. I can't sell if she doesn't run, and after sitting since August she wouldn't start. From start to finish, including dis- and assembly, I overhauled that little carb in 30 minutes. Her pilot jet was plugged, but now she runs as good as ever.
Wow DB - you're becoming quite the expert bike servicer! Good for you - I have found that being methodical and orderly plus having decent tools are the keys - but after that, just get into it!

Pete
 
Alright, the sump plate has been cleaned up quite a bit including filing flat one hole on the case. There was one drop after sitting overnight, but nothing at the end of a 4hr shift this morning. I wiped down the bottom as I put her too bed, we'll see if there's any more drops on the floor tomorrow.

IMG_20170111_173154156.jpg IMG_20170111_183518807.jpg

Today I finally had the time to pull the carbs and check float height to ascertain whether it may be causing my stalling issue. One set was slightly twisted, set at 27&28mm. The other was straight, but also set too high at 27mm. All four floats are now sitting right at 25mm.

While I was in there I checked the pilot circuit with carb cleaner and air. No problem there, it seems.

I'd say she seems happier now to sit at 1200 idle in neutral, but stepping into first she stalled. The clutch is definitely dragging a bit. In 1st, clutch pulled, I feel a bit of forward motion when I hit the starter. It took raising my idle closer to 1500 to overcome the drag.

Time to install the new MotionPro clutch cable my in-laws gave me for Christmas. For now, I'll see about tightening the existing cable a bit.

Unrelated, this morning I noticed a good amount of white smoke out of the right exhaust.
 
That sump filter plate looks much better now Daniel. I think you'll like that Motion Pro cable, it worked pretty nice on my bike. So what's up with the smoke?
 
....or could it have been simply some moisture in the exhaust system which turned to water vapour when the exhaust pipe and muffler heated up?

Pete
 
Yes, your "before" sump plate was no where near clean enough. I'll bet it did make for quite the leaker, lol. It's not uncommon for a fresh gasket to seep a bit at first. Several heat cycles should seal it up. You may want to check the bolts in a week or so too. They may be a little loose by then due to gasket compression. If you oiled your new gasket prior to install, you should have no stuck gasket problems in the future. It should come off easily and complete. Usually, you can get 4 or 5 re-uses out of one before it loses it's sealing ability and needs to be replaced. I do re-oil it each time to insure it won't stick. Sometimes that drop or two of oil you find the next day is just from that.

I think you will find that your in/lb torque wrench becomes one of the most used torque wrenches you own. Besides the sump plate, all the Allens holding on the big right and left engine covers will need it. The right side obviously because it holds oil. You want all those fasteners equal in tightness. But do use it for the left cover too, if only to avoid over-tightening and stripping any of the screws. The torque spec for an M6 fastener is usually given as 5 to 8 ft/lbs. I don't recommend using the max but rather something about in the middle of the range. These are 30+ year old bikes and most of the fasteners you're dealing with are steel into alloy. I've used 80 in/lbs successfully for many years and am even considering trying a little less, maybe 76 or 72.
 
Yeah, the 'Before' is rather embarrassing. All was dry under the bike this morning. I did use oil as you suggest, thank you.

I took the 150cc to work today, but tomorrow should provide some time to test ride the improved float level and clutch adjustment.

Mouse or water vapor. Yeah, I'll keep my eye on it.
 
The properly set floats should help with your stalling problem. Sometimes it takes a few miles for carb changes, especially float level changes, to settle in and have their full effect. Since float levels are measured with the carbs upside down, a higher number translates into a lower fuel level when the carbs are right side up. Your floats were set lean which means you could have been experiencing some fuel starvation. This could especially be true as you come to a stop and the fuel in the bowl sloshes forward. You might get a momentary loss of fuel feed to the jets. That fuel feed port is on the rear of the jet tower.
 
Back around Thanksgiving I had announced the completion of this refurb's Phase I with the delivery of a custom seat built by a local guy. Using my stock pan and trim, he built new foam and cover to my specs. Almost.

Those studs are covering holes from his 1st attempt at attaching the trim. You can sort of see in the bottom photo that the final trim placement was crooked looking at it from the back.

The back seam was off center and the front where it meets the tank was crooked.

And last, the sides weren't supported enough.
IMG_20161120_140409388_HDR~2.jpg
IMG_20161120_135926773.jpg


I rode away with it that day with the understanding that he'd rebuild the cover when I returned back from my Dec trip. But, he wouldn't retry the trim. No, sir, no way. That bit of chrome seemed to have given him quite the hard time.

I was bummed about the trim, but confident that he'd make good on the other issues. Oh well, I would settle for a clean job sans trim.

Yesterday I received a pic via text letting me know the seat was finished and ready for pick up.
imagejpeg_1.jpg
Very good, I thought. It looked good and I was excited to go pick it up today before work.

Lo and behold, he presents me with my seat complete with properly placed trim! The process to get here was a bit of a pain, but I'm very happy with the results. Everything is straight and centered. The cover has a nice over-stuffed look. And damn, I'm thrilled he came through on the trim. The daimond hatch pattern in the trim is what sold me on the daimond cover.
IMG_20170115_105404255.jpg
 
Ok, moving house is complete and I had an afternoon to spend with Stella.

She had a stalling problem, partially fixed by resetting the float level, that I was attributing to a dragging clutch. Cable adjustment helped, but didn't cure.

Today I installed the new Motion Pro clutch cable I had received for Christmas. It's been hanging in the shed getting the occasional drip of oil while I wait for the opportunity.

Problem solved. The motor used to drop 100-200 RPM when I stepped into gear. Now there is no RPM change at all and neutral is extremely easy to find.

Fixing the float level allowed a steadier 11-1200 idle in neutral. Fixing the dragging clutch allowed me to keep that idle in gear.

All along, while I've known I was getting into the L side cover soon for cable replacement, I have had a consistent oil leak. I had fixed the leaking sump plate, but there was more.
IMG_20170201_150932651.jpg

Hey, Mailman, look familiar?

Upon further inquiry, I have the short pushrods and quite a bit of lateral play at the seal/bushing. I'll go with the general suggestion to change to a long pushrod when I change the seal.
 
OK - so still some issues, but really looking very nice indeed!

I like that seat DB!

Pete
 
Back
Top