View attachment 94491
Hey, Mailman, look familiar?
IMG_4138.JPG
Yeah I'm familiar with that! Fortunately it's not a very hard fix. It took me a few hours in an afternoon and that was replacing the bushing behind the seal too. I can't believe you can still find NOS pushrods on EBay but they are out there.
I'm happy to hear you are getting your carbs and clutch action dialed in.
I'm right behind you buddy, catching up!
 
I've got the long pushrod on its way, the Ebay link 5twins put up on Mailman's thread is still good. NOS, ~$16.

Seals I easily found on boats.net and Stadium Yamaha.

What about the bushing? I can't seem to find it on parts diagrams. Anyone have the part #?
 
I've got the long pushrod on its way, the Ebay link 5twins put up on Mailman's thread is still good. NOS, ~$16

What about the bushing? I can't seem to find it on parts diagrams. Anyone have the part #?

Dang! I got skunked! I paid $20 Haha!
Don't know the bushing number. I ordered mine through Mikes, they also have a little tutorial on how to remove the bushing.
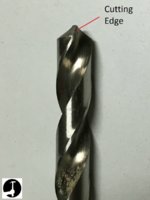
Speaking of which , the procedure goes like this, you run a drill bit through the bushing ( I forget the drill bit sizes) then you run a larger bit into the bushing which bites into the bushing and you can pull it out. What I wanted to tell you was be careful of the type of drill bits you buy for the job. I think a conventional tapered drill bit would work best. Like this,
IMG_4145.JPG
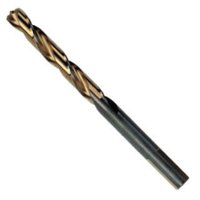
I bought a bit from Ace Hardware, Irwin brand.
A fine bit I'm sure,but it had a tip that was too aggressive in its shape that made it hard to center in the bushing , it also bit into the bushing too soon before it penetrated very far. It immediately spun the bushing before it had a good grip on it and I feared it would fall inside the case. The bit I bought looked like this.
IMG_4143.JPG
I think you would be fine with a regular bit. Btw, gggGary is not a big advocate of changing the bushing, just from some of his posts I've read.
 
Yup - I just got one of those long pushrods for Lucille in the last 10 minutes - I paid $18 USD.

Pete
 
The bushing wears such that the push rod can wiggle and slop around. That in turn wears out the oil seal, which then allows oil to leak out. I think it happens on most of these bikes. If the wiggle is there and you only replace the oil seal, the oil seal won't last very long.
I replaced both, about 9 or 10 years ago, and each year when I clean and check the oil seal area, I also try the wiggle test on the push rod. No wiggle detected on latest check. Its wise to grind the end of the push rod in a concave fashion, so that the push rod will be self centreing on the ball bearing.
 
Interesting. Thanks, Mailman. I'll look into gggGary's posts on the subject, but RG's description of the rod wiggle tells me I should replace the bushing.

RG, I imagine you're talking about grinding a concavity ever-so-slight?
 
The O.E.M. long pushrods I have are already factory dimpled on the outer end. There's nothing on the inner end but I'm not sure that matters. There probably isn't much side to side play at the inner end being that it's running through the center of the tranny shaft.

 
I dimpled the worm screw as well as the long push rod. Some caution perhaps as to how deep you dimple them, as the hardning process at the factory might only go so deep. I assume they are hardened at the factory, but I don't know.
Dimpling push rod and worm screw.JPG
 
Interesting. Thanks, Mailman. I'll look into gggGary's posts on the subject, but RG's description of the rod wiggle tells me I should replace the bushing.

RG, I imagine you're talking about grinding a concavity ever-so-slight?
Yes, your bushing is probably original, so its going to be worn out. With a new bushing, there is no detectable wiggle.
 
I still had some wiggle after replacing the bushing and with the short pushrod, just not as much. It sealed but I figured it was only a matter of time before that short rod wore the new bushing to the point that the seal would leak again. I put the long rod in and then had very little wiggle. Best chance of success at sealing this area is to replace the seal, replace the bushing, and switch to the long rod.
 
Going with 'best chance of success'.

The pushrod arrived in today's mail, bushing and seal(s) on their way. The rod is supposedly NOS, but I see no dimple as in 5twins' pic.
IMG_20170204_150739555.jpg
 
Ok, here's a big one for y'all.

I'm getting back at the luggage rack project and feel like I've arrived at my favorite mounting position.
IMG_20170204_145605414_HDR.jpg


In this position, I'm happy with the proportions, both side view and rear. The taillight is well centered in the rear frame. The rack itself doesn't feel too tall, or too short. Structurally, it looks like an easy couple of straps. One from the very rear of the frame loop to the front circle. The other from the fender mounting bolt to the rearward plate. Maybe some cross members if it seems to need it. All's happy in my eyes.

However at this height the grab loop impedes the L hand arm of the rack pushing the whole rack to the left.
IMG_20170204_150033366_HDR.jpg
IMG_20170204_150114715_HDR.jpg
IMG_20170204_150013888_HDR.jpg

I have no intention to sell her, I don't have any interest winning restoration trophies, but is cutting the grab loop a step too far? Or is it OK in the effort to make this machine mine, perfected for the daily utilitarian needs I require?

While I wait for your opinions, I'll have another go at finding a lower position that would do the job without cutting.
 
Here it is, positioned just below the grab loop. I think this will work very well.

I am leary of getting too close to the taillight, don't want to obsure it. But this should do splendidly. It will sit slightly further back to clear the shocks.
IMG_20170204_154522495_HDR.jpg
IMG_20170204_154558011_HDR.jpg
IMG_20170204_154626389_HDR.jpg
 
Looking good Daniel! I like that rack. Did you say you bought that from somewhere in England? Do you have to make your own brackets? I like it better in the low position also.
 
Thanks! Yes, it's a newly manufactured Craven out of the UK. Better price than I was finding for originals.

I can either make my own, or send them measurements. They don't have a fitting kit ready to go for the XS650. Even though the model is listed on their website. I'm not bitter or anything. But for accuracy and getting it done the first time, I plan to make them with a friend's assistance and tools.

I am very much looking forward to getting my bag off my back. It's so much more comfortable to ride without it.
 
Back
Top