steveair2's '78 XS Chopped Hard Build

I hope everyone is doing okay through the plandemic. I've been lucky enough to stay employed through the whole ordeal. I coated the inside of my fuel tank with two coats of Redkote Saturday.
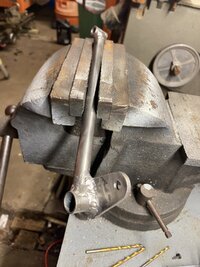
Worked on handlebars tonight. I cut nine slots, used steel rule to measure depth, and measured back side to 5/8".
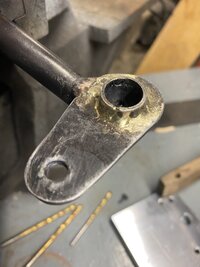
Used a can of acetone to prop the bend during welding for safteys sake. Really just for fun, or it worked good because it would deform to needed angle.

IMG_2128.jpg IMG_2130.jpg IMG_2131.jpg IMG_2132.jpg
 
Thanks much chewblanca, I love Wisconsin. Usually attend Oshkosh airshow every year. I will be a welding instructor there next year.
Been trying to give it hell this week. Constant interruptions don't help and had to put a water pump in my truck yesterday.
I ended up putting fourteen cuts in the tubing to get the bend I think I like. Then I used the reverse paper coping trick I used earlier in this thread to match the other bar. Somehow ended up making the cope one-quarter inch too long. I'll fix that tomorrow. I also roughed out a pair of front engine mounts.
This is my seven day work week. I'll be working twelve hour shifts Saturday and Sunday. I'm going to take these bars to work and weld up all the cuts I made durring my breaks.

IMG_2143.jpg IMG_2144.jpg IMG_2145.jpg IMG_2146.jpg IMG_2148.jpg IMG_2149.jpg IMG_2141.jpg IMG_2142.jpg
 
Oshkosh air show is always a fun time. Haven't been in years. I'm also in the process of making some new handle bars. I have some boring old T-Bars on it now. Inbetween riserless mini apes or riserless z-bars.

How do you like that internal throttle?
 
Thanks again for the input chewblanca, now I don't feel like I'm talking to myself. The internal throttle seems like it's going to work well.
I really won't know till it's all hooked up and a good couple of shake down runs. Can't wait.
Today I fixed the cope I made too long last night. I managed to make a jig to get all the angles identical. I got them tack welded together and then slipped them onto my risers. They felt very comfortable and I think they came out much better than I thought they would. I think they might be keepers.
I can't get a decent picture of them on the bike until I get the risers welded solid and the set screws brazed to the base of the bars.
I've got to get my sweaty ass into the shower and to bed early. I'm doing twelve hours shifts Saturday and Sunday.

IMG_2152.jpg IMG_2151.jpg
 
Thanks Jim. That was a pretty goofy comment I made seeing hows I very rarely reply to any threads here.
I got home at 8 pm and didn't want to get into anything too involved. I tried bending my left front engine mount, and screwed it up.
I'm going to make some practice pieces with some lighter gauge steel. There's a funny little angle in there that has to be just right.

IMG_2153.jpg IMG_2155.jpg IMG_2156.jpg
 
Thanks for the pointer Jim. I don't have a press but we do have one at work.
I'm moving slow today, took it easy for the most part. I welded the cuts in the left bar, then smoothed it out with the grinder.
Then welded and brazed the riser together.
Happy Memorial Day and thanks to all of our Veterans. I didn't get to serve due to not being able to pass the physical. SUCKS!

IMG_2157.jpg IMG_2158.jpg IMG_2159.jpg
 
Today went much better than yesterday, even though I didn't get as far as I wanted too. I welded up the cuts in the right bar, smoothed with flapper disk and brazed the riser section. I bolted both bars to the front end and fit the horizontal joiner. I'm slowly welding the horizontal joiner while bolted to the front end.
I don't dare do any welding off the bike and risk deformation. I think I'm going to weld as much as I can while the bars are on the bike, and braze what I can't reach off the bike.
IMG_2160.jpg IMG_2161.jpg IMG_2163.jpg
 
Looking pretty good, reminds me of pre-unit bars. I made my own handle bars too and I tacked them up on the bike as best I could but once I welded them they were pretty warped. I was able to get them back to straight with alittle heat and persuasion but I think next time I'll just take the top triple off the bike and weld them on the table.
 
Thanks for your input chewblanca. I've had hell with these bars the last few days. Now I see why risers and bars are built the way they are.
After welding the horizontal piece in to connect the two bars, the stainless steel riser bolts seized up on the way out. I immediately stopped turning the bolts once they didn't want to turn. I dripped oil down the bolt holes and slowly turned the bolts in and out adding oil as I went. It took me close to an hour to get them out of the front end. They weren't galled to bad but I did need to clean everything up with a tap and die.

Then today after work I thought I would finish weld the bars off the bike. There was only a little bit left under the horizontal piece.
I welded one of the two sides, then tried to bolt them back on the bike. Of course they wouldn't fit! So I went ahead and finish welded everything.
Then I cut a eight inch out of the center of the horizontal piece, added a one inch joiner and brazed them back together while bolted to the front end.
I also rosette welded the grip extensions in. I thought I'd be prepping them for paint tonight.

I went inside and told my wife that the bars kicked my butt, but are now ready to be prepped for paint.
I said to her "maybe I should have just bought a set of handlebars".
She replied "you could have just bought a motorcycle" oooooooohhhhhh! So glad I made my own bars!

IMG_2164.jpg IMG_2165.jpg IMG_2166.jpg IMG_2167.jpg IMG_2169.jpg IMG_2170.jpg
 
I had a good time today. Played Little Richard and James Brown on the blue tooth and had the space launch going on the TV.
I prepped and painted my handlebars, then made some progress on my front engine mounts. I used some thin metal to mock up the front engine mounts.
Then cut some 1/8" steel for the mounts. Didn't get as far as I wanted too, but that's okay.

IMG_2203.jpg IMG_2204.jpg IMG_2201.jpg IMG_2202.jpg IMG_2188.jpg IMG_2171.jpg
 
Even though they look simple, I knew these front engine mounts were not going to be the easiest parts to make. It took me a few tries to get the bends right.
I was using a two by four and a dead blow hammer to make the first attempts. Then I figured out that clamping hard in the vise and using a regular hammer with no two by four gave me more accurate results. I couldn't find my transfer punches so I had to drive to two different Harbour Fright stores to get a set. The first store was out of stock. Even tried to throw down five hundred bones at each store for the Titanium 170 mig welder. Neither store had the welder in stock.
I managed to get two pieces cut and bent. Had to heat them red hot to get whatever industrial paint off that was on them. I'd like to know what kind of paint that was, it's some bad ass shit.

IMG_2207.jpg IMG_2208.jpg IMG_2209.jpg
 

Attachments

  • IMG_2171.jpg
    IMG_2171.jpg
    67.5 KB · Views: 106
Last edited by a moderator:
Thanks much for the compliment chew, I really appreciate it. The handlebars are far from perfect, but they will do for now.
The metal I'm using for the front engine mounts came from some plates that I removed from a large dust collector I installed at the chemical plant I used to work at. They have some very tough yellow paint on them. I'm guessing that it is some sort of epoxy paint. They also had a plastic film over the yellow paint.

I've been gas welding all of my projects through the years. Besides all the small projects I've done, I've done two airplane fuselages and this motorcycle I'm working on. I really need this motorcycle project completed and out of my shop this summer. That's my goal. Then I'll be rewiring and painting my 1964 Ford Econoline.

I took this evening off from the bike project and ran a thirty amp circuit about fifty feet into my shop for a Lincoln Tig welder I bought a few years ago.
On my next weekday off I'm going to the welder supply and getting a bottle of argon. I've got about ten minutes of experience tig welding.
I'm planning on doing a lot of practice and getting good at it. I want to be able to tig aluminum soon, and I have plans for a lot of fabrication work in the future.
Once I get the Titanium 170, I'll be able to gas, stick, tig and mig.

IMG_2211.jpg
 

Attachments

  • IMG_2171.jpg
    IMG_2171.jpg
    67.5 KB · Views: 88
Last edited by a moderator:
Ohhh I thought the yellow pieces were your cardboard mockups or something lol!

I'm not the best TIG welder but it is very satisfying. Especially on stainless. I only ever use scratch start though so it's not quite as refined.
 
Finally got a Monday through Friday daytime job after twelve years of rotating shifts.
I redesigned my regulator bracket. This bracket holds the regulator, coil and capacitor.
Soaking engine mount parts in viniger.
 

Attachments

  • D97DF42F-D495-4D31-966E-94B13BDBBC19.jpeg
    D97DF42F-D495-4D31-966E-94B13BDBBC19.jpeg
    280.5 KB · Views: 43
Today I test fit the new bracket and started making a bellcrank for the brake cylinder.
 

Attachments

  • E547BF2D-F4ED-48EA-9D6E-7BFE55FCBF91.jpeg
    E547BF2D-F4ED-48EA-9D6E-7BFE55FCBF91.jpeg
    398.7 KB · Views: 48
  • 4A382E98-CCB3-44F1-93C0-D73FC286E2D1.jpeg
    4A382E98-CCB3-44F1-93C0-D73FC286E2D1.jpeg
    370.7 KB · Views: 37
Today I finish welded the brake pedal and linkage. Then painted them. The upper engine mount parts look great after vinegar treatment.
The parts made from angle iron look like they’re going to crack just sitting there. I guess I’ll use them for patterns for some better ones.
I welded the brake pedal control horn on one side and brazed it on the other.
 

Attachments

  • 4D9E4EA6-5CFF-4EFC-9CA3-7B1DE44E14E5.jpeg
    4D9E4EA6-5CFF-4EFC-9CA3-7B1DE44E14E5.jpeg
    326.7 KB · Views: 40
  • 6D73B8D8-B4C5-48C1-8B87-37DDB1BC7D91.jpeg
    6D73B8D8-B4C5-48C1-8B87-37DDB1BC7D91.jpeg
    345.6 KB · Views: 41
  • 689DD5CA-45EF-4CDE-ACCE-3627BEB7AFDA.jpeg
    689DD5CA-45EF-4CDE-ACCE-3627BEB7AFDA.jpeg
    374.6 KB · Views: 43
  • 96582425-D2F1-43C0-9747-738704EBCABC.jpeg
    96582425-D2F1-43C0-9747-738704EBCABC.jpeg
    234.5 KB · Views: 34
Back
Top