The father/son special

tbird

Newb
Messages
59
Reaction score
42
Points
18
Location
SoCal
Ok, so I am finally starting this thread. First I would like to thank all you for the info and entertainment that is provided on this site:thumbsup:. I could not have and probably would not have taken this endeavor on had it not been for this site. I have never built a bike before, but have a small background in hot rods and was a mechanic for several years. Been trolling this site for over a year now, finally made a purchase last Oct and have been building it with my dad since. Had a little delay from Ardcore(which is not unheard of:doh:) and been putting in weekends when I can. My goal was to have it running I the spring(didn't happen), now I just want to ride the damn thing:bike:. I'll put pics up when I can...
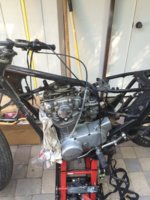
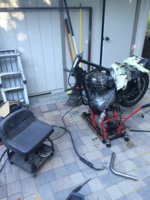
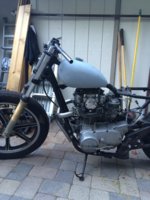
this is what i started with, it was would start but was dumping fuel out of the left carb:D
 

Attachments

  • IMG_0557.jpg
    IMG_0557.jpg
    230.2 KB · Views: 338
ok, so after spending to money on jets, needles and needle jets from Mikes(I will be running open exh/intake) and rebuild kits to fix the gas pouring out of the carb problem; i still had a running problem. I then chased my tail for quite some time, finally figured out it was a defective petcock. Once i bypassed that i found that the PO had been trying to "tune" around the petcock by screwing the idle screw all the way in:laugh:
sorry no pics of me pulling my hair out:shrug:
 
if you are reading this that means you clicked bobber and you read that I had ordered a hardtail from Ardcore. Yes, we are hardtailing this and I already can hear Fredintoon grumbling about it:D that being said lets get to cuttin:thumbsup: while waiting for the hardtail to arrive we started with removing the stock neck gussets
 

Attachments

  • IMG_0732.jpg
    IMG_0732.jpg
    224 KB · Views: 235
  • IMG_0733.jpg
    IMG_0733.jpg
    200.5 KB · Views: 249
as you can prob tell this is truly a backyard build, in my parents backyard. My dads el camino is in the garage in pieces:laugh: and this is where the welder and majority of tools are. This is also a budget build, trying to do as much in house as we can. I liked the look of HHB speedster headers, but the price of a builders kit better:D
took the front end off to make it easier to mock up the headers
 

Attachments

  • IMG_0823.jpg
    IMG_0823.jpg
    232.9 KB · Views: 275
here you can see the peanut tank I picked up off of ebay and just a hint of the header sticking out
 

Attachments

  • IMG_0824.jpg
    IMG_0824.jpg
    240.3 KB · Views: 252
Here is the exhaust from the front and side, pretty happy with the shape:cool:
 

Attachments

  • IMG_0826.jpg
    IMG_0826.jpg
    224.9 KB · Views: 274
  • IMG_0825.jpg
    IMG_0825.jpg
    218.1 KB · Views: 304
ok, so will try and do a photo dump to catch up.

after some arguing w/ ardcore this finally arrived
IMG_0867.JPG


so naturally the tear down began..
IMG_0867.JPG


IMG_0880.JPG


then this happened:yikes:

IMG_0881.JPG


trial fitting of the hardtail:eek:

IMG_0882.JPG


had some pegs off of my dirt bike;)

IMG_0906.JPG


seat pan

IMG_0907.JPG


exhaust back from the coater, mocking up fitment w/ the front end lowered to approximate height. its close:eek:, but doesn't rub
IMG_0910.JPG

IMG_0911.JPG
 
Ok, so from the beginning I had a rough idea of what I wanted to do w/ the seat. I wasn't really digging the hairpin or barrel springs. I was looking at the airbag setups and the ones w/ the mountain bike shock. I was leaning toward the MB shock, just couldn't find the right shock set up for my budget. I was kicking around another idea, which is what I went with, I wanted clean and simple and think it looks good. You can also see my rear master set up, it will have a hard line plumbed to the rear caliper.

IMG_1038.JPG
IMG_1039.JPG
 
thank you, I was hoping to be unique in that regard:cool:, spoiler alert-it actually works(quite well):D

also, not shown in pics, we added a "rail" on either side of the eye of the spring so it will not slide side to side
 
Last edited:
So next we started working on mounting the rear fender and tail light/lic plate mount. I scored the fender from Hugh on one of his "garage sales" on the IG.
IMG_1364.JPG
IMG_1365.JPG


also got the headlight mounted
IMG_1367.JPG
 
So at this point it was tear down time. We blew it apart to paint the frame/motor. No pics of that process. Here is the frame painted w/ motor installed.

upload_2018-3-27_12-20-13.png


Wheels on and hiding from the rain
upload_2018-3-27_12-21-23.png


upload_2018-3-27_12-21-52.png
 
Originally I was going to run the EX500 carbs(which i had already purchased), but i didnt have enough clearance w/ the rear down tube. Sooo, I was forced to go a different route. After a lot of reading on here, I went with VM37's from Hoos Racing. I was then stuck w/ an intake manifold problem. Google and Ebay to the rescue. Found this intake from joe-wiseguy on the fleabay;)

3-27-2018 1-08-35 PM.jpg


bad pic, but installed

upload_2018-3-27_13-14-46.png
 
I had high hopes of covering the seat ourselves, my dad had other ideas:lmao: 
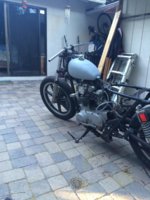
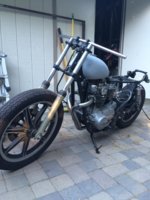
and we had it done professionally. I really happy w/ how it turned out.:cool:. You can also see the velocity stacks I am running:D

3-27-2018 12-38-48 PM.jpg
 
Lookin' good.
I've a minor complaint.... put bigger pics up for us old guys.;)
 
Lookin' good.
I've a minor complaint.... put bigger pics up for us old guys.;)

sorry about that, lemme see what i can do:thumbsup:. I'll put a couple up, let me know if there is a specific one that you want to see that i dont post
 
Back
Top