Timing basics

ember

XS650 Addict
Messages
131
Reaction score
2
Points
16
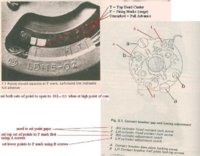
Does anyone have a set of step by step instructions for timing points ignitions? My Clymer book isn't very intuitive for someone who has never timed a bike before.
I did my best following the book, but it's not running right. May just need a small advancement or something simple, but I am having a hard time following the book.

Biggest problem I am having is moving the mark slowly to line the timing marks, but the compression wants to turn it over too fast and it flies by the mark(s) before I can get an accurate reading on my volt meter.

Thanks.
 
after setting both points gaps to spec.using screws #1 AND #2 .012-.018, usually .012-.013 works best by finding high point of the cam
align timing mark on the rotor with the F mark turning motor counter-clockwise using socket on rotor nut KEY OFF, check tappets (both intake and exhaust on right throttle side should be loose) if isn't turn motor 360 until right side tappets are loose with F mark aligned rotor mark, set upper points to just open by moving main backing plate #3 using screws "A" DO NOT CHANGE THE POINTS GAPS, turn motor 360 C-C to align rotor timing mark again now left side tappets should be loose, move backing sub-plate #4 using screws "B" to just open points, check with timing strobe light right side must be set before left can be set
 

Attachments

  • timing1.JPG
    timing1.JPG
    100.8 KB · Views: 3,040
  • timing_127.JPG
    timing_127.JPG
    70 KB · Views: 4,723
Thanks, Jay.
Unfortunately, I am not getting spark on the left side, so that is why it was running like crap. Need to figure out what happened since it ran decently before I screwed with timing it.
The right side looked to be firing at the right spot with my timing light on.
 
You can hook a little test light or meter up to the points wires to make sure they are opening in the correct spot as you turn the engine over slowly with a wrench.

Make sure the points are clean...spray some brake or electrical cleaner on a piece of paper and rub it between the points. The slightest grease will mess them up.
 
I'm fairly certain my timing is correct now, and I used an electronic multi tester to find when/where the points open.
Also cleaned the points when I set them. After all was said and done, I used a spark tester and I am getting no spark on the left side. Left header pipe was cold. Have a feeling the coil is fried, but will have to dig into it deeper later in the week.

I suck with electrical systems, so I am learning as I go.
 
swap the spark plug leads, so your right side coil is on the left cylinder, left side on right cyl. then switch the wires from the points(grey to orange...) if the left side now fires then it is the coil.

if the points are pitted (like mine, bad condenser), file/sand them. clean a couple times with lacquer thinner or some other solvent.

this happened to me, filed my points, gapped, cleaned and it fired right up
 
Thanks for the tips, everyone. I will try swapping leads this evening!
I have a XS2 and have the RH cylinder at TDC (valves loose) If I move the rotor to the F position, no points appear to be opening - I have to move the rotor a great deal till the RH points start to open. The bike was running prior, and I can hardly believe that the timing could be this far off and still run. Am I doing something wrong?
 
You can't see the spot where the points just start to open, that's why you need a test light or meter. By the time you can see the points opening, you will be way past the marks.
 
With all these dual point bikes I find the best way is to use a dwell meter and strobe light. Not an expert but just sayin.......

Edit: another thing I found out the hard way is to ensure the advance mechanism is clean and working properly, not the case here though.
 
Last edited:
Thanks for the help. With the meter, I could see that they were opening - a little late, but not that bad. Now if I can find some new screws to replace the boogered ones that hold the points in, I'll be fine! The previous owner (or maybe the one before him?) chewed up the slot real bad. I shouldn't be surprised, though, considering that the studs for the valve covers were also mostly stripped, among other things.

Thanks again,

Dave
 
Sounds like a pregnant idea - it would make them easier to start, too. The case bolts have already been replaced. I love Allens - course, could be because that's my last name!
 
Points gapped? The rubbing block wears fast because the owner didn't grease the cam and didn't oil the felts. A mere finger print of grease in front of each rubbing block gets scouped up like a snow plow by the rubbing block and lubes it right where it is needed. A common technique in the 50's and 60's lost to time. Now, only a secret known to ancient wise men.

I've found bad plug wires and plug caps on many old bikes. Twice on two different points ignition XS650s. Don't be fooled by a spark test. The wire or cap has a break and the spark jumps the gap eroding it farther until the open break can't be jumped and the spark fails. Remove the plug and check. Surprise!!!, there is spark? It is because the gap in a spark plug is much easier to jump with no compression. Of course there may be no spark also. Test the wire and cap to find the culprit or just replace them all with non resistor wires and caps. Non resistor caps are difficult to come by, check before you buy.
----------------------------------------
The above are some suggestions I wrote from another list. Here are a few more to help.

Is the spark plug fouled? The spark goes throught he carbon instead of jumping the gap. An all to common mystery that should be obvious. BP7ES is what works well for most XS650s but I used hotter BP6ES until I had my engine sorted because the hotter plug doesn't foul as fast. Use premium fuel.

A common problem is having the points wire grounded so the points don't make an intermittent ground.

Check teh plug wire and plug cap for breaks using a contenuity test.

Since the points are just an intermittent ground, the coil (the wires and cap must be good) can be checked by tapping the points wire against teh case to ground it on and off. The coil should fire the plug.

Once you get the beast going, use premium gas for detonation prevention. Gas had lead when your bike was built and there is no easier way to keep from holing a piston than using premium gas all the time. Easy, 20 cents more or a potential blown engine?

Tom Graham
 
Where to begin? I was switching over to a pma on my 82 when I realized that the pma didn't work on my stock electronic ignition (but not before cutting all of the wires for the stator and timing module & pulling everything out.

My pamco kit its in thee mail :D so all is well.

I just need to figure out how to set my new timing. I picked up a TDC tool, a degree dial, and have a timing light on its way. Any tips on how to find TDC without destroying my engine:confused:? My wife reminds me that I do have a nack for breaking things:eek:.

Thanks for any help,

Matt
 
Just installed new points. Per my multimeter, the points don't open until past the T mark - points set at abt. .014. Also, the reading is only 3 or 4 volts - is this correct?
 
Thumpower, I assume you have read your repair manual on setting and timing your points.
If you have then you know the voltage has nothing to do with timing.
To use your multi-meter for timing you use a low ohm scale and time the points to just open between the two F marks.
fishhat, depending on how you gathered the PMA parts, collected parts from many sources, or a kit. Some of the PMA kits have timing marks to set your ignition, A collection of parts won't.
I suggest reinstalling your stock rotor and stator to set up the Pamco. Once you get the pamco set up, put the PMA back on.
I know there are instructions on how to find TDC and from there marking the rotor and alternator cover with timing marks, I just don't have them.
A search of this site for PMA timing marks might find the info.
Leo
 
I picked up a tdc stop tool and a degree wheel to find tdc. All is well in the world of timing. Now the clutch on the other hand...
 
Back
Top