JaxShane650

XS650 Enthusiast
Messages
65
Reaction score
10
Points
8
Location
Columbia Missouri
Encountered a larger problem when taking apart my carb for the second time and believed it deserved its own thread to try and figure out what to do with this thing.
Okay so I did some tearing apart, cleaning, and investigating of these minikuni carbs. From what I found these carbs seem to be completely stock when comparing them to the pictures 5twins posted. And you all were right about idle circuit being most likely dirty, there was some dirt in the circuit that I believe caused the idling issue.
Here are the Idle jets
View attachment 88363
Idle jets that are in the throat of the carb by the air filter
View attachment 88361
Main jets (too worn out to see the marking but I believe they are stock)
View attachment 88362
Here are the slides
View attachment 88364
Before I put this thing back together I was thinking about re-jetting this carb with this kit for the BS34's https://www.mikesxs.net/parts/yamaha-xs650-dyno-tune-needle-jet-kit-for-bs-34 from MikesXS and wondering if it they are worth it since this kit says it helps with aftermarket filters and exhaust which I have on this bike.
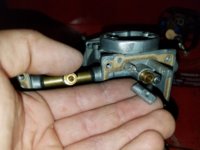
Here are the Carbs Themselves
View attachment 88365
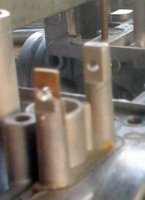
and while taking them apart I stumbled upon a problem I tried to solve before I took them apart for this second time. The problem being that one of the posts that holds the float in place had sheered off which you can see here.
View attachment 88366
I have tried and used JB wield to put it back together and and thought it would work but it has not survived the gas and fell apart when I opened up the carbs. Any of you experts out there have a solution for this problem or some compound that will withstand gas better than JB wield does?
 
If you're talking about the broken post, then no, you can't just glue it back on.
The BS34 carb body is probably ZAMAK, an alloy of mostly zinc.
Difficult to repair. Most folks just scrap the broken part.
If you scroll down about 3/4 of the way down this site, you'll see one kind of repair that involves welding.

http://rick.sparber.org/ma.htm

I've successfully patched broken zamak parts by reinforcing. Drill and press-fit pins thru the center, and/or tubing outer reinforcement, all bonded with jb-weld. A meticulous and precision task, can't be done with kitchen utensils...
 
you could try low temperature aluminium brazing .
I recently used it to repair a 50 year old Lambretta crankcase and it worked perfectly.
The brazing can be done with any plumbers propane bottle and you just need to heat the parts until your spit sizzles then apply the aluminium brazing rod .

If you combine 2Ms suggestion of a dowel pin you'd have a very strong joint .

 
Put the BS34 on the shelf and get a set of Kawi EX500 carbs, search them out.
 
Okay thank you for the recommendations, I might of found someone to tig wield the carb back together and hopefully that will solve the problem. As for the crab dyno kit that mikes xs sells, is it worth it for the BS34 and does it help the carb out and make the bike run better? Any thoughts?
 
I very much doubt if you will be able to Tig weld that tiny post . Too much heat too difficult to align the pieces and access adequately. Far better to use a low temperature brazing solution which will not damage the carb. I suspect you'll find the post and carb body will disintegrate due to the age of the aluminium .

Here is a 52 year old Lambretta crankcase that I brazed a 2" x 1" bar into sucessfully.
Because the crankcase is such a large chunk of alloy I should have pre-heated it in the oven first to get a neater flow of solder but it worked and is oil tight.
case repair finish ext.JPG

series 2 crankcase repair 5.JPG

150lis hole in crankcase 1.JPG
 
So did you just use normal wire solder? I have some solder that I use for electronics and I'm guessing I would just need a torch to heat up the aluminum and then melt the solder to the aluminum and stick the two pieces together?
 
no not solder .....its a special low melting point Aluminium stick for brazing /welding aluminium.
You just need any propane gas bottle like the plumbers use and a stick of the aluminium and thats it.
you just heat bothe parts until your spit sizzles and then introduce the aluminium stick to the joint and it flows just like solder does.
you need the pieces you are joining to be absolutely clean though.
This is an excellent video to show you how strong and easy it is to do

http://www.ebay.com/itm/2mm-Low-Tem...294722?hash=item25c397ca02:g:PToAAOSwuTxWAUEV
http://www.ebay.com/itm/Campingaz-C...489781?hash=item464253a935:g:QGIAAOSwAodWE~fN
 
So would it be safe to say that I could buy some sort of aluminum brazing rod, a propane torch, and then solder this thing back together after cleaning the two surfaces?
 
Not for a novice, an experienced person may have success and even then failure is definatly a possibility.

Ask around for a carb body that needs to be rebuilt and someone is going to throw away and rebuild it with your internals. Must be plenty of those out there. You have the bowl and lid.
 
Would there be any other glues/epoxies that would work in my situation here? JB wield I know wont work, but there has to be some sort of affordable glue/epoxy that can withstand modern day gas that would work in my situation. Those posts are not under much pressure at all so I would just need an epoxy that can withstand the gas and ethanol that is in modern day fuels. Anyone have any Ideas?
 
well if you are looking for a bodge job then there is possibly a way.
Forget the glue ,the end of the post is way too small an area to glue effectively on its own. you need to build any resin up all around the base of the broken paste so the the post repair is braced over a larger area

What you need is a mechanical solution as 2M suggested.

If it were me and I absolutely had to repair it because it was the last BS38 carb in the World........I would use a brass bolt with the same diameter as the pivot pin.
Thread the bolt through the remaining pin and lock it with a thin brass nut.
Remove the thickness of 2x brass nuts from the brass float where the pivot pin goes through.
Put the float onto the brass bolt so that it acts as the pivot pin.
Thread a thin nut on the bolt until there is just sufficient gap to allow the float to pivot on the bolt.
Put the broken post on the bolt next to the nut then put the final lock nut on the end of the bolt.

You need to aim for the broken post to end up sitting exactly where it broke off so adjust the lock nuts and the length of the brass float pivot to suit.
Lastly clamp the broken post to the carb and build up some JB Weld or metal Resin or any filla that is impervious to fuel and oil.
There is plenty of room to build the weld all around the base of the broken post to make a good strong joint.

It won't be pretty but it should hold as the broken post is braced mechanically by the brass bolt which is bolted to the good post and acts as a pivot fot the float.

If you think you might be interested in trying this i'll do a vid showing how it would fit on a spare carb I have to show you what I mean
 
So peanut, you are basically suggesting I do something like this guy did?
After seeing this video I feel like this would be the best long term option as long as I drill the right size hole, tap the right threads, get the right size bolt, and have it all centered correctly.
 
I hadn't seen that video very good.
Its similar to what I was proposing but actually better.

However if I was going to go to all the trouble of drilling and tapping a new thread in the base of the broken post I wouldn't try to drill a brass screw to take the pivot pin , I would find a piece of 1/4" aluminium rod and run a thread onto that. Then drill it for the pivot pin and then lock the threaded aluminium rod in place with thread lock.
make a much better solution
http://www.ebay.com/itm/10-pieces-1...hash=item51aee7e866:m:mhlLZMZupuv4FkfIWK4alGg.
 
Last edited:
I hadn't seen that video very good.
Its similar to what I was proposing but actually better.

However if I was going to go to all the trouble of drilling and tapping a new thread in the base of the broken post I wouldn't try to drill a brass screw to take the pivot pin , I would find a piece of 1/4" aluminium rod and run a thread onto that. Then drill it for the pivot pin and then lock the threaded aluminium rod in place with thread lock.
make a much better solution
http://www.ebay.com/itm/10-pieces-1...hash=item51aee7e866:m:mhlLZMZupuv4FkfIWK4alGg.

I had a broken post and took the following route for repairs:

1. Made a vertical cut in the post approx. 1cm long.
2. Cut a piece of brass sheet to the right length and drilled a 2.5mm hole in it.
3. Inserted the brass into the hacksaw cut and positioned it correctly by inserting the float pin. The brass was just thick enough to fit the cut without putting it under strain.
4. The float pin was passed through the good post and the brass sheet sitting in the saw cut. The pin was held firmly against the face of the remaining 3rd of the original hole thus ensuring the correct level height.
5. I then drilled a 1mm hole through the post and brass sheet, made a 1mm stainless steel pin and pressed it in gently to lock everything in place.

Post Repair.jpg

I hope this repair will work out well for me.
 
Paul I bet that repair works out for you since yours broke more near the top, sadly mine broke on the thick part of the post lower to the base of the carb.
20160906_231912.jpg
 
what if,....what if....(candy and nuts comes to mind) but, what if you drilled a hole straight down after removing the entire post, and tapping for a bolt with a 1mm hole in it, where the pin would go? red locktite it in there forever. the pin dosnt have to be a tight fit, that bulge in the float bowl holds it in place.
Slap me if im wrong.
 
That's what I have been thinking of doing but I'm not sure the size hole to drill, tap, and the bolt to get to put in the carb body. Also I'm not sure how I would center the drill hole without eyeballing it and possibly messing it up. Other than that I'm pretty sure I can do the rest and it would be relatively easy.
 
Back
Top