Turn Signal Repair

ThatXS650Guy

More Sparky than Speed Racer
Top Contributor
XS650.com Supporter
Messages
1,027
Reaction score
3,163
Points
263
Location
North GA
Hey Gang, Getting pretty close on my 650 but need to get the turn signals sorted. The three solder points came "unsoldered". Any tips to getting these back on? Soldering is a skill I have not yet acquired. Seems like you need three hands to solder anything...
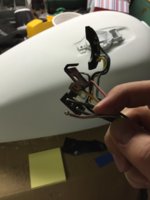
Below is a pic. The vice grips are just keeping the block stationary. The first wire is in the foreground.
TIA,
Jim
A4A0E421-14AF-4BD9-B047-131E153B8C3D_zpsug9h4ttq.jpg
 
I have one of those tiny benchtop vices for just this purpose. It holds the "thing", one hand holds the soldering iron and the other hand holds the wire(s).

Consensus seems to be that when you re-solder these, some flux makes things easier for you.
 
Some pointers here,
Jim, that tool is a vise-grip. A vice grip involves a naughty lady and costs more.
Pete, this is a family site and whatever tiny vice you do on your bench top should be discussed elsewhere.
And I'd say use a non-acidic paste flux for electrical work and not some but lots.
That and everything made squeaky clean before you start.
WER, what's most satisfying is riding a bike that you fixed yourself.
 
Fred have you ever soldered that part? I've done a couple and it is tedious for me. If you are handy at that particular job let us know and you might get some side line business.
To "fix" the bike do you have to re-work the original parts? Replacement of parts doesn't count?
 
Hi WER,
yes I have. Admittedly it's a fiddly process and NO, go DIY and put salve on your own solder burns!
Things that wear out usually can't be fixed and need to be replaced but to replace that little switch
you'd have to buy the complete handlebar unit and even used ones ain't cheap.
However, Jim's switch ain't worn out, it's just become unsoldered. And that's fixable.
 
Another set of hands is a big help here...but if you can get the wire's end to sit down on the rivet, say with another vise grip holding it in some fashion, then you have one hand to hold the solder tip, the other to feed the solder. Heat the rivet/wire, let the solder flow and as mentioned, clean it good and it should work out.
 
I'm a big fan of these "helping hands". A tip - shrink wrap the ends of the alligator clips or the teeth will bite into the wire's insulation when thing get hot .....

 
By all means, try it. I had to fix mine, but it was only one broken joint. Still, took me two tries. First "fix" lasted about a week then broke again. Second time was a charm, been good for years now.
 
Hi Pete,
looks like two of the wires are still attached so you'll only have the one occasion to repress your screaming as the molten solder drips onto your skin.
Thing is, if there's more than one wire to re-solder you get REAL careful as you make the subsequent repairs.
Honestly though, the time I had my leftside switch apart to re-solder those connections I found that soldering was the easy part.
Getting all those flimsy little parts back together again afterwards was the part that was really difficult.
 
well good luck with that. I tried to resolder two switches and neither worked very successfully .

The biggest problem you have is the heat. You need fast instant heat for a quick soldered joint and an equally fast cool down or you'll find the switch will start to melt and the metal terminals will come loose.
It might help to make sure that the wires face in exactly the original orientation too, otherwise as fred says you'll find it next to impossible to bend those thick wires to fit back in the switch case.

I found the best way is to pre-tin the switch terminal and the wires you intend to solder then clamp the wire end so that it lays on the switch terminal. Apply heat to the switch terminal and dab the solder on the terminal and wire until you see the solder run like liquid mercury then blow on the whole switch assembly like mad to cool it down quickly. The joint should look very shiny . if its dull like aluminium you probably have a cold joint and will need to resolder it.
 
Last edited:
If it makes you feel better, this is what I found tonight after yanking mine apart to investigate my bipolar blinkers.
Welcome to the party Pal.
Thanks All. I'm going to give it another try this weekend. I'll probably spend some time watching you tube videos on soldering first and then give it a whack.
 
My soldering iron has a dial on it. It will actually get red-hot if you crank it all the way up. I may have to go 80% when I attempt this and have a fan ready to try cooling it off.
 
sounds like you have a good powerful iron but your fan idea will be too slow I'm afraid.
You need to watch the solder solidify nthen instantly start blowing like you're putting out a fire or better still dump a damp cloth on the switch.
The heat from the soldering iron will keep heating up the switch body for quite a few seconds after you have removed it.
 
Well, I attacked mine last night. It turned out pretty well. My iron gets pretty hot and I had it at 80% I think.

I cleaned everything up with a brass brush and contact cleaner and got it nice and hot and ended up with a good joint.

It was definitely key to have something good to hold the switch with. I used a small bench vise and took the switch apart so the only thing I was soldering on was the top plate.
 
well done! its much more satisfying to salvage something than buy a cheap replacement switch that probably wouldn't last more than a couple of years at best.

If I have to repair my current switch i will completely rewire it with smaller guage wire than original as I only use modern low wattage signal flashers now
 
Back
Top