Wherein I either make a seat or a fool of myself, and also other things with the bike

Nash,
I would have to second Fred's thoughts on plain bushings being better than rollers for something working in a partial rotation design like rear sets. That along with the vibration characteristics of an XS650! Just look at the design of the wrist pins in the engine, they only work through a short arc and Yamaha did not even feel the need to put an actual bushing in them!

Yes, I do know that the very early engines had the needle bearings but that was probably a hold over from some engineer more familiar with 2-stroke engines!

Now if someone had taken the time to give those old Mustang brake peddles a shot of lube every couple years you would never had needed to fix one! If you want to get real fancy just drill a small hole in the brake peddle just big enough for the straw on a chain lube spray can so you can lube them good every time you lube the chain!
 
tungsten disulfide! best lube for plain bearings solvent dry the steel, apply powder rub in, then use a compound of grease or oil with the TD in it. Waiting on long term results, but early on finding this stuff is like a miracle for tough lube areas.
 
Dad stuff yesterday, but back to work on things today. This post won't be too picture heavy as there wasn't really much that felt picture worthy. I worked on skinning the seat frame below the seat pan. The weather today was shit so I didn't ride so I kinda just hope I made the right choice of measurements but I'm relatively confident it was right. Started out tracing the opening onto some paper to get the shape roughed in since it's very irregular. The paper itself is funny and I should take some pictures of them, but maybe another time and place as it's not directly motorcycle related. Anyway, getting the shape pretty close in paper I transferred the shape over to a piece of metal and cut it out.

This is where the measurements come into play. The seat frame sits above the main frame and leaves a gap there. Not having the bike handy and failing to have measured it a couple days ago, I set the stuff up to go 3/4 inch below the seat frame with a 3/4 inch break to give the bottom edge some strength and keep it from being just a sharp piece of steel hanging down.

IMG_20181101_180203.jpg

Once the piece has the break in it, it has to be curved to match the pinch down of the seat. The thing on the pedestal there is what we call the shrinker stretcher, I have no idea if that is the technical term, but it does exactly what it sounds like. The blue one shrinks and the grey one stretches, so you can use them to curve metal with a break in it. The picture was taken before the piece was matched up nicely, after this I put it up against the seat pan and saw the curve was light, so I shrunk it some more until it was right. Also pictured is what we call the Beverly shear, that one I do know is not the correct term as Beverly is just the brand name. So um....I guess that's an uncompensated endorsement for Beverly what-ever-the-rest-of-their-name-is. There is also the foot control for the plannishing hammer there in yellow because somewhere someone was questioning what that was.
IMG_20181101_185233.jpg

Here I have tacked the skin pieces onto the seat frame, used the MIG for ease of getting them stuck to the bottom rails of the seat frame then back to the TIG for sticking them to the hoop. Luckily I had another skin piece that I had prepared before the show ready to tack on for this picture. Well, really I didn't. I tacked on the one from the previous picture then made another one and tacked it on then took this one. What's good though is I used the same template to make both pieces and there aren't any huge holes so everything is pretty even and symmetrical which is nice. I screwed up making my fork brace and didn't get it symmetrical and it still bugs me, I need to just trash it and do it again but some other time.
IMG_20181101_193318.jpg

This is where I left off for the night (home 3 minutes before 8 woohoo). Getting the seams welded up is an exercise in patience as I want to just run right down the thing and burn it all it but that will just warp everything so it's stitch, cool, stitch, cool, stitch, cool. I've still got a good bit of welding to do on it and then I've got to take the seat pan back over to the English wheel and get the front corners of the pan down tighter. The top will be capped too and the front of the skins trimmed back. That is probably what I'll do next. Maybe it will be dry tomorrow and I can get a picture of it sitting on the bike again.

Regarding the rear sets, I'm sure what I'll end up doing eventually is ordering a set from somewhere and putting them on the bike, then deciding they aren't really what I want. Then I'll end up making a bracket to put the pegs where I actually want them. Sort of the same idea as how I did the handlebar.
 
I just want to say the compliments are awesome. I've mentioned it before, I'm not a metal worker by trade I'm actually just trained in mechanical and electrical work. We have a real small shop that does work mostly on American Muscle cars, there are six of us that work on the cars and one person that works the front office. I'd be the fourth best metal guy there, ahead of only the people who never touch welding or shaping equipment, and the guys in front of me have been doing it for twenty or more years a piece. So, as you'd imagine it's real easy to get frustrated with what seem parts of horrendous quality by comparison.

On a more thread related note, I was going to work on the seat more tonight but the day wore into me a bit too much. There is a good chance I'll mess with it Saturday and Sunday both though, so things will get done.
 
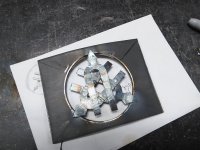
Got to work on things for a good portion of the afternoon and early evening.
IMG_20181103_142139.jpg
First thing I wanted to do was actually get the thing mocked up on the bike again, as can be seen the hinge the front sticks out well outside the outside of the frame. Ended up cutting the skirt out to be able to get the hinge bolted to the seat rail. I also found out that while the 3/4 inch skirt length is just about perfect, you can see in this picture sits right about middle of the frame tube. Problem ended up being the 3/4 inch break on the bottom of the skirt which immediately prevented the seat from sitting flat.
IMG_20181103_142309.jpg

I trimmed the break a couple times and refit to check, it's tight enough I ended up deciding to simply roll the bottom edge. It'll work out just fine I reckon, should still serve the dual purpose of adding strength and softening the edge of the skirt. Here too you get a better idea of how far past the seat rail the hinge piece sits, eventually it will end up even farther outside than that as the frame isn't sitting quite square on the chassis yet. Eventually I'll get to that point of fitting things and when that happens I'll decide how to clean up the area with the hinge. I may just bubble around it, or if it sits outside enough I can cover back in behind it. Being able to cover in behind it would be the better looking of the two options I think.
IMG_20181103_150409.jpg
Next I did what I really wanted to get to and started building the cowl area. To start that off I had to bend a piece of bar to anchor the back end of the sheet metal. Took some measurements with the seat on the bike and decided to extend the rear bar out past the kick up of the bike chassis. I may regret this later but I'd really rather not cut the frame up and worse than it was when I got the bike.
IMG_20181103_150431.jpg

Having taken the measurements I needed, I shortened the box tubing of the seat rail. With nothing aft of the hinge bracket to support but body work there was no need for the comparatively heavy tubing. Took 2 1/4 inches, should anyone be curious. After that it was welding the strap piece onto the end of the box rails.
IMG_20181103_152622.jpg
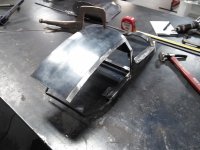
Here is the bar welded into place and the piece for the top of the cowl cut and run through the slip roll to put a crown to it. Also visible on the sheet are the marks I made to measure out the angle on the edges, 1/2 inch in on both sides. It went to the sheet metal break and got the edges bent down.
IMG_20181103_153025.jpg

Breaks on the edges, better view of the crown now. After that I spent a pretty decent amount of time going back and forth from the shrinker stretcher and English wheel trying to get the panel having the downward curve I want as well as a bubble out. Again, I wish I was better with the wheel so maybe I wouldn't smash my fingers so much. I was real happy with the eventual outcome here so I'm improving.
IMG_20181103_160239.jpg

Of note here, I mocked up the top panel to try to get a handle on how long it needed to be. I was hoping this picture would show the panel's shape better than it does but oh well. I ended up taking an inch and a quarter off the back end of the panel after mocking it up like this. The angle at the back looked like it was going to be too hooded to me at the length it was originally made. As one of the comments earlier in this thread said though, it's easier to cut off than add metal back in. Once I got the top panel how I wanted it, I was able to measure things out and make the rear hoop.
IMG_20181103_165726.jpg

The rear hoop is welded in and the top panel stitched between the hoops. The contour of the top panel shows better in this picture, and about this point I started getting real excited as things are really starting to look like what I keep seeing in my mind.
IMG_20181103_173336.jpg

Skip forward several minutes and I've made one of the side panels, this piece ended up being more difficult than I was expecting. The top panel seemed to just fall right into place, This piece has the bottom lip rolled like the front panels, and then I did a break at the top and ran it through the shrinker to cause the top to curl in. Every time I would adjust the top edge it wanted to affect the bottom edge and vice versa. Then I had to trim it to fit the seat frame.
IMG_20181103_175633.jpg

Side panel is welded in place. I had prepped pieces to do both side panels, you can see the piece for the other side sitting under the tape measure here. Anticipation won out though and I ended up closing up this side first.
IMG_20181103_181524.jpg

Made a paper template, traced it onto some sheet and then cut it out using the shear which is not technically called Beverly. This thing was refreshingly easy after the side panel. Got it tacked into place and looked at the clock, it was late enough I decided not to start on the other side.
IMG_20181103_185839.jpg

There was a gap between the front and rear side panels because of the way I assembled things so far, so I made a small filler for the bottom and started to weld the gap up. Didn't get the entire thing filled because of dealing the the heat created. There is a considerable amount of welding left to be done overall anyway, even on this particular side. Something I have noted though is I've started feeling like I need to radius the lower rear corner. In all the drawings I've done of this I've had the bottom edge flat and it's never looked weird to me, but seeing things in steel I think I need to upsweep the last maybe three inches and then put a small radius to the transition. Mostly I'm happy with it though.

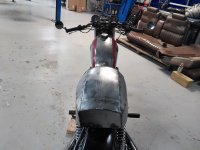
One thing that is sort of problematic in a minor way though, but the rear support is contacting the rear fender when the seat in installed on the bike right now. I'm not leaving the fender the way it is right now anyway on the finished product so it's not a huge issue other than it keeps me from easily just popping the seat on to look at things now. That's it for now though, it was time to put the old seat back on, clean up, and get home for the night.

P.S. There is a picture of the seat as it is now sitting on the bike, but I decided not to share it as it just looks weird with the seat not being able to sit flat.
 

Attachments

  • IMG_20181103_160239.jpg
    IMG_20181103_160239.jpg
    173.7 KB · Views: 172
"...I didn't know how to do it, so I did it anyways..." No rules. No expectations. No limit. 'Stock' don't enter in to it. Leave that behind. Go for it. When you have something in your mind, build it. :rock:
 
More work today, started off by skinning the other side. That looked a lot like skinning the first side so I didn't take any pictures. After getting that on I tackled the back panel.
IMG_20181104_150850.jpg

Started out again by making a paper template. Recessing it up into the tail it's more difficult than just slapping the paper down and tracing the back end of the seat.
IMG_20181104_154033.jpg

After tracing the template onto some metal I deliberately cut the metal larger than the tracing so that I could keep a nice tight fit since getting it welded and looking nice was going to be hard enough as is. So after cutting the piece out I went about trimming and sanding to get it to fit. The idea was to get the back end perpendicular to the bottom edge of the seat frame so that the top of the cowl hoods over the back plate and then the tail light will be partially hooded as well. Getting it to fit just right up in there took a long time, long enough in fact that it never did really fit just right and I ended up tacking it in place with more gap that I would really have liked but I wasn't doing it over again so whatever. The beauty of it being recessed and hooded is that you'd have to flip the seat up or really kneel down and pry into it's business to see the ugly welds, so I'm not overly bothered by it.
IMG_20181104_175837.jpg

So the back panel is in, and you can see that I went ahead and trimmed the bottom back edges. I put a slight radius on them too just for effect though it will have to be redone once everything is welded up for good. Even from this angle you can't actually see the crap welds on the back plate. You can make out the overhang here too.
IMG_20181104_175848.jpg

The only thing left to make was the reinforcing pieces at the front. They will stabilize the front corners of the seat pan, or at least that is the idea. Now I need to get welding, lots and lots of welding. All the seams that I tacked together are going to be completely welded up and then sanded back down, and I need to get the back panel welded in better. After thinking on it for a few minutes I'm just going to MIG it, it's just too weird an area to try and TIG for someone without a lot of skill with a TIG (me).

Once that is done it'll be back to working on the seat pan itself. It needs an edge all around it so that it won't just immediately cut the cover that goes on it. Also I need to have a way to attach the cover to the seat pan, and make a cover too for that matter but a co worker has pledged assistance with that. I was originally going to do that myself but it's been a long time since I've sewn anything and not only did he say he'd do it, he actually asked to do it. So that's cool. Black cover, silver stitching in a diamond pattern if you're curious.

And that's that, after.....about 11 hours of work for the weekend on top of several nights staying a couple hours after work last week I've basically got something that looks like a frame and pan with a cowl behind it that mimics the shape a cross section of the fuel tank. Was thinking about tail lights on the way home this evening and I think I'm leaning toward the more modern looking LED light I saw a couple days ago but that could still change. I need to get the bike back to work too so I can get the thing centered.

I made a video of it too, it shows everything better than simple pictures I think.
 
Bike pictures, weirdly proportioned looking bike pictures. Was eventually able to get some work done on things tonight after helping a coworker with his CRV for a while, and took the time to fix (redo) the mounting. I realize now that I should have made the seat rails wider, I wasn't thinking at the time and made them the same width as the frame rails of the chassis not thinking of the seat hinge brackets being wider than the frame rails. What that ends up meaning is that the hinge brackets stick out past the skin of the seat frame and I'm going to have to do some sort of blister/cover over them to clean the look up some.

The other thing I found out tonight was that I had to raise the seat 3/10 of an inch to get it to sit flat. When I skirted the frame I didn't have the bike there and hadn't thought to measure it previously. It looked like it was going to be perfect at 3/4 inch below the seat rails, found out that the seat was binding on that skirt as it was swinging down though. So I ended up cutting the mounting that I had done back when it was just the seat rails out and doing it over, but now the seat is centered over the chassis and sitting flat. I'll have to get some rubber bumpers on it at some point and I need to fit the hook for the latch.
IMG_20181107_181804.jpg

Amusingly, all the pictures are from when I was figuring out what I needed to do to get the thing flat, I don't have any of it sitting on the freshly made mounts. I got to this point while there were other guys left in the shop so I got their opinions on things, and the word is it looks good and sits well with the small pad. Irritatingly the pictures make it look bulbous and ungainly despite not getting that impression in person. The picture from the left side especially makes me feel that way, I can only think it's a result of the seat being all bare steel and the picture being two dimensional.

One of the guys is a crotch rocket rider, and he remarked at at high seat height of the bike saying that he felt it was uncomfortable trying to flat foot it saying that to get his feet flat the seat dug into his thighs. He remarked it was weird that it sat higher than his CBR954RR. The other guy isn't a rider, but said while he could flat foot the bike it also felt like the seat was digging into his thighs while doing so. Weirdly despite being roughly the same height as the first and an inch or so shorter than the other, I can sit on the seat flat footed and have a slight bend in my knees and don't find there to be undue pressure on my thighs.

Something all three of us agreed on was the pegs should stay where they are. Sitting on the seat and putting your feet back by where the peg mounts bolt to the frame bends my legs uncomfortably and it lowers the knees off the sides of the fuel tank. At some point I'll try to get a picture or short video showing the riding position for me. I sit up close to the tank when I'm on the bike, despite this being a "Standard" the foot position doesn't feel altogether different from my F4i though so:shrug:

I got a tail light on order so it'll be nice to get that in and get it fitted. Keeping my fingers crossed that it is what I'm expecting it to be. Amazon order coming from China though so a bit nervous.
 

Attachments

  • IMG_20181107_181825.jpg
    IMG_20181107_181825.jpg
    177.3 KB · Views: 191
  • IMG_20181107_181856.jpg
    IMG_20181107_181856.jpg
    176.6 KB · Views: 205
  • IMG_20181107_181717.jpg
    IMG_20181107_181717.jpg
    192.6 KB · Views: 208
It looks really good Nash - very nicely fabbed.

One small suggestion - when you doing the latch etc, I would try to make it a locking latch (i.e. with a key) and also I'd try to incorporate some sort of helmet lock. Many modern bikes - even big ones, don't have a helmet lock and that is a PITA in my experience.

When I stop somewhere, I have never felt quite right about just leaving my helmet draped over the mirror or sitting on the seat.

Anyhow - keep on keepin' on!

:popcorn:

Pete
 
Last edited:
I get enough undesired attention when I'm on my F4i, people walking down the street wanting you to rev it or wheelie it or who knows what all other foolishness. I just laugh and shake my head.

As for the helmet lock, that's something I've never given any thought to that because in riding twelve years I've never used one. I'll take a look at it and see what I can do, I can see it eventually coming in handy sometime and there isn't any downside to having one. Getting the seat to lock is more involved because the factory seat didn't. Could be as simple as a cut in the handle with a loop going through it and a small padlock. I've always just carried my helmet in with me when stopping places in the past.
 
A friend of mine used to use 'leg irons' (kinda like big handcuffs, with a longer chain) to lock both his helmet (a full-face) and jacket (through the sleeves) to his bike. Badass and effective... :pimp:
 
Your doing a great work on your seat. I do wonder why it's not utilized as a holding compartment? Documents, gloves or whatever. Or did I miss that?
 
I'm going to move the battery and all the electrical bits that are between the carbs and rear fender up into there. The seat sits on the same side hinge mechanism as the factory seat so you can flip it up for access to everything beneath it, no need to put an access panel in it.
 
Back
Top