XS2 Survivor resurection.

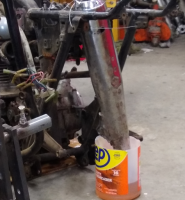
Get yourself some of this and apply to the rust. It will loosen it right up. If you don't believe me go get some put a chromed rusty part in it and see what happens after an hour. Wont touch the chrome. Ive used it on a lot of my chrome rusty parts for this bike. zoom in on the shocks. they were covered in rust.
https://www.instacart.com/landing?p...MIgf2hv7-p8wIV8nxvBB3lkwF4EAQYASABEgKvC_D_BwE
cb550.jpeg
 

I would try give it some Chemical ..I mostly use regular oil
and then heat and / or just tapping on the outside of the circumference
Holding on the backside with something like those
very common in sheet metal forming

https://verktygsboden.se/riktjaern-...MIot6Nhtyp8wIVgpGyCh1wZgs6EAQYCCABEgKO8_D_BwE

In this case a large hammer on the backside can be used
Starting with a soft hammer ( Wood / Rubber / Plastic ) avoiding marks
Using hard hammer if needed it will definitely loosen it but the problem is not to overdo it
Just so much it comes loose and the crown end can be used to unwind it
 
@YamadudeXS650C thanks for the muffler gun suggestion. Used a blunt tip and it worked on the left side. A little file work and the nut will be OK.
upload_2021-10-1_16-30-47.png

Right side no lucks. Trying a chemical treatment. Milkstone remover(50% phosphoric acid) and water. Have used it on fenders and rims, it does a pretty good job. If this and muffler gun don't work it will get cut tomorrow.
upload_2021-10-1_16-39-29.png

Right side muffler has a rust hole on the very bottom. Exploring possible fixes. Seems solid around the hole. I have a spare left but not right. :(
Would like to use this one as it is original to the bike. Would rather not weld on it. Thin and chrome. Thinking of riveted patch with high silver content silver solder.
upload_2021-10-1_16-41-5.png
 

Attachments

  • upload_2021-10-1_16-39-14.png
    upload_2021-10-1_16-39-14.png
    589.3 KB · Views: 102
@YamadudeXS650C thanks for the muffler gun suggestion. Used a blunt tip and it worked on the left side. A little file work and the nut will be OK.
View attachment 199106
Right side no lucks. Trying a chemical treatment. Milkstone remover(50% phosphoric acid) and water. Have used it on fenders and rims, it does a pretty good job. If this and muffler gun don't work it will get cut tomorrow.

View attachment 199108
Right side muffler has a rust hole on the very bottom. Exploring possible fixes. Seems solid around the hole. I have a spare left but not right. :(
Would like to use this one as it is original to the bike. Would rather not weld on it. Thin and chrome. Thinking of riveted patch with high silver content silver solder.
View attachment 199109
I have a couple similar holes on my '82 Heritage Special muffs.
I used a small patch of
J-B Weld Extreme Heat High Temperature Resistant Metallic Paste
and it lasted one year.

j-b-weld-specialty-anti-slip-tape-37901-c3_600.jpg
 
I have a couple similar holes on my '82 Heritage Special muffs.
I used a small patch of
J-B Weld Extreme Heat High Temperature Resistant Metallic Paste
and it lasted one year.

j-b-weld-specialty-anti-slip-tape-37901-c3_600.jpg
I may be old school. I like the thought of a mechanical repair. Patch and Silver solder. Never been a big fan of JB stuff. It may be a good replacement for Silver solder. Thanks.
 
Kind of late and lazy updating. I ended up cutting the muffler nut off. With a unsteady hand and someone else's luck I was able to do it without touching the threads on the muffler.
upload_2021-10-25_17-24-39.png

So with the exhaust off I decided to clean the exhaust up. It has a lot of patina (rust).
upload_2021-10-25_17-28-42.png

Tried @jetmechmarty suggestion about Quick-Glo and it works very well. Thanks Marty!
upload_2021-10-25_17-30-10.png

Pipes and mufflers finished.
upload_2021-10-25_17-32-46.png

Enough for this post. Another to follow.
 
Kind of late and lazy updating. I ended up cutting the muffler nut off. With a unsteady hand and someone else's luck I was able to do it without touching the threads on the muffler.
View attachment 200423
So with the exhaust off I decided to clean the exhaust up. It has a lot of patina (rust).
View attachment 200425
Tried @jetmechmarty suggestion about Quick-Glo and it works very well. Thanks Marty!
View attachment 200426
Pipes and mufflers finished.
View attachment 200427
Enough for this post. Another to follow.

Looks like new! :geek:
 
After getting the exhaust done I removed the front fender and wheel. Cleaned a waxed front fender and stays. Fender cleaned up nicely.
upload_2021-10-26_15-4-1.png

upload_2021-10-26_15-8-41.png

Broke now the front wheel.
upload_2021-10-26_15-10-5.png

Cleaned and waxed the rim. Tried to save the spokes but some would not cleanup. Bead blasted the spool, little bit of polishing and installed new bearings. New stainless spokes and laced it up. Looks ok.
upload_2021-10-26_15-14-28.png

upload_2021-10-26_15-15-4.png

And yes I did put the seal in for the speedo drive. Tomorrow the next installment.
 
Looks a lot better than OK! :geek:
I really like the way it came out. I did no polishing on the center part of the spool and the concave part on the outside. Just glass beaded and rubbed down with Blue Magic. Other parts lightly buffed. Thought about having it Cerakoted but since I'm not sure you long I'm going o keep it I don't want to make it harder for someone to do a proper restoration.
upload_2021-10-26_17-50-53.png
 
Time for another installment. I have to do this resurrection differently than I would like. I would rather tear it down to the frame and go from there. Can't do that right now as I do not have enough room to store all the parts. So I have to do it in sections. Since I started at the front and the wheel and fender is done time to take the rest of the front end apart. Something had been bothering me and I couldn't put my finger on it. I finally saw it. Surprised one of you Eagle eyes didn't point it out.
upload_2021-10-27_18-34-46.png

Out of time for today. Anybody see something wrong in the pic?
 
Last edited:
Back
Top