XS650 Clutch Pushrod experiment & tidbits

There is another method that has come to light that involves collapsing the bushing by pounding a sharp object into it just to the side of its split. I haven't tried this yet but will investigate next time I do one. Honestly, I can't recommend it yet.

i will try this
 
It has been mentioned that this new rod eliminates clutch adjustment as you ride. I have the one piece steel rod and with proper adjustment I don't have to adjust as I ride.
I have a short arm worm from a later model on the 75 now. I had a Mike's worm with the long arm with two holes and used the inner hole. These arms set up this way with the cable attaching close to the worm open the clutch farther than others. This helps with the adjustment issue.
Keeping the cable and worm well lubed helps too.
Leo
 
The other 3 bimetal rods, plus the 1-piece 7075 rod are going out to DogBunny. He and his co-conspiritors perform daily urban battle on the hot streets of Austin, so these rods will experience a proper flogging. Looking forward to some critical reviews here, don't hold back, guys. Would like to achieve at least equal thermal expansion performance to the original 2-piece system.

Ordered some more 304 stainless and 7075t6 rods for another run at the version2 design.

Spent much of yesterday tooling around the tourist congested streets of Fredericksburg. Inching along in 83°F packed/stalled traffic finally yielded some hot engine experiences, and the version 1 rod I'm running finally showed some slackening, maybe an extra 1/2" at the lever end, and the clutch engaging zone starting at about 1/2 lever travel. Interestingly, as soon as I got up to about 20 mph, all that slack 'disappeared'..?..?..!

Still running with the 'ultimate worm', with its 1.65" lever-arm/clevis-hole length. Now's the time to shorten it to 1.5", as recommended by RetiredGentleman, and see if it reduces this perceived slackness a little...
 
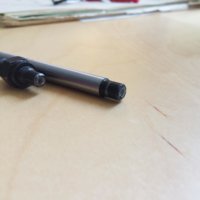
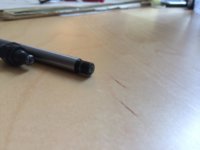
Got my new, fancy, bi-metal pushrod in today! Photographed is the 650Central pushrod I pulled out, which has about half a "season" of riding on it. Look at those ends... a great way to get shards of metal in my bike. Some of those shards (for lack of a better term) were coming peeling/breaking off on my finger tips. How disheartening.

Anyway, haven't even started up the bike yet. After I get some time in the saddle I will report my findings.

Cheers!
Adam
 

Attachments

  • IMG_4739.jpg
    IMG_4739.jpg
    90.1 KB · Views: 421
  • IMG_4740.jpg
    IMG_4740.jpg
    110 KB · Views: 410
Got my new, fancy, bi-metal pushrod in today! Photographed is the 650Central pushrod I pulled out, which has about half a "season" of riding on it. Look at those ends... a great way to get shards of metal in my bike. Some of those shards (for lack of a better term) were coming peeling/breaking off on my finger tips. How disheartening.

Anyway, haven't even started up the bike yet. After I get some time in the saddle I will report my findings.

Cheers!
Adam

That is really bad wear! The pushrod appears to be just mild steel with no hardning layer???

Adjusting screws normally never show any wear at all, so that is strange also!

I inspect my pushrod ( single long rod) and adjusting screw each year, and never see any wear at all.

Your adjusting screw can't be stock OEM, because they don't wear like that. I'm guessing both the push rod and adjusting screw you have, began there life in Taiwan, sold to Mikesxs, then re-sold to 650central.

You should contact MMM at 650central and voice your concerns.
 
I have to order a chain, pushrod bushing, sprocket seal, some jets, etc today, so I will definitely bring it up to him.

I was surprised, as well, by the wear on all three ends. My worm gear didn't have a plethora of grease, but it wasn't dry, either. I dunno, I repacked it with dialectric tuneup grease (only thing I had on hand). I'll check again in a month or so. Pretty lame.
 
It has been mentioned that this new rod eliminates clutch adjustment as you ride...

Leo, the 'slackening' problem mostly occurs in hot weather urban slow stop-and-go traffic, easily experienced down here in the south. It's negligible in cooler weather with some airflow. The factory 2-piece rod, with the longer aluminum rod, seems to mitigate much of this heat-slack, and a 1-piece version of this bimetallic rod was implemented in the XS500's. This experiment simply replicates the XS500 setup...
 
...I was surprised, as well, by the wear on all three ends...

I'll have a close look at your old adjuster after it gets here. Old posts here by XSJohn discuss the 'dimpling' mod to improve clutch action and pushrod seal life.

http://www.650rider.com/index.php?name=Forums&file=viewtopic&t=5364
http://www.650rider.com/index.php?name=Forums&file=viewtopic&t=6175
http://www.650rider.com/index.php?name=Forums&file=viewtopic&t=7855
http://www.650rider.com/index.php?name=Forums&file=viewtopic&t=6331
http://www.xs650.com/forum/showthread.php?t=362

I'm sure that many have implemented this mod. It might have also been done to your old adjuster by a previous owner, will try to find out. It will be resurfaced anyway, so then I can determine if it is 'soft'...
 
NO! Are you serious!? I even wrapped the screw in something soft so it would be less likely to bust through the envelope. What a jip! Really sorry about that. PM me if you'd like me to paypal you the cost of an adjuster screw.

Yesterday I had time to get my new chain on and address a couple other things under the left side cover. I haven't put a lot of miles on the new rod yet, but I can say that there is no strange wear on the end of it.

The rod feels great. Noticeably less slack after riding. It's going to be 100+ when I go for a ride on lunch. I'll let you know how it goes.
 
Nah, don't worry about it, happens alot out here. They're easy to make, just wanted to examine the end as a postmortem of your old setup.

Heard that Cali is going to be the 'hot' zone this year, so you are definitely an 'evaluator' for this mod. I still expect it to slacken up a little, wondering how much and if it's tolerable...

It was over 100 yesterday when I went for a short ride to lunch. When I got back I could barely get it in neutral. I know this is common with XS650s, but it's never been a problem for my well maintained bike :thumbsup:). More so, I could barely move the shifter. Like, my foot/ankle didn't have the strength to pull it up, because it was jammed. I'm hoping this was an anomaly. If not, I doubt it will have anything to do with your rod.

I re-adjusted the worm gear screw a few hours later, when I had a few free minutes, for safe keeping, since I had the side cover off twice while replacing the chain.

I'll ride today. Hopefully all will be right in the world.
 
Before reinstalling the left side cover, cleaning and regreasing things in there may help. Do the clutch cable service, especially lubing the cable elbow area. Clean (I use old toothbrushes) the worm and worm body screw ramps thoroughly, inspect the worm screw endpoints for burrs and bent/sharp edges that may gouge into the plastic body, followed by a good greasing (I use a teflon based grease there). Then, cleaning and regreasing the shift shaft and the support hole in the cover may help shifter action.

The method I use for adjusting the clutch cable is a little different from the traditional method.

Starting with a cold engine:
First, adjust the handlebar cable adjuster all the way in, gets maximum slack, lengthens cable.
Then adjust the sidecover pushrod adjuster screw to get the desired handlebar lever free-play, about 1/4" - 1/2" at the lever end.
Snug down the lock nut, not hard, just snug, maybe 4-6 ft-lbs. Doesn't take much to hold it, and want to avoid having a stuck adjuster nut.

With other brands of ball/ramp type actuators, there is a definite beginning-to-end zone of operation, and the proper adjustment for these match the original XS adjustment method.

However, the XS650 clutch worm doesn't have this type of range restriction. The worm does have a 'bottom' of its travel, but that position usually is with the actuator arm so far forward that the stock clutch cable will never reach, it's too short for that. Plus, you want the lever travel zone to be at the better leverage angles, starting just a bit (about 3/8") before where the actuator arm and the cable form a right (90°) angle. The stock clutch cable is a little short, and having the handlebar adjuster run all the way in will allow you to be in this ideal zone.

The original adjustment method is to run the pushrod screw adjuster in until resistance is felt (all pushrod slack removed), then back out about 1/4 turn, presumably to remove compressive load on the pushrod group (adjuster, pushrod, balls, mushroom rod, pressure plate), so that the clutch can achieve full lockup, avoiding the 'foot riding the clutch' scenario that wears out car clutches.

However, the second half of the factory adjustment method has you adjusting the handlebar lever cable adjuster to get proper lever slack. This not only moves the worm lever arm to a less advantageous leverage zone, but removes the slack that you established at the worm adjuster.

Try it yourself. Adjust the clutch per factory method. Then return to the worm adjuster and see how much slack is left there. I've found it to be virtually nonexistent. So, to regain the lost cable length, came up with this revised method to maximize clutch actuation.

Try this method, and make note of your clutch 'feathering' zone (between where it just starts to grab and achieves full lockup), for both cold and hot conditions. An ideal feathering zone would be at the last 1/3rd of lever travel, and a tolerable zone occurring at the last half of lever travel.

If your cable attach point is at the outer of the long-type worm lever, or if you've installed the MikesXS replacement actuator assembly (which has a different/gentler screw ramp), this feathering zone will widen a bit. Desirable for some (softer engagement), not so for others (too mushy).

Bottom line is that to ensure good clutch disengagement, it's best to have the feathering zone occur only in the last half of lever release. Otherwise, you may not get enough clutch separation to find that elusive neutral.

Other experiments I plan on trying, which may influence finding neutral, involve the other side of the engine, like square-fit of mushroom rod to the pressure plate, polishing of the shift forks guide bar and such.

Outside of that, there's the usual suspects, like oil selection, clutch plate condition, plate-tab gouging in the engagement slots/grooves, sharp edges of the plates' tabs, worn or improper assembly of the clutch hub washers, worn double-row mainshaft ball-bearing (behind the clutch), imbalanced clutch springs, maybe more.

I hope your situation is limited to the left cover, worm actuator, area.
 
Last edited:
Before reinstalling the left side cover, cleaning and regreasing things in there may help. Do the clutch cable service, especially lubing the cable elbow area. Clean (I use old toothbrushes) the worm and worm body screw ramps thoroughly, inspect the worm screw endpoints for burrs and bent/sharp edges that may gouge into the plastic body, followed by a good greasing (I use a teflon based grease there). Then, cleaning and regreasing the shift shaft and the support hole in the cover may help shifter action.

The method I use for adjusting the clutch cable is a little different from the traditional method.

Starting with a cold engine:
First, adjust the handlebar cable adjuster all the way in, gets maximum slack, lengthens cable.
Then adjust the sidecover pushrod adjuster screw to get the desired handlebar lever free-play, about 1/4" - 1/2" at the lever end.
Snug down the lock nut, not hard, just snug, maybe 2-3 ft-lbs. Doesn't take much to hold it, and want to avoid having a stuck adjuster nut.

With other ball/ramp type actuators, there is a definite beginning-to-end zone of operation, and the proper adjustment for these match the XS adjustment method.

However, the XS650 clutch worm doesn't have this type of range restriction. The worm does have a 'bottom' of its travel, but that position usually is with the actuator arm so far forward that the stock clutch cable will never reach, it's too short for that. Plus, you want the lever travel zone to be at the better leverage angles, starting just a bit (about 3/8") before where the actuator arm and the cable form a right (90°) angle. The stock clutch cable is a little short, and having the handlebar adjuster run all the way in will allow you to be in this ideal zone.

The original adjustment method is to run the pushrod screw adjuster in until resistance is felt (all pushrod slack removed), then back out about 1/4 turn, presumably to remove compressive load on the pushrod group (adjuster, pushrod, balls, mushroom rod, pressure plate), so that the clutch can achieve full lockup, avoiding the 'foot riding the clutch' scenario that wears out car clutches.

However, the second half of the factory adjustment method has you adjusting the handlebar lever cable adjuster to get proper lever slack. This not only moves the worm lever arm to a less advantageous leverage zone, but removes the slack that you established at the worm adjuster.

Try it yourself. Adjust the clutch per factory method. Then return to the worm adjuster and see how much slack is left there. I've found it to be virtually nonexistent. So, to regain the lost cable length, came up with this revised method to maximize clutch actuation.

Try this method, and make note of your clutch 'feathering' zone (between where it just starts to grab and achieves full lockup), for both cold and hot conditions. An ideal feathering zone would be at the last 1/3rd of lever travel, and a tolerable zone occurring at the last half of lever travel.

If your cable attach point is at the outer of the long-type worm lever, or if you've installed the MikesXS replacement actuator assembly (which has a different/gentler screw ramp), this feathering zone will widen a bit. Desirable for some (softer engagement), not so for others (too mushy).

Bottom line is that to ensure good clutch disengagement, it's best to have the feathering zone occur only in the last half of lever release. Otherwise, you may not get enough clutch separation to find that elusive neutral.

Other experiments I plan on trying, which may influence finding neutral, involve the other side of the engine, like square-fit of mushroom rod to the pressure plate, polishing of the shift forks guide bar and such.

Outside of that, there's the usual suspects, like oil selection, clutch plate condition, plate-tab gouging in the engagement slots/grooves, sharp edges of the plates' tabs, worn or improper assembly of the clutch washers, worn double-row mainshaft ball-bearing (behind the clutch), imbalanced clutch springs, maybe more.

I hope your situation is limited to the left cover, worm actuator, area.
Thank you for the advice. All of the left side cover parts are in excellent shape. The clutch should be as well, as I recently serviced it. I had no problems actuating the clutch.

I'm almost certain what I felt had to do with the transmission. It was hard to get it in neutral because it was suddenly almost impossible to move the shifter. Not a good feeling.

Anyway, I'll post back if I have more problems. Haven't had a chance to get on the bike sense then.

Cheers,
Adam
 
Oh, I see, shifter jam. I had the opposite about 10 years ago, flopsy-mopsy shifter. Found it to be the factory swaged fitting of the inner lever to the shaft, it loosened up. Re-indexed it and welded it, everything else was fine.

Only thing I can think of that would be at the left side of yours would be if there were a problem with the shaft retainer clip and/or its associated thrust washer. Could check in/out play of the shift shaft, and if it frees up...
 
Hey, Ralph. So far, I guess 'No news is good news'. During the hotter 102° days, I was able to (easily) overheat my engine in stop-and-go traffic, and experienced some clutch slackness. Again, it quickly and mysteriously disappeared as soon as I was able to get up to around 15-20 mph.

I'm just finishing some mods to my lathe, including a precision collet chuck, so I can make some more pushrods. I found another alloy with better expansion and wear properties than 7075AL, just having problems sourcing sample stock.

Later this year, I plan to pull the left cover, and examine the experimental bi-metal rod, adjuster screw and cable sheath to see what's happening in there. It's hard to justify more experiments since it's working so easily now. I think I'm getting spoilt...
 
Back
Top