XS650B : Neutral Light Bulb

oyajicool

1975 XS650B
Messages
24
Reaction score
0
Points
1
Location
SO FL
My neutral light bulb has been flickering for some time. It needed a light tap on the gauge to wake up some times. But, now I think the bulb is burnt out. The light does not illuminate even the blue wire is grounded on to the engine.

How can I gain access to the bulb? I have no idea how to take the gauge off and take it apart.
What is the part number of the bulb so I can get it before taking the gauge apart?

Thank you,
Mark
 
It's been a few years, but on my '75 I think it involved a couple screws on the underside to remove the outer cover, then there are rubber covered bulb sockets that just friction fit into the underside of the gauge itself. Sorry - don't have the bulb info...

bruce
 
Here are some pics of the gauges, the first shows one cover on and the other off.
Text P1000685.jpg

Just undo the 2 nuts on the bottom, remove the case and the light holders are just there.

If the gauges are old and haven't been apart then the rubbers may be shot.
Text P1000687.jpg
 
Last edited:
Thank you, 650Skull. I just checked out your album. Those gauges show their ages, don't they.
My gauges are not too far off from yours, I think.

I rode the bike this morning. The neutral light worked for a few times. Now, I think it is more of connection problem than the burnt bulb.
 
If at one point a tap to the gauge made the light come on, then you might have a broken filament in the bulb that is connecting, then disconnecting. Or you got a connection issue inside the gauge. Best to pull it apart to check it out.

I have my '76 gauges apart, and the rubber seals were trash, but I found a decent substitute in some big O-rings I already had. They are from a seal kit for go-kart split 5" aluminum racing wheels ( I used to race).
 

Attachments

  • XS650.rebuild 001.jpg
    XS650.rebuild 001.jpg
    293.6 KB · Views: 297
  • XS650.rebuild 002.jpg
    XS650.rebuild 002.jpg
    136.9 KB · Views: 298
Last edited:
Those gauges show their ages, don't they.
My gauges are not too far off from yours, I think.
.

Yea they are an old set. If your gauges can be turned by hand easy, or have some play in the bracket, that will cause vibration and burn the bulbs out. I think it could be a cause for the main bracket breaking as well.

Rubbers are hard to get, i have been playing around with making some up myself
 
Thanks to every one. I had the gauge apart.

Those 2 of 8mm cap nuts are the ones held it together and onto the frame/ring work. I thought it was more complicated.

The rubber seal was torn apart. As 650Skull said, it was the cause of the gauge rattle for a while, which I didn't mention. I cut up a section of weather stripping and used as the rubber seal. It is working good for now.

AS for the neutral light issue, it was the burnt bulb after all. For the replacement light bulb, I used something I had on hand for a long time. It is less than a half of what is called for in the parts book. But, it is bright enough for me even in daylight.


Mark
 

Attachments

  • DSCF2895  800.jpg
    DSCF2895 800.jpg
    203.1 KB · Views: 337
  • DSCF2910  800.jpg
    DSCF2910 800.jpg
    253.7 KB · Views: 322
  • DSCF2894  800.jpg
    DSCF2894 800.jpg
    87.9 KB · Views: 340
  • DSCF2907  800.jpg
    DSCF2907 800.jpg
    204.7 KB · Views: 331
  • DSCF2903  800.jpg
    DSCF2903 800.jpg
    206 KB · Views: 329
Now the tach is secured onto its frame, it makes rattling noise as I ride.
The dial is vibrating. The needle is showing steady RPM, looks to be correct RPM, too.
I lubed the tach cable, but no improvement. Something is loose.
I would like to send it out to a repair shop and have them look at it. And, possibly, repair it.
Google search has shops, one in CA, other in MI.
Do any of members here has good experience working with them?
Do you have a shop you would like to recommend?

Thank you,
Mark
 
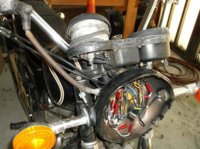
The Tac is real easy to strip down your self.

Here is a tutorial on how to remove the glass on the XS650 gauges.
http://www.xs650.com/threads/removing-bezel-from-gauges-74-83.52013/
The gauges in the tutorial are from the 76-83 plastic type but it is the same process on the 74/75 Gauges, I have done mine, (not the ones from the other album).

Once the glass is off, undo the 2 screws, either side of where the cable goes in, and the whole mechanism, face plate and all will come out.

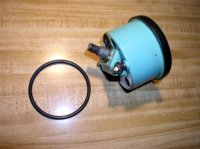
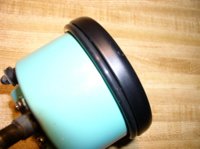
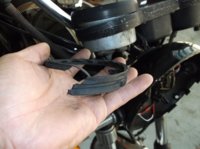
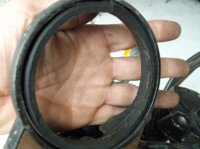
You may find the rattling is because there is no damper rubber between the cup and main bracket. Hard to see, when the rubbers are damaged, but they actually have a groove, and that groove is where the main bracket is dampened from the gauge.
When you look at the main bracket it has a protrusion that goes all the way around inside, where thew cup sits. Imagine the rubber sits over that protrusion and against the bracket top and bottom of that, so from the inside it looks to be a flat surface and the bezel sits against the top of the rubber damper, and the top of the chrome, (sometimes just painted), cover pulls up against the bottom of the damper so when the 2 nuts tighten the cup it pulls the gauge down and the cup up so it is all snug.

I hope that sounds like i saw it in my head, and you can make sense of it.

I have been fiddling with making up a ring for the top and another for the bottom that also squeezes/holds the main bracket as well. I'll take some pics later.

just got home and can't be bothered getting up right now. ...........Sorry
 
Last edited:
Thank you, 650Skull.

Saw your album again.

So, there used be rubber dampers. Now, they are worn out and gone. Is this what's happening to my tach?

I don't know if I have gentle enough hands to tackle the job, but I will give it a shot. But, what about those damper replacements? I hope I have small enough grommets in my grommet kit.
 
The dial is vibrating. The needle is showing steady RPM,

Are you describing the face plate as a dial................ If so then you will need to remove the glass, (as described in the album), to get at the screws to tighten them. A small dob of nail vanish under the screw head will stop it from coming loose again and do not over tighten as that will crack the face plate due to normal vibration
 
Last edited:
I got these bulbs for replacement bulb.

14v-3.4W, P/N 1891

2v off from spec, but these will be fine.

I don't' think I can get to it this weekend, too may other things to do.

650Skull, from out side those screws you mentioned does not appear to be loose since I don't see any chafe marks or dust it may be creating. I will know it for sure if I open it up.

I am still contemplating about sending it to a shop for professional work. The face plate (I thought it was called a dial. What do I know? English is not my first language.) needs rejuvenation to match the speedometer as it looks more crisp/sharp lines and numbers.

Mark


=================

I had another look at the face plate just now. It does look the plate itself is loose as 650Skull says.
 

Attachments

  • IMG_20150201_092309063.jpg
    IMG_20150201_092309063.jpg
    274.8 KB · Views: 297
Last edited:
You'd be surprised how much the face glass contributes to the face plate looking shabby.

My 74/75 gauges looked dull and i thought they were past the usable, in an ok situation. After cleaning the back of the glass and a gentile wipe, (be very careful or you'll damage the face), of the face plate the gauges look a million dollars, (comparatively), even if there was some heat damage around the high beam light.
 
650Skull, just wondering if you ever got around to taking photos of the dampers you were working on? I had to go into my tach and tighten the screws and of course the damper (371-83523-70-00) fell to peices. I tried finding it at several parts vendors but they all were either "out of stock" or "obsolete".

I like that big O-ring fix....but I don't have anything like that in the shop.

Thanks in advance.....Gordon in NC

1975 XS650B
and a few BSA unit singles
 
Back
Top