I don’t have the fifth overdrive on my bike, but if I had ever split the cases I definitely would add it. Doesn’t annoy me much with the low speed limit in Hawaii, but if I was back in the states on the interstate then it would be a thought. Sprocket changes are good for changing ratios, but for fifth gear I say might as well do it.
-
Enjoy XS650.com? Consider making a donation to help support the site.
XS650.com receives a small share of sales from some links on this page, but direct donations have a much greater impact on keeping this site going.
You are using an out of date browser. It may not display this or other websites correctly.
You should upgrade or use an alternative browser.
You should upgrade or use an alternative browser.
xs750 build step by tedious step, "build-along" with me
- Thread starter billy icon
- Start date
billy icon
test pilot,gunnie pig, and all around experiment
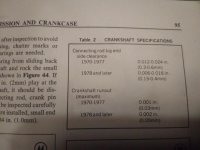
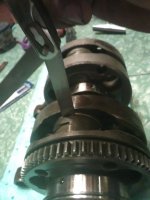
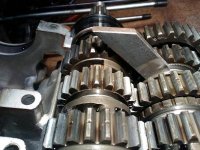
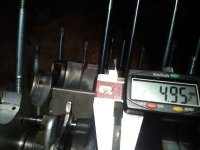
it looks like I will be jumping around a little bit here, as to keep posting at least every other day on the build, so today I cleaned the crank and bearings best I could with brake clean and compresed air then put some oil on all the surfaces, with the crank on the kitchen table I did some measurments
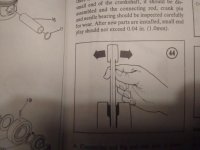
the book I have says the gap between the rods and the thrusty washers, should be 0.012-0.024 or 0.3-0.6mm and I have 0.53mm so im definatly in the specs here, and then they have a measurement for rocking the rod back and forth to check the wera of the bearing, they say the small end of the rod should not rock back and forth more than 1 mm, and Im within that spec also, couldmt get a photo of my set up with the dial indicator, maybe tomarrow, I do have a set of V blocks somewhere and I will try and include checking crank run out for the heck of it, but i havent seen one in need of straitening ,unless I rephased it, YUP I build a tool to rephase cranks, ill show it sometime soon
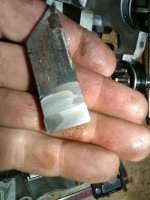
so lets go back again to the pistons and cly im looking to use, It now seem like the xs1 cyl, has been re sleved with some LA sleave ductile iron sleaves, Im coming to this conclution, because the outside dia. of the part that sticks below the cly fins, is slightly larger than any other cly ive measuered , and also when I hone them the look of the metal is slightly diferent that factory, can anyone tell me the benifits of the ductil iron? at this point the pistons only have .001 to .0015 clearance between piston and cyl wall, the book says .002 so I either hone my way there or take it to a machine shop and get it done,
notice the master link holding my feeler gauges in there holder, trick right?lol
the book I have says the gap between the rods and the thrusty washers, should be 0.012-0.024 or 0.3-0.6mm and I have 0.53mm so im definatly in the specs here, and then they have a measurement for rocking the rod back and forth to check the wera of the bearing, they say the small end of the rod should not rock back and forth more than 1 mm, and Im within that spec also, couldmt get a photo of my set up with the dial indicator, maybe tomarrow, I do have a set of V blocks somewhere and I will try and include checking crank run out for the heck of it, but i havent seen one in need of straitening ,unless I rephased it, YUP I build a tool to rephase cranks, ill show it sometime soon
so lets go back again to the pistons and cly im looking to use, It now seem like the xs1 cyl, has been re sleved with some LA sleave ductile iron sleaves, Im coming to this conclution, because the outside dia. of the part that sticks below the cly fins, is slightly larger than any other cly ive measuered , and also when I hone them the look of the metal is slightly diferent that factory, can anyone tell me the benifits of the ductil iron? at this point the pistons only have .001 to .0015 clearance between piston and cyl wall, the book says .002 so I either hone my way there or take it to a machine shop and get it done,
notice the master link holding my feeler gauges in there holder, trick right?lol
Attachments

billy icon
test pilot,gunnie pig, and all around experiment
for those following along, I took the cly. to a very reputable machine shop , where they are going to power hone the cly with a "CT10" i believe the machine is called, "power hone" is what its called and if the cly was even.001 eg shaped it would cure that, although I don't believe it to be, anyways I'm having it hones to gett PERFECT cly to piston clearances, and I already knew this but in case some of you didn't, there is a "calculation" to get your cyl to piston clearance, and it goes by the sise of the bore....it goes like this, if your bore is 75mm and the clearance is .002 as a stock engine would be, then as you go up in piston size the clearance would get larger, not a lot mind you, and basically we came to a final number of .0025 .for an 80mm bore. that's what a 750cc is.... pretty cool right down to the nats ass... and another piece of info I already knew but wanted to share after visiting with the pro, is that different materials expand differently, for example, a "forged" piston like a wiseco will expand more when warmed up, than say a cast piston like im using in this build, ...Pretty interesting stuff, to me at least .... smater every day EH?
I am very confident in the build so far, and I havent even started to put it together... I ordered the 5th overdrive set... carb spacers.. and a master link for the cam chain..and two sump strainers, (suposedly improved) ... hope the parts come soon. I will keep the thread going with bits and pieces of imfo as the days go by. heres the hone ck10 they used

I am very confident in the build so far, and I havent even started to put it together... I ordered the 5th overdrive set... carb spacers.. and a master link for the cam chain..and two sump strainers, (suposedly improved) ... hope the parts come soon. I will keep the thread going with bits and pieces of imfo as the days go by. heres the hone ck10 they used
Last edited:
Smart decision taking it to the machinist to get it perfectly bored you definitely won’t regret it. I hate kicking myself in the butt later because I tried to save a buck.
You'll want to closely examine the OverDrive 5th gear's dog sockets, looking for undercutting.
http://www.xs650.com/threads/overdrive-5th-gear-dropping-slipping-out-to-neutral.41539/
http://www.xs650.com/threads/overdrive-5th-gear-dropping-slipping-out-to-neutral.41539/
billy icon
test pilot,gunnie pig, and all around experiment
okay im trying to post every day on this build, (as the crankshaft turns, season 1 episode ?)
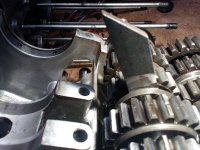
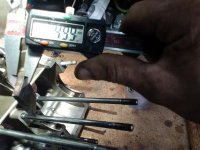
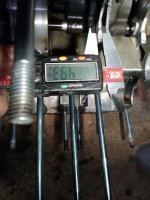
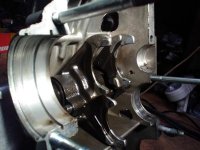
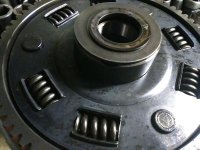
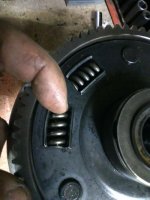
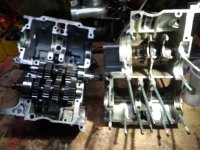
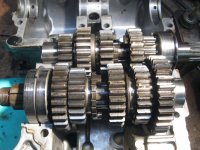
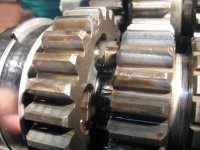
today I wanted to check the thickness of the shift forks... odd the book gives no thickness measurements, hmmm. now i knew this engine was very low miles but I keep finding stuff with such little wear im amazed, so instead of looking for a measurment the book says it whould be I measured the forks (THEY LOOK brand new), and then making a piece of metal that just fit inside the forks hone (shift ring) then measureing the piece of metal and doing some math, herres some photos, oh also the springs on the back of the clutch basket are all good, not only is none of them brocken but there is still tention on them, usualyy IF there not brocken they are atleast shorter then the space they live in,,, interesting again is the brushes are twice as long as the little line scored in them from the factory to let you know there worn, Ive only put new brushes in once and I dont think they where any longer than these
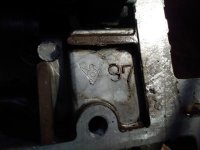
I also found this little stamp or mark inside the case that looks like a little bird is interesting... ATENTION TO DETAIL SQUARED hehe
today I wanted to check the thickness of the shift forks... odd the book gives no thickness measurements, hmmm. now i knew this engine was very low miles but I keep finding stuff with such little wear im amazed, so instead of looking for a measurment the book says it whould be I measured the forks (THEY LOOK brand new), and then making a piece of metal that just fit inside the forks hone (shift ring) then measureing the piece of metal and doing some math, herres some photos, oh also the springs on the back of the clutch basket are all good, not only is none of them brocken but there is still tention on them, usualyy IF there not brocken they are atleast shorter then the space they live in,,, interesting again is the brushes are twice as long as the little line scored in them from the factory to let you know there worn, Ive only put new brushes in once and I dont think they where any longer than these
I also found this little stamp or mark inside the case that looks like a little bird is interesting... ATENTION TO DETAIL SQUARED hehe
Attachments
-
 fork gauge 1.jpg26.5 KB · Views: 167
 -
 fork gauge3.jpg23.7 KB · Views: 140
 -
 fork gauge5.jpg31 KB · Views: 179
 -
 fork gauge4.jpg20.7 KB · Views: 184
 -
 fork gauge6.jpg35.8 KB · Views: 146
 -
 forks1.jpg15.6 KB · Views: 147
 -
 fork gauge7.jpg23.6 KB · Views: 151
 -
 forks.jpg19.7 KB · Views: 157
 -
 clutch spring.jpg20.6 KB · Views: 132
 -
 cluthc.jpg27.1 KB · Views: 156
 -
 fork gauge8.jpg24.5 KB · Views: 146
 -
 fork gauge9.jpg14.5 KB · Views: 150
billy icon
test pilot,gunnie pig, and all around experiment
billy icon
test pilot,gunnie pig, and all around experiment
so i got a few more pieces and parts for the build today from the mailman, no not YoU Mailman , from my mailman, lol
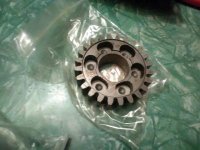
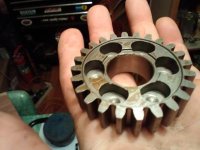
I got the master link for my D.I.D. timing chain, and the 5th gear overdrive, and a couple carb spacers, not sure if ill use the spacers or not, but they got me with the free shipping over a hundred dollars and the spacers where in the clearance department at mikes, thats the cutest master link ever


I got the master link for my D.I.D. timing chain, and the 5th gear overdrive, and a couple carb spacers, not sure if ill use the spacers or not, but they got me with the free shipping over a hundred dollars and the spacers where in the clearance department at mikes, thats the cutest master link ever
billy icon
test pilot,gunnie pig, and all around experiment
g.g.gary mentioned looking for undercut on the 5th gear and he sent a link to a thread, I got soo lost in that thread, maybe someone can chine some light on where he is speaking of , im used to the term undercut when you weld to hot and leave a crevasse next to the weld
it definatly had a chinese smell to the bag it was wrapped in, and I can spot chinnese cosmoline anywhere, it has a little bit of grinding dust mixed in right from the factory
it definatly had a chinese smell to the bag it was wrapped in, and I can spot chinnese cosmoline anywhere, it has a little bit of grinding dust mixed in right from the factory
Attachments
Post #44......has a good pic of the dog
http://www.xs650.com/threads/overdr...pping-out-to-neutral.41539/page-3#post-418898
Ratranger...fist couple of posts.
http://www.xs650.com/threads/undercut-1st-gear.54503/#post-590014
http://www.xs650.com/threads/overdr...pping-out-to-neutral.41539/page-3#post-418898
Ratranger...fist couple of posts.
http://www.xs650.com/threads/undercut-1st-gear.54503/#post-590014
billy icon
test pilot,gunnie pig, and all around experiment
ok so we are talking about the shape of the "curve" on the male protruding part that goes into the female hole of the mikes xs 5th gear overdrive, and im looking to make sure it has the same shape where it fits in right?
and if not I figure a way to match it up, say with valve laping compound and "BY HAND" engauginf and disengaging the dogs in and out of the mikes part? maybe im overthinking it, Im sure when I slide it in tomarrow and try to shift the gear over by hand I will feel what I need to feel? oh man that sounds bad
and if not I figure a way to match it up, say with valve laping compound and "BY HAND" engauginf and disengaging the dogs in and out of the mikes part? maybe im overthinking it, Im sure when I slide it in tomarrow and try to shift the gear over by hand I will feel what I need to feel? oh man that sounds bad
billy icon
test pilot,gunnie pig, and all around experiment
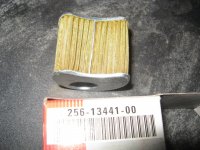
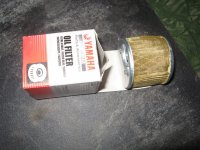
i just wrote a bibles worth of a post and accidentally hit "inbox" tried going back, nope its gone baby gone.. ill try again tomorrow , new filter , and 5th installed, I have a lot of very good info about the mikes Chinese 5th overdrive gear( the greasy and gritty bag it came in literally said product of china). I will share my findings as soon as I get over typing for an hour just to loose the post 
new genuine yourmama oil "filter"
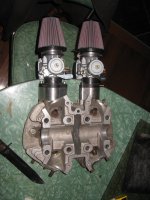
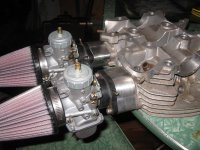
mocked up carb spacers new boots with barbs and K&N filters, oooo fany pants lol
5th gear overdrive installed (very detailed info to come on this)
new genuine yourmama oil "filter"
mocked up carb spacers new boots with barbs and K&N filters, oooo fany pants lol
5th gear overdrive installed (very detailed info to come on this)
Attachments
-
 IMG_0008.JPG286.2 KB · Views: 118
 -
 IMG_0009.JPG241.7 KB · Views: 123
 -
 IMG_0013.JPG182.8 KB · Views: 141
 -
 IMG_0012.JPG198.3 KB · Views: 113
 -
 IMG_0011.JPG159.7 KB · Views: 159
 -
 IMG_0009.JPG241.7 KB · Views: 141
 -
 IMG_0008.JPG286.2 KB · Views: 120
 -
 IMG_0004.JPG189.1 KB · Views: 124
 -
 IMG_0005.JPG214.7 KB · Views: 154
Looking forward to reading about the 5th gear.
To avoid future issues regarding long posts what I do when I have a long descriptive post to write is type it up in MS Word first. This had the added benefit of not having to type the whole thing up in one go, and makes proof reading easier. Just my 2c.
To avoid future issues regarding long posts what I do when I have a long descriptive post to write is type it up in MS Word first. This had the added benefit of not having to type the whole thing up in one go, and makes proof reading easier. Just my 2c.
billy icon
test pilot,gunnie pig, and all around experiment
oh boy, so the transmission in my truck, that I NEED everyday blew up, I put a 92 ford f250 ZF 5speen tranny in my 79 ford with a 460, it was hard to shoe horn in in the first place, but then I put shorty headers on it dual exauhst ,crossover pipe ect. so today I had "help" pulling the tranny and before I could do that I had to drop the entire exhaust(interfered with the bellhousing, then to clear the firewall had to remove the motors mounts, OH but I can no longer remove the motor mount bolts cuz HEADERS YAY, had to remove both headers (some bolts imposible to put a tool on... then remove the motor mounts theennnn. still wont come out... had to drop both radius arms and the frame crossmember, not the one under the tail of the tranny, the one in front between the I beams... and stillll. had to shoe horn on it for over an hour... EEEERRRRGGG! long story long I got it out, 5th gear is going to be way more apreciated after this. I rebuilt a craigslist tranny and it goes back in later when I have called the F*&K down... oh wait Im suposed to be givin my update on XS659 5th gear lol. ok where was I?....
billy icon
test pilot,gunnie pig, and all around experiment
is there a way to doodle in a post so I can explain myself with dwawings?
billy icon
test pilot,gunnie pig, and all around experiment
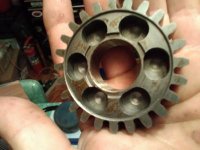
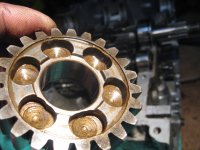
ok wow, so I have found many things out that I have heard mentioned here, and Im curious what you guys think? Obviously the "male" end of the dogs that go in the holes on 5th gear are "tapered" this is to ensure it stays in gear when "Load: is aliped to the gears...n now what I spent this evening doin is taking lots and lots of different measurements from both the factory 5th gear and the mikes xs 5th overdrive gear, the width of the mikes gear is slightly larger I could fit a .012 feeler gauge between the factory gear and the washer under the snap ring... and a .006 with the new mikes xs gear, not a problem there, kinda good IMHO.... then the inner diameter of the hole in the center was slightly smaller than advertised, but slid on nicely and spins very smooth, the machining in there is good and clean... now on to what weve all been waiting for the "dog holes"....now before I continue, I was informed by a member on this forum that my posts are hard to read and hard to understand, I apologize for my horrible grammar, and my drawings here are even worse.... so bear with me, we will get there, or at least I will...
so the comment by GGGARY was to check the gear for undercutting? I didn't really know what he meant but I assume he meant to look and see if the "dog holes" where tapered inside ... to match the taper to the "male dogs" protruding from the gear next to 5th gear... and so i took some measurements as I said and couldnt find that taper in the holes, neither on the stock 5th or the mikes 5th overdrive gear... I did do what I would call a common sense test ... i engaged 5th gear with the factory 5th in place and put a load on it with my hands and tried to make it "slip" or "jump" out of gear, and then changed out the gear for the mikes 5th and did the test with my hands again, and to the "feel" of it, the mikes xs is a better engaging "dog" than the factory gear,
here are my thoughts
1 if the hole is not tapered like the dog then under load it would only be the tip or edge of the dog applying pressure, ya know what im sayin???
2 them machining process to taper those holes does not look to have been done, yet I am capable and have the tooling to do so.
3 should i make them match, IE the taper of the dog and the inside of the hole?? or am I overthinking this, I have read some treads on 5th poping out of gear and it would be because of this reason,
here are some crappy scetches of the two exsamples, from what I can tell there in not taper in the hole of the factory gear, I have been wrong before, anyone chime in and let me know
Attachments


Last edited:
billy icon
test pilot,gunnie pig, and all around experiment
anyone?... Gary? where's g g gary, lol..... OOPS i ment wheres to many xs1s. that who i need to chime in
Last edited:
billy icon
test pilot,gunnie pig, and all around experiment
does any one have an opinion on this most recent suject, the dog holes, do you think they are larger at the bottom of the hole on the factory gear??
anyone? lol
did I scare you guys away with my OCD?
anyone? lol
did I scare you guys away with my OCD?
")
billy icon
test pilot,gunnie pig, and all around experiment
Jim, im sure you understand thou, Ive been trying to measure the inside of the holes, ai need something like calipres wit ninty degree tips, and I will definatly share my findings,
any backyard ideas to measure the bottom of the hole, I had the idea play dough but it would squish when pulling out...ooh I could fill it eith silicone, then pull it out and measue..hmm
any backyard ideas to measure the bottom of the hole, I had the idea play dough but it would squish when pulling out...ooh I could fill it eith silicone, then pull it out and measue..hmm
Similar threads
- Replies
- 1
- Views
- 508
- Replies
- 15
- Views
- 3K