Yam_Tech314's official build thread

I really like those frame paints that from a distance they look black but up close they are something different.

Exactly my goal, Scott. Thanks for confirming that I've succeeded in making it look that way.

It definitely doesn't look black in the sun. I like that it appears to change colors.
 
I'd like some recommendations if I could...

I for sure lack the proper tools to tear down the bottom end, and I can (rarely) see a time where if I try something I'll be in over my head. That's not to say I won't figure it out though. Over the years, I've eventually accumulated the proper tools to do many things. But before that, I became a pro at using the wrong tool for the right job. Perfect example being my super rigged 2x3 and deck screw oil filter removal tool. I always figure things out, and I'm too meticulous to allow myself to put something back together incorrectly. I have plenty of storage for the clutch basket and discs, but before I crack into it, is there any real reason I shouldn't tear down the bottom end? I mean, shit, I've come this far right?

Someone wiser than myself. Please lead me in the right direction!!!
 
I've torn down lower ends on a few bikes, but with a purpose/reason (Removal of a broken gear, bad bearing, removal of the kick-starter on a race bike, vapor blasting the engine, so it had to come apart anyways, etc). It's not terribly difficult, but if I wasn't doing it for a particular reason...then I typically don't. If you're there, and want to learn and perhaps clean/vapor blast the engine cases, then go for it. But if you have no intent on doing that, and there's not signs of needing it (The lower ends on these bikes are pretty stout), then not sure it's worth it....But then again, what's the fun in that??? Heck, you may enjoy it. :)
 
Splitting the cases can be done with rudimentary tools in the "Stone Age Garage". I don't remember the thread, but it's here, someplace, in the "Tech" section... If you found suspicious chunks on the drain plugs, if you want to install a "real" 5th gear, if it developed a leak, or you're doing a re-phase. These are all good reasons. To boldy go where you've never gone before? Why not? While you're at it, do that 5th gear. Have the motor vapor blasted (it'll look like it just came out of the mold!). Take the opportunity to do all the gaskets, seals, and o-rings, so it's perfect for the spring. Just take pictures of your progress! (We're nosy, ya know? :wink2:)
 
I have done a ton of bottom end tear Downs in school, but I was always graced with proper tools and gear.

I'm for sure getting the cases blasted, because I refuse to out anything dirty in that pristine frame.

While I'm at it, what the hell is a "real" 5th gear? Lol
 
Already glad that I went with my idea to take the clutch baskets out at least, found two springs broken on the outer clutch basket gear.

Which is where THIS piece most likely came from. Looks to be the end of a spring... What do we think?
 

Attachments

  • 20191008_221716.jpg
    20191008_221716.jpg
    142 KB · Views: 134
  • 20191030_215003.jpg
    20191030_215003.jpg
    152.1 KB · Views: 167
  • 15724870166487885137105974074083.jpg
    15724870166487885137105974074083.jpg
    170.3 KB · Views: 150
The stock (OEM) 5th gear has 23 teeth. Mike's (and other suppliers, I'm sure) has a replacement, with 24 teeth. What's one stinkin' tooth, you ask? It changes your final drive ratio (overdrive). Same top(ish) speed, lower RPMs. This can also be accomplished by changing sprockets, but that changes your ratios throughout all the gears. All things the same, the "real" 5th gear only changes 5th gear.
 
There's a kit for the basket. Cant remember who sells it though....
Mikes; I just went through this. The springs are riveted into the basket and there is a set you can buy with bolts, but it's a job to remove the rivets. Luckily, my basket and clutch springs were OK, not needing replacement. (I stopped popping clutches after blowing the idler gear and housing on the tranny on my '67 Chevelle) But the metal and fiber discs were shot on the bike, even the cogs were rounded off. Marlin suggested to me to replace the thrust bearing with the new, improved one from Mikes, also, because it has 10x the needle bearings of the original. Original clutch, 48 years old... the new clutch is a little sticky, (hard finding neutral while stopped) and the new cable, a little stretchy so I have to use it and adjust the clutch cable a time or two. If you google "Mikes clutch kit", the other parts I mentioned will pop up next to the kit. Buying the kit will save you money as opposed to buying individual parts. There are other kits, available, as was suggested to me on the forum, and I also purchased a new push screw & housing assy., as the pivot arm is longer, facilitating easier shifting with two holes on the arm for attachment (a short and long mount), but the clutch didn't have enough throw as it is positioned, to detach from the mounting hole on the far end, so the shorter setting was used but the push screw is nice and new and smooth, now. And the adjustment screw is new, too. Mine was badly stripped.
 
Last edited:
Welp, the actual act of SPLITTING the cases wasn't easy. I managed to split them with a hair dryer, and a roadside car jack.

Seems like crank case technology has remained MOSTLY the same for the last like, idk 30 years? Looks like it's set up JUST like a lot of other horizontally split motors. It's a relief that it feels a bit more familiar than I thought it would .

Tonight was fun.

For now, I just bagged up the drive gears, zip tied the shafts together so that there's still order to the chaos.

Did the same with the crank. Gave it a big trash bag for a home, and stuffed it in a box until further notice. Not gonna lie... Never been this far on a teardown of one of my OWN bikes. So I don't really know where to go from here... In school we just looked at it and they said "cool. Now put it back together in the right order, and show me all your measurements for the serviceable parts..."
 

Attachments

  • 20191031_200542.jpg
    20191031_200542.jpg
    182.6 KB · Views: 130
  • 20191031_205440.jpg
    20191031_205440.jpg
    170.4 KB · Views: 140
Well, at minimum you need to do a crank runout check and check all the mains for play and roughness.
Yup. Listen to da man!
Congratulations! You're well on your way to "Journey to the Center of the Motor"! Study, study, study, and it will all make sense. One of my credos is "...the more homework you do, the fewer surprises you get..." It worked for me at work, and with the Xs. I sound like I know what I'm doing, but, I stand in the shadow of Giants. Like Jim, TwoManyXS1Bs, 5Twins, Mailman, and many, many others who actually know what they're talking about. The more I learn, the more I find out what I don't know, ya know? Marathons are won at the finish line. Keep at it, pal (as will I). One day, we'll be the grizzled gurus people turn to for answers (if we're lucky!). :bike:
 
" ... grizzled gurus people turn to for answers …" Tebo, ya got a way with words. This is the only place I know of where people actually want to hear what old men have to say! I, for one, am damn glad they say it and I'm here to hear it. ( Most of them have the patience of Job. Good thing for me!) :)
Thu
 
I also like that they're all patient enough to answer my questions, even when they know I could probably take my time and find it somewhere on the forum... They're gracious enough to send me a link and say "read it, you big dummy"

I love the "homework" I get from all the Gurus (Jim, this is mainly your saying) but it's never a bad time when I'm on here. I always get the help and guidance I've needed for oh so long. Lol

Glad to be here still.

I guess this is a good time to say that my XS will be mine for a year come mid November. If my memory serves me right.
 
Well, it's been since October.

I'm finally in a better spot financially, and will be able to quickly save up enough money to make some SERIOUS progress on this build. Time permitting, I aim to have this bike DONE by the official start of spring. Last year I timed properly for it's first ride, this year I want to make headway on it ASAP and be legal, and complete by spring. That being said, I need to focus on the motor first. Here's my plan:

Vapor blast the case parts and everything I can possibly send away to be thoroughly cleaned

Electronic ignition, no more points.

277 rephase.

Permanent alternator

Oil cooler(?) This one hasn't been thought about as much

New seals all around

Replace ALL hardware on motor aside from studs and maybe interior bolts and nuts.

New gaskets all around

New cam chain

New cam chain tensioner

One piece clutch push rod

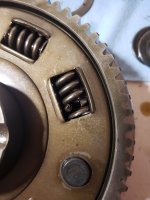
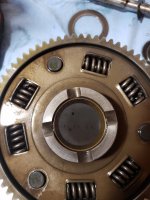
Maybe finding some help with a new clutch basket (while I'm at it 8 disc conversion?)

Polish all covers

Two into one exhaust

(Re)overhaul carbs

What am I missing? Where should I start? What else can I do to make this thing top notch? (Motor-wise)

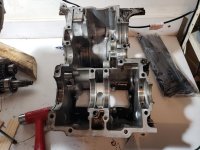
I wanted to really make sure the engine got built properly before worrying about the rest of the motorcycle.

Plan is to get motor done completely, mount it in the frame, put swingarm on and then figure out riding position from there. Buy new rear shocks, finally get some mag wheels, tidy up the front end with either new or rebuilt forks, and all the rest should fall graciously into place.

How am I doing? Just kinda thinking out loud here. Open to any and all suggestions and criticism
 
I don't see the need for a rephase. I think this is a wonderful motor just the way it is. I also don't see the need for a PMA. It's no better than the stock system, despite what PMA vendors will tell you, it's just different. Granted, you won't have stock charging system issues anymore, but a PMA introduces it's own new and different set of problems. As far as charging systems go, upgrade some of the components like the reg and rec on the stock system and I don't think you can do much better.
 
Back
Top