Yam_Tech314's official build thread

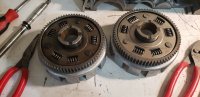
Okay, so I went and did it. Got a good chunk of parts today for the project, because why not!

Tried my best to work in order of whats needed, but as my other half always says: "you cant make progress without taking steps" so rather than wonder where to start, I just splurged and got as much as I could think to grab.

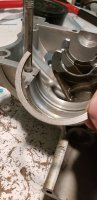
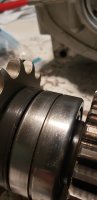
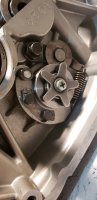
Ill have the bottom end of the motor cleaned in a hot tank in a few days, then when the parts arrive, I can put it together.

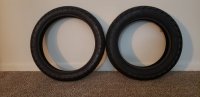
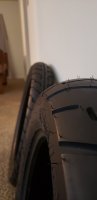
I also got tires to finish the mock up. so thats exciting.

ill have front brakes, and a new wiring harness to wrap it all up!

does anybody know what to do when buying tires for mag wheels? I know that sounds dumb, but Ive never done it, I need valve stems for the wheels now... Do I need to buy them separately??? wow, I never thought Id need to consider that lol....
 
I don’t think those mags are tubeless. Could be wrong, but I put tubes in mine so the valve stem was included there. If you use tubes, there are two nuts that come in the valve stem. One stays inside the rim while the other is outside. If you are able to go tubeless, then yes, buy the valve stems separately. Also what type of tire did you buy?
 
Come to think of it, I don't think the tires said anything about tube or tubeless.

My understanding - I might be wrong and it might be different in the US - is that tubeless tyres are always marked 'tubeless'. Otherwise, the tyre might carry the marking 'tubed type' or no marking and must be used with a tube. A tubeless tyre can be used with a tube - for example Kawasaki W650 & W800 have tubeless tyres but because these are fitted on wire-spoked rims they need inner tubes. Or the air would leak out. LOL.

So if your Shinkos don't have a marking then by that logic they are tubed type.

There are plenty of people on this forum who will know definitively whether your cast rims are suitable for tubeless tyres. It's not simply a matter of looking leak-proof because there are no holes for spoke nipples. The shape and size of the rim needs to be correct to allow the tyre to form a seal when inflated.
 
I have all that I need for starting to build the bottom end of the motor. I started replacing seals yesterday, when I realized I still hady front sprocket on the output shaft... TIGHT. Tried a ton of different things to get it off. I don't have a bench vise, otherwise wood and a vise would have made it an easy gig...

I am stumped. Tried using old chain, tried a lot of other tactics. I don't have impact tools, and I don't want to risk damaging the gears clamping it to a ton of stuff with C clamps.

On another note, My tires arrived happily, and are awaiting installation. At that point, I'll determine my ride height for rear springs, and be on my way to full motorcycle reassembly.

Mmmmm. New tire smell.
 

Attachments

  • 15911467453446776169977239403567.jpg
    15911467453446776169977239403567.jpg
    105.3 KB · Views: 153
  • 15911468122112440732150814478493.jpg
    15911468122112440732150814478493.jpg
    41.3 KB · Views: 174
Do I need more than one of these??? I feel like there should be two per groove...

One for bottom, one for top, right???
One set would ride in the bearing on the output shaft, one would ride on the one side of the crank bearing? It's been so long I can't remember... Oh my... If that's how it should be, then how on earth could I misplaced such important pieces??? Maybe they're somewhere but I'll be damned if I've found them.
 

Attachments

  • 15915746641887439337780109051990.jpg
    15915746641887439337780109051990.jpg
    138.4 KB · Views: 186
  • 15915747192876387595587791994714.jpg
    15915747192876387595587791994714.jpg
    84.4 KB · Views: 166
Now that I can replace the seal behind the sprocket, I wanna do the rest of em. But that pesky alternator rotor is in my way... Is there ANY way to get this on and off without a puller???
 

Attachments

  • 15915781800543965051520349595689.jpg
    15915781800543965051520349595689.jpg
    79 KB · Views: 179
  • 15915782058696415877319647244672.jpg
    15915782058696415877319647244672.jpg
    72.4 KB · Views: 108
Is there ANY way to get this on and off without a puller???
Nope. There's a .014" gap between the rotor and the stator. Bend it so much as a RCH and the two will rub against each other.... ruining both. Mikes XS has the pullers backordered. You can get one for about the same price on Ebay.
 
DEFINITELY gonna go with TCBros on this one. So far they've been great to me, and I need stuff they got anyways. Need brake pads, and compression fittings for the brake lines. I'll have to send my wheels to a shop and just let em' put tubes and tires on em.

My question is this... If I pull the alternator, how do I go about reinstalling it properly when I replace that seal?
 
Thanks to a forum friend, there is a puller on its way to my home.

In the meantime, I took my tires to a dealership to get them mounted and balanced. I didn't want to risk scratching up the rims, and pinching a tube, since I don't have the right equipment. I overpayed. Definitely. I also learned that the cheap tires require a lot of wheel weights because they're poorly weighted and balanced from the factory. Overall, I'm quite satisfied with the look, and height of the bike now. the feel is perfect for my body size, and it isn't going to be long now til I'm ready for some serious reassembly. Time to share some of my pics, and ideas!

This is a basic side profile for me to determine riding position, and overall stance of the motorcycle.
20200613_125309.jpg


Next up is just some sketching to style a rear body piece for when I'm ready for a seat. Looks a bit long, but then again, it's just an idea. Not fully decided yet
20200613_144044.jpg


Here is a closer pic of the wheels just because. I'm endlessly happy with how this is coming together.
20200612_195927.jpg


Finally a picture of a rider in place. Gosh I need a haircut.

20200612_191437.jpg
 
Patiently awaiting the puller from Beags.

In the meantime, I have reinstalled the shifting mechanisms to ensure I have the greats in proper order. I know they only go in one way, but I wanna make sure I tie off as many loose ends as I can before I smush the two halves together. Am I missing anything here? I'm safe to reuse the bend tab behind the two bolts right? I tightened them down by hand tight as I could without feeling like I was gonna snap them off... I don't have a torque wrench, and I really don't think I need it for that in particular since it DOES have a bend tab. After this, I'm going to install the shift shaft, and let the yamabond cure.

Any tips here for this process? I really wanna get it right the first time! Lol.


Also, take a look at how nice the new outer clutch basket looks compared to the other one.
 

Attachments

  • 20200616_192150.jpg
    20200616_192150.jpg
    109.2 KB · Views: 139
  • 20200616_181529.jpg
    20200616_181529.jpg
    135.6 KB · Views: 136
Maybe you might consider a torque wrench. Buy one with a range of settings appropriate for motorbikes - some have too high a range, maybe meant for owners of lorries or M1 tanks?

Takes the guesswork out of fitting things. Often the correct torque setting is less of a heave than you might expect. Makes you feel like a professional doing what they call in Bristol a proper job.
 
Please tell me this is the clutch pushrod seal?

Got my rotor off, thanks to Beags! Ready to make a sammich I think. What else should I check before buttoning up the bottom end???

Am I free to hand tighten the bottom end bolts until the sealant cures, then torque it down later? Or should I torque it right away.?? Gosh, I spent so much time WAITING for this moment and not enough time PREPARING for it.
 

Attachments

  • 15924369171981960719511178066652.jpg
    15924369171981960719511178066652.jpg
    73.1 KB · Views: 138
  • 15924369459916020775086493385475.jpg
    15924369459916020775086493385475.jpg
    82.6 KB · Views: 120
Back
Top