Couple things - repair the outer sheath on your clutch cable with electrical heat shrink tubing. It'll fix it up like new. Then take better care routing it next time. Look at where and how it's running, and if anything will pinch it. Consider switching to the long one piece clutch pushrod. It works a bit better and is less prone to leaking. It also puts less wear and tear on the pushrod seal and bushing. Speaking of which, chances are you need a new pushrod bushing along with the seal.
-
Enjoy XS650.com? Consider making a donation to help support the site.
XS650.com receives a small share of sales from some links on this page, but direct donations have a much greater impact on keeping this site going.
You are using an out of date browser. It may not display this or other websites correctly.
You should upgrade or use an alternative browser.
You should upgrade or use an alternative browser.
Yam_Tech314's official build thread
- Thread starter G_YamTech_314
- Start date
You should be able to renovate your key switch as long as the contacts on the contact plate aren't burnt up or damaged. Not sure why you "gutted" it the way you did? What you are calling tumblers are actually called wafers. The key inserts through the rectangular cut-out in them. That cut-out is placed higher or lower on the wafer and that varies the width of the bottom edge .....


The different widths match up with the different depth cuts or notches in your key. That means that when you re-assemble your lock, you'll need to put the wafers in the right slots to match your key. If correct, when you insert the key, all the wafers will be pulled down flush with the lock cylinder .....

If wrong, some wafers will still stick out above and/or below the cylinder .....

The different widths match up with the different depth cuts or notches in your key. That means that when you re-assemble your lock, you'll need to put the wafers in the right slots to match your key. If correct, when you insert the key, all the wafers will be pulled down flush with the lock cylinder .....
If wrong, some wafers will still stick out above and/or below the cylinder .....
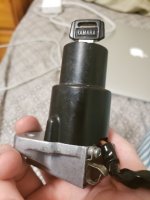
My goodness. You're a god-send. To answer your question. The ignition switch worked when I bought the bike, the day I got it home... Key would not turn AT ALL. This is the same reason I bought another gas cap. The gas cap situation has been resolved. The ignition switch as of now is a flat head screwdriver adapter... I would love to still use the original key and switch. It works fine. I cleaned up the contacts and there's no issues there. But why would the ignition just all of a sudden stop turning? I tried everything. Not pressing down. Pressing down hard, to no avail. I'd love to figure that out.You should be able to renovate your key switch as long as the contacts on the contact plate aren't burnt up or damaged. Not sure why you "gutted" it the way you did? What you are calling tumblers are actually called wafers. The key inserts through the rectangular cut-out in them. That cut-out is placed higher or lower on the wafer and that varies the width of the bottom edge .....


The different widths match up with the different depth cuts or notches in your key. That means that when you re-assemble your lock, you'll need to put the wafers in the right slots to match your key. If correct, when you insert the key, all the wafers will be pulled down flush with the lock cylinder .....

If wrong, some wafers will still stick out above and/or below the cylinder .....

Just got back from vacation, and realized I NEVER asked you guys what I did wrong with my valve adjustment... I should've known, if it ain't broke don't fix it. But I want to learn, and I thought maybe I could get it a bit closer to spec.
As you can guess. I did the adjustment. Wrong at first, so I went back to the manual, re read, and readjusted one side at a time (changing TDC with ONE crank shaft revolution.. Now when the bike is cold it backfires through the carbs. I think it's only the right carb but I could be wrong. It didn't do that before... Oops..!
EDIT***: I doubt this has anything to do with it, but I ran it with no chain. I also should add that I'm running no filters at the moment. Also has not been tuned to idle properly yet... keeps shutting off atastart upuattempt. I think my carbs idle circuit needs worked on but I'm getting ahead of myself... I'm going to try and buy filters soon, then readjust the valves. EDIT***
Also, enjoy this picture of a PA Brook trout caught by M'lady. She did good this year.
Attachments

Last edited:
If the valves are set too tight, you can get some backfiring. What did you set them at? The clearance specs changed several times over the production run, not sure why because the motor never changed much, so it can be a bit confusing as to which spec to use .....

Most of us have found the last spec listed, about .003" on the intakes and .006" for the exhausts, works well and is what we use. If you used the '76-'77 intake spec of .002", that might be your issue and may be a bit tight for those valves. I know, it's only a .001" difference, but that can matter. It did on my '78. I initially set my intakes to the '78 spec of .004" for them. They ticked like crazy. Closing them up just .001", down to .003", quieted them right down.
Most of us have found the last spec listed, about .003" on the intakes and .006" for the exhausts, works well and is what we use. If you used the '76-'77 intake spec of .002", that might be your issue and may be a bit tight for those valves. I know, it's only a .001" difference, but that can matter. It did on my '78. I initially set my intakes to the '78 spec of .004" for them. They ticked like crazy. Closing them up just .001", down to .003", quieted them right down.
Oh boy. I think I set the intakes at .003... But I'm gonna have to do them again no matter what. I do the "go no go" so I'll have to revisit these.If the valves are set too tight, you can get some backfiring. What did you set them at? The clearance specs changed several times over the production run, not sure why because the motor never changed much, so it can be a bit confusing as to which spec to use .....

Most of us have found the last spec listed, about .003" on the intakes and .006" for the exhausts, works well and is what we use. If you used the '76-'77 intake spec of .002", that might be your issue and may be a bit tight for those valves. I know, it's only a .001" difference, but that can matter. It did on my '78. I initially set my intakes to the '78 spec of .004" for them. They ticked like crazy. Closing them up just .001", down to .003", quieted them right down.
OKAY GUYS AND GALS.
I'm feeling accomplished because thanks to 5Twins, I was able to get my ignition switch wafers back to the slots they belong in, gave them a good cleaning, and I now have an original Yamaha key to go with the original switch, and they work (clunky) as a pair. But still, they work. Gonna have to take it apart and pack it with grease without removing the wafers!
A few questions... How hard should this key be to turn? It's not gonna feel like a car ignition switch, right? I feel quite a bit of resistance when turning the key, but the key DOES TURN. I'm guessing it has a lot to do with lack of grease, and the spring that controls the resetting of the fork lock pin. I also have NO clue which position is what, probably going to try and find a way to reinstall a chrome cover ring for the key side of the switch and label it when I find time.
I made a short video to ask a few questions, demonstrate operation, and fend off hungry mosquitos. Please help me in this journey of restoring ancient iron back to it's former glory.
The rear wheel was a challenge to get off, as it works a bit different than bikes Ive seen when I was in school. I like the idea of knowing that even if my axle comes loose, it's pretty much locked in place by the alignment blocks, bolts, and locking bold that goes thru the swingarm. Pretty nifty.
Oh, and I re did my valve adjustment to .003" for the intake, and .006" for the exhaust. We will see how that changes things once I charge my battery up...
Here is the real question: Can I use White lithium grease in my ignition switch? Or should I get Dielectric grease!? I hear yay and nay on the white white l from permatex, but I don't want my switch to solidify over time...
I took the initiative to go back out and get Dielectric Grease, the forum seems quite quiet the last few days, and I didn't have the patience to wait for a reply! I'm glad I went out and got the right grease...
The last thing I want to do is see my newly rebuilt ignition switch lock up because the lithium grease oxidizes or something funny.
It. Works. Like. New. I'm honestly so thrilled to have a switch that didn't cost me any extra, and works just like new. Plus, having the original key is so cool. Thanks a ton to all of you helping out with suggestions and advice. This whole project is going to be life changing.
Attachments
Boy oh boy what a day it's been. Just trying to rebuild my electrical switches, buttons, etc. I got the signal switch cleaned up, and Dielectric greased. It functions smooth as ever! Problem is, I still only get power to the right side turn signals. Left side doesn't even engage the signal relay. Not a click, no nothin' any advice on that one? I don't think it's the switch, upon inspection and cleaning there's nothing missing that I can see. I need to start studying the wiring diagrams for this thing. Hard part is, the front end wiring is different.
On the bright side, the switch is clean...
On the bright side, the switch is clean...
Attachments
Take a close look at the 3 solder joints. I bet one's broke loose.
On which piece? The rectangular switch part?
Scratch what I just said before that, Jim... Are you sure you aren't the previous owner if this thing???Take a close look at the 3 solder joints. I bet one's broke loose.
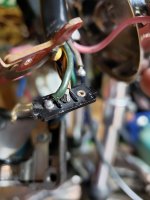
Unscrew the signal lever.....

then move that phenolic plate out of the way. The solder joints are under there.

then move that phenolic plate out of the way. The solder joints are under there.
The best lead solder comes from Mexico. Yamaha probably knew this, but the Japanese are known to do business with family only.
Scott
Scott
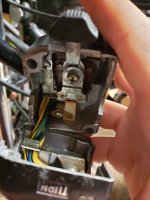
Here are the key switch functions - at the beginning of your video where you can remove the key, that is the "Off" position. The short turn to the right, or clockwise, and the key locked in (can't be removed), is the "On" position. Going back to the "Off" position, from there the long turn to the left (counterclockwise) operates the fork lock function, as you've seen. The short turn or "click" at the end of that is the "Park" position. But, there seems to be a couple small "glitches" with your switch's operation. The key should come out in the "Park" position and yours doesn't. Also, the "push down" feature doesn't seem to be working.
Normally on the Special switch, you need to push it down in then release it to allow the switch to turn left into the fork lock area. Unless you do that, it will only turn between "On" and "Off". Off to the side of the lock cylinder is a stepped plunger. That's the part you're seeing in that hole because your label plate is missing .....

Pushing the lock cylinder down in pushes that plunger down out of the way and allows the lock cylinder to rotate past it and operate the fork lock .....

But you say when you push that plunger down, it locks your switch and won't let it turn. I think you have an assembly error, in particular with this plate and metal post just below the lock cylinder in the housing .....

The plate can only be installed one way, the right way. If you had it flipped over, the screw holes in it wouldn't align with the holes in the housing. I think you may have the metal post sticking up through it in wrong. It can go in 2 ways but the correct way is with the nub on it's base sticking up through the slot in the plate .....

I'm thinking yours may not be. You may have the metal post part installed 180° off.
Normally on the Special switch, you need to push it down in then release it to allow the switch to turn left into the fork lock area. Unless you do that, it will only turn between "On" and "Off". Off to the side of the lock cylinder is a stepped plunger. That's the part you're seeing in that hole because your label plate is missing .....
Pushing the lock cylinder down in pushes that plunger down out of the way and allows the lock cylinder to rotate past it and operate the fork lock .....
But you say when you push that plunger down, it locks your switch and won't let it turn. I think you have an assembly error, in particular with this plate and metal post just below the lock cylinder in the housing .....
The plate can only be installed one way, the right way. If you had it flipped over, the screw holes in it wouldn't align with the holes in the housing. I think you may have the metal post sticking up through it in wrong. It can go in 2 ways but the correct way is with the nub on it's base sticking up through the slot in the plate .....
I'm thinking yours may not be. You may have the metal post part installed 180° off.
Clean both ends of the joint real good with a brass or stainless brush. Use liberal amounts of flux when you solder it. Then use Q-tips and your solvent of choice to clean the flux off when you're done.
The plate can only be installed one way, the right way. If you had it flipped over, the screw holes in it wouldn't align with the holes in the housing. I think you may have the metal post sticking up through it in wrong. It can go in 2 ways but the correct way is with the nub on it'
I'm thinking yours may not be. You may have the metal post part installed 180° off.
The metal post is certainly in correctly. I made sure the nub ran in the slot before tightening everything down. I'm guessing there is possibly some key wear? The switch turns freely now. I have no need to push in no matter what position I try though, so perhaps there's another issue I'm unaware of.
To create a list of problems and solutions I found today (with help of course)
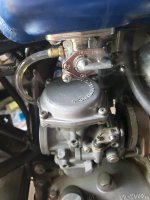
I figure I'll start with the most pressing issue. The darned backfiring. Even after doing an adjustment to the valves, I'm still having a lot of trouble with backfiring when the engine is cold. It actually backfires out of the exhaust, and carbs. The bike actually backfired hard enough today to not only tweak my ankle upon trying to kick it started, but it blew the right side carb clean out of it's air boot. And yes, the clamp was tight... What the heck is the deal here? Could it be the lack of air filters? No oil breather hoses? Air leak in a manifold somewhere? Or perhaps I should hang up the wrenches and stop trying to do a proper valve adjustment... This wasn't happening before I adjusted them, but it was also colder outside then... I'm dumbfounded. I really want to figure that out before I try and fix the rest of the bike. The motor is the most important part.
I'm also having a hell of a time keeping the motor at a steady idle. It very slowly seems to want to creep into the 1500-1600rpm range on its own. As the bike warms up, I'm finding that I need to constantly turn the idle screw out, probably a quarter turn every minute or so. What's up with that? Too much air?
Second and less important. It's looking more and more like I'll have to completely rewire the front end. The fact that it was swapped makes for such a mess in the bucket that I may as well cut it all out and start from scratch... At least then I'd know what was what.
Thanks to some of Jim's knowledge and experience, I got my left side signals working properly, and now have a good working horn, and signal lever. Next up is going to be an overhaul of the starter button. (I don't even have a starter button at the moment, just tape over the spring where a button should be.
That's about all I accomplished today, I'll definitely add notes if I forgot to put anything here. Hope everyone else's projects are going smoother than mine lol! Below you'll see a picture of my smoking carbs... When they blasted off the motor.
I figure I'll start with the most pressing issue. The darned backfiring. Even after doing an adjustment to the valves, I'm still having a lot of trouble with backfiring when the engine is cold. It actually backfires out of the exhaust, and carbs. The bike actually backfired hard enough today to not only tweak my ankle upon trying to kick it started, but it blew the right side carb clean out of it's air boot. And yes, the clamp was tight... What the heck is the deal here? Could it be the lack of air filters? No oil breather hoses? Air leak in a manifold somewhere? Or perhaps I should hang up the wrenches and stop trying to do a proper valve adjustment... This wasn't happening before I adjusted them, but it was also colder outside then...
I'm dumbfounded. I really want to figure that out before I try and fix the rest of the bike. The motor is the most important part.I'm also having a hell of a time keeping the motor at a steady idle. It very slowly seems to want to creep into the 1500-1600rpm range on its own. As the bike warms up, I'm finding that I need to constantly turn the idle screw out, probably a quarter turn every minute or so. What's up with that? Too much air?
Second and less important. It's looking more and more like I'll have to completely rewire the front end. The fact that it was swapped makes for such a mess in the bucket that I may as well cut it all out and start from scratch... At least then I'd know what was what.
Thanks to some of Jim's knowledge and experience, I got my left side signals working properly, and now have a good working horn, and signal lever. Next up is going to be an overhaul of the starter button. (I don't even have a starter button at the moment, just tape over the spring where a button should be.
That's about all I accomplished today, I'll definitely add notes if I forgot to put anything here. Hope everyone else's projects are going smoother than mine lol! Below you'll see a picture of my smoking carbs... When they blasted off the motor.
Attachments
Similar threads
- Replies
- 214
- Views
- 25K
- Replies
- 98
- Views
- 8K