Yam_Tech314's official build thread

No need to fix what ain't broke. XS650's have and continue to run millions of miles on mechanical regulators. I kinda like being able to set a charging voltage based on usage. :pimp:

I liked inspecting the functions of it myself. I took the cover and gasket off to see what it was, and I was impressed to see mechanical switches. In school everything I worked on had a reg/rect combo on them.

Correct me if I'm wrong, but they seemed adjustable.
 
I also had the machinist contact me saying he would do a valve job on the head I bought to replace the cracked original head. What would the benefits be to that? Is it even worth it? Do I risk damaging the newly purchased head by letting him do that?

"Grinding the valve seats and backside of valves to make sure they seat completely and keep compression in the cylinder"

That's what my cousin told me about the valve job. He's been getting race motors done there for a long time now. So far, the honing job seems to have been done nicely, but would a good valve lapping be enough???
 
You can make your own valve spring compressor tool. After using a “loaner “ tool from Advanced Auto a few times I just made my own. I used a large 1/2” drive 21mm socket and cut a window in it with my 4” grinder. Then I just used my large 8” c-clamp from Harbor Freight to compress it. I used a small telescoping magnet to retrieve and install the collets from the socket window. The c-clamp also comes in handy when doing brake jobs on my truck to compress the caliper pistons, so it’s multi functional. Here’s a pic of my socket.
71B13E8C-DDA3-434F-8DFE-9C45C866F8FA.jpeg
 
Last edited:
Cylinders honed and ready for the next step.

Got a lot of motivation coming from my cousin to get the bike done. It helps that the machinist wants to see it run toom they're both a big flame under my ass.

Looking good. Going to be ordering parts this weekend.
 

Attachments

  • 20210126_212501.jpg
    20210126_212501.jpg
    92.8 KB · Views: 121
I use this one: https://www.amazon.com/gp/product/B07W82414G/ref=ppx_yo_dt_b_search_asin_title?ie=UTF8&psc=1
It's a bit more spendy, but all you do is set the height, then align the cup onto the valve and simply pull down the lever (think vise-grips) and it compresses the valve springs. It's super easy. I like that you don't have to tighten by hand and try to keep the cup on the valve as you turn it in. If you do a lot of these, it pays for itself in the amount of time it saves.
 
In going to pick the 4 best valves I have, out of the 8 lying around. My machinist wants to cut new angles in the seats and backsides of the valves and told me $40 would do. I'll take him up on the offer. From there, brand new valve springs and rings will be ordered. The list goes on and on but these are the next few steps in line. Then, and only then will I invest in the tool. I want to have the parts on their way before the tool gets bought. Might have to count some pennies... I leave for Daytona Fl. In a week and a half.
 
Of course your machinist wants to cut your valves. He doesn't make any money if he's not working, lol. But, $40 does seem pretty reasonable. I only had valves cut once because they were very badly pitted. Usually I just hand lap them back in and that's enough to fix them. Yours would probably be the same. The other reason you sometimes need them re-cut is if the hand lapping ends up making the seats too wide. I guess I've been lucky so far as that's yet to happen to me.
 
Can you further describe the valve seat cutting intentions?
Cut new angles such as in a 5 angle valve seat? Or just re cut the 3 angles which were original?
Interesting..

The inexperienced side of me says that I want him to just cut the same 3 angles to resurface the seating surfaces.

The bold side of me wants to trust him and just say "do it" he wants to put three angles in the seats, but I don't think he wants to put the SAME angles that the stock head has. What benefit this serves is beyond me but he said he wouldn't have suggested it if he thought it was unnecessary. He's cheap like me so I guess he thinks it's a good idea!

I'm nervous to allow different angles to be cut because as I recall, it's a weak spot in the motors... Not to mention this is the SECOND head I've owned since the original was cracked (or possibly just had a valve seat knocked out of whack.) Either way, Do we think it's a bad idea? I don't really know enough about any of this to even have an opinion. I'm only nervous because of my lack of experience.

He's been at this a long time... You should've seen how fast he measured the taper in my cylinders...
 
Forgot to take pictures of the "after" results for the cylinder head, but I already did that once to the old head...

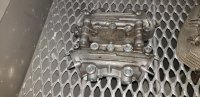
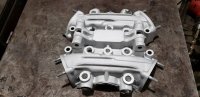
I did take pictures of the head cover though! I was sure to tape off and stuff all oil holes before bead blasting. I gotta say, it's more satisfying to do it myself than to pay a shop to do it. Took about two hours to get into all the nooks and crannies. I now have all parts to the motor clean, and we are nearly ready to reassemble.

I'm happy to have people pushing me along. I've been in a slump these last few months with the way the world is going and it's time I focus on what brings me joy.

My cousin wants the bike to beat my uncle's fox body drag car. He's running a stock v8 that pushes about 250hp and runs mid 12's. (My cousins valiant runs low 10's and he's shooting for 9's next season. I will never have an xs that fast. They aren't meant for that)

All jokes aside, there's an actual shot at beating my uncle's car if I ever chose to but for now I just wanna make it as reliable as I can and go from there.

If you guys wanna see the Valiant, my uncle painted it, I helped with the restorative work such as undercoating, and parts removal, and they did the rest. It has a 414 Chrysler small block in it. It makes between 500 and 600 HP naturally aspirated. I find it to be pretty impressive. I still love motorcycles at heart but the transformation of that car was fun to watch.
Screenshot_20210129-223451_Facebook.jpg
 

Attachments

  • 20210129_171544.jpg
    20210129_171544.jpg
    185.6 KB · Views: 109
  • 20210129_174247.jpg
    20210129_174247.jpg
    163.2 KB · Views: 101
Finally got around to polishing and cleaning all the other electricals that get mounted on the battery box. I'm waiting patiently for motor parts to come back from the machine shop.

In the meantime I wanted to try and wire up the aftermarket wiring harness I got awhile back. There's no "clip in" connectors, they just plug in, and don't have any teeth or clasps to lock them in place and prevent unplugging. I'm also finding a lot of "extra" or unnecessary wire connectors on the harness... Should I try to use it? I think it may be from Mike's XS. Can't honestly remember where I got it from though.

Would an original wiring diagram still be accurate when trying to wire this thing up? I should remind everyone, I have a later model front end set up on my '76 frame.
 

Attachments

  • 20210305_213734.jpg
    20210305_213734.jpg
    125 KB · Views: 103
From my perspective...

I think you're probably the only one that can determine if you should use it or not...meaning you will need to see how close the wires/colors and routing match up to your bike and the wiring diagram for your front end/back end. Likely, there will be some redundant wires, different color wires, and/or routing changes that don't match up exactly...but if it's close, and you don't have any other options, I don't see why you wouldn't give it a try. You may want to make up your own diagram with what you have so you can reference it in the future.

With regard to the clips not having "teeth", if they are a solid fit and there's no tension on them, you should be alright. If really concerned, you can take a thin zip-tie and thread it between the wires on each side of the plug, pulling it tight will keep the plug from pulling apart.
 
Good idea! I guess I can hook everything up and make a check list to ensure everything gets connected. I'll probably trim and cap any wires that aren't being used/won't be needed. I'll likely be able to figure it out, I just didn't know if anyone had a similar set up to me that had been through this before.

I'm going to take the old harness and compare them side by side. I think I'm in for a long day of documentation, research, and trial/error. I'll likely use my old harness to power the motor electrical systems on a test stand so I can run the motor while out of the frame. I want to trouble shoot anything that could be wrong with the motor before I put it in it's final resting place...
 
Is there a chance that the light checker was put in a different spot on the XS in later/earlier years? If this is a universal harness they may have had to pick and choose where they placed some of the connectors. I'm finding matching plugs for some components such as the signal relay, and the light checker, but on the '76 wasnt the light checker tucked under the tank right in front of the signal relay? On this harness, the connector for the checker is near the rear side of the harness... I'm scratching my head here. The tab pictured in the 2nd photo is where I believe the rubber jacket of the checker slides on... But my harness is obviously not supporting that theory.
 

Attachments

  • 16151427659417400074913841815696.jpg
    16151427659417400074913841815696.jpg
    96.9 KB · Views: 81
  • 1615142804496668347300446378577.jpg
    1615142804496668347300446378577.jpg
    110.7 KB · Views: 90
  • 20210307_134853.jpg
    20210307_134853.jpg
    302 KB · Views: 91
Back
Top