Beautiful. I have one in my area. They'll probably have it in stock.
-
Enjoy XS650.com? Consider making a donation to help support the site.
XS650.com receives a small share of sales from some links on this page, but direct donations have a much greater impact on keeping this site going.
You are using an out of date browser. It may not display this or other websites correctly.
You should upgrade or use an alternative browser.
You should upgrade or use an alternative browser.
Yam_Tech314's official build thread
- Thread starter G_YamTech_314
- Start date
So today I spent some time in the garage after a long day of reorganizing, and cleaning up in my house. We are settling into the new place quite nicely, and I'm proud to say it.
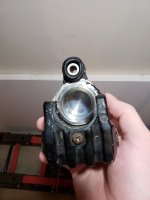
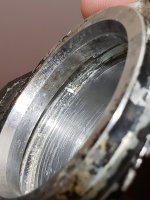
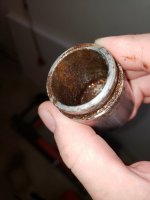
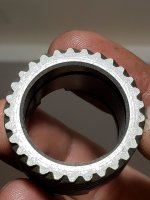
I dabbled with the idea of trying to get the piston out of the siezed caliper it was in. Mind you, I have no air Chuck, or air compressor strong enough to blast the piston out, so I just used the trusty PB Blaster, and let it sit in a cake pan for the better half of the day. Got my channel locks tightly onto the rim of the piston and actually managed to break it free with just stepping on it, and about a can and a half of elbow grease.
Here are the results of that endeavor. Salvageable caliper??? Obviously the piston is a goner.
Attachments
-
 20190728_220947.jpg88.8 KB · Views: 166
 -
 20190728_220956.jpg199.7 KB · Views: 179
 -
 20190728_221001.jpg193.3 KB · Views: 185
 -
 20190728_221008.jpg142.8 KB · Views: 183
 -
 20190728_221011.jpg168.1 KB · Views: 201
 -
 20190728_221028.jpg113.8 KB · Views: 206
 -
 20190728_221023.jpg154.8 KB · Views: 139
 -
 20190728_221617.jpg139.7 KB · Views: 215
 -
 20190728_221713.jpg111.5 KB · Views: 159
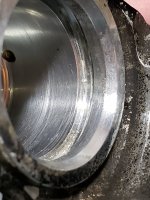
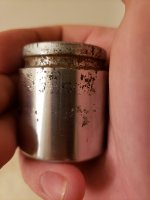
Just looking at the pictures......that caliper looks to be in better shape than any caliper I've ever taken apart. And the piston could be salvageable too if cleaned up and smoothed over. How do the rubbers look?
Scott
Scott
The o ring is probably gonna need replaced. I was just thinking of replacing the piston to be safe rather than sorry. I don't want to cut the ring and spring a leak onto my tire... I'd rather just go new. The caliper does look pretty darn clean tho.Just looking at the pictures......that caliper looks to be in better shape than any caliper I've ever taken apart. And the piston could be salvageable too if cleaned up and smoothed over. How do the rubbers look?
Scott
And the piston could be salvageable too if cleaned up and smoothed over.
Smoothed over how? Should I try and get it resurfaced? Or will sand paper suffice? It's kinda pitted, but I'm not sure if the putting would cut a slot in a new o ring...
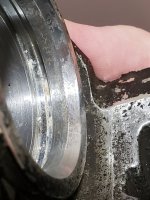
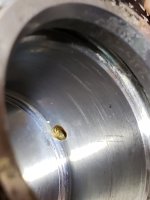
Once pressurized, the piston doesn't move in/out much. Most of the rusty areas on your piston are above the seal so won't be pushing through it. You just have to figure out if the lowest rusty parts are going to push through the seal. If you replace the piston, they sell stainless ones. That's what I'd go with, never have this rust issue again.
If the square sectioned "o-ring" seal is the only bit of rubber you need, you're going to discover Yamaha doesn't sell it alone, only included in a full rebuild kit, and I think those are near $30. But, you can buy just the seal from Suzuki for much less .....
https://www.partzilla.com/product/suzuki/69107-05CF0
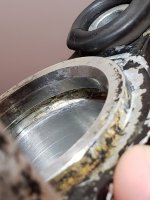
Be sure you thoroughly clean the crust out of the o-ring groove in the caliper.
If the square sectioned "o-ring" seal is the only bit of rubber you need, you're going to discover Yamaha doesn't sell it alone, only included in a full rebuild kit, and I think those are near $30. But, you can buy just the seal from Suzuki for much less .....
https://www.partzilla.com/product/suzuki/69107-05CF0
Be sure you thoroughly clean the crust out of the o-ring groove in the caliper.
Once pressurized, the piston doesn't move in/out much. Most of the rusty areas on your piston are above the seal so won't be pushing through it. You just have to figure out if the lowest rusty parts are going to push through the seal.
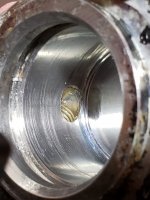
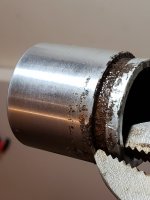
I'd say there's spots that thoroughly cover the piston on one side almost 70% of the way down. Im not sure... Do I want it to work? Yes. Do I want it to make my brakes fail/leak? Not at all. Whatcha think of it all cleaned up? I did the best I could with some sand paper and S.O.S pads.
Attachments
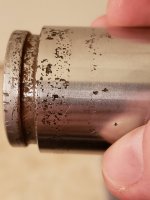
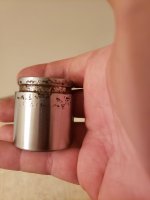
Yes, I'd replace that one, the pitting is too low. Notice the clean line between the lower and upper pitted areas, that's where the seal was resting. The rusty parts will push through the seal no matter which way the piston moves. Here's a stainless one, about $15 more than the plain chrome steel ones, but you'll never have to worry about it again .....
https://www.ebay.com/itm/HONDA-GL10...e=STRK:MEBIDX:IT&_trksid=p2060353.m1438.l2649
https://www.ebay.com/itm/HONDA-GL10...e=STRK:MEBIDX:IT&_trksid=p2060353.m1438.l2649
I'll vouch for that stainless piston. Excellent machining.
Looks Great ! (Web site) it would be so fun to try one of those ., eitherHere's a stainless one, about $15 more than the plain chrome steel ones, but you'll never have to worry about it again .....

With some help from the company workers I'm sure I can achieve a set-up with minimal friction...Looks Great ! (Web site) it would be so fun to try one of those ., either
In all seriousness though, it looks like a great set...

I was not aware that Stainless pistons were available. Seems like such a good idea it has me wanting to disassemble both of my front calipers which have been sitting over 2 years now.In all seriousness though, it looks like a great set...
BTW , even a bicycle tire pump and a rag wad will pop those pistons out without damage.
-R
You're lucky! The caliper on "The Basketcase" was so bad, I couldn't even take it apart! That's when I decided to upgrade, using the forks from an '82 (35mm, one-piece rotor), and eventually brand-new MC, stainless line, and caliper. I'll feel better knowing everything is new. The MC was toast:
...hence the name "Basketcase"

...hence the name "Basketcase"
Last edited:
same with the one that I removed. Not only did it not fit the bars I put on, but it was just overall too bad to fix. I got -3 braided line waiting to go on. Waiting for the right moment to order compression fittings, and gonna check my front disk out for warpage. All in due time.The MC was toast
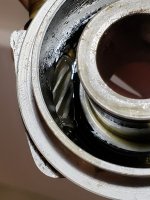
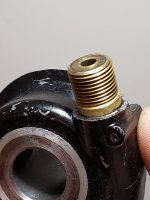
Did some tinkering today... Nothing major since I can't really afford parts at the moment. But I did manage to clean all the old junk out of the speedo drive. I have it stored in a plastic bag coated with PB Blaster. I found that the old grease was dirty, and would not allow the drive to spin freely. (Of course, under load it wouldn't be an issue, but the less resistance, in my eyes, the better!) Got it real clean with my own barbaric methods.
I Used boiling water to soak parts to loosen grease, then brushed the speedo's teeth real good. It needed it. From there, while it's still WAY too hot to touch, I touch it anyways, and fill it with motor oil to simulate how a motor keeps itself clean. The hot oil gets in every crevice and I rebuild the drive without grease, just oil. From there I spin the drive with the screw driver to get the gears to mesh, and spin against each other for about five minutes, its still pretty warm by this point. I find that the oil and grease turn into a black and thick mess. That's how I know it worked. I'm not sure if you guys go this crazy, but hey, what the hell else can I do without money to buy all the shiny cool parts???
All in all I think it turned out alright. Gonna pack it full of new grease tomorrow, when I go buy some...
What do y'all think?
Attachments

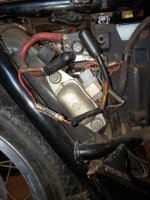
Stumbled upon this cluster of stuff. Anyone know what this fuse might be for? Definitely looks rigged up... Pretty sure the fuse is blown. Bike still runs though.
Woops.... Took the picture, but in lieu of other electrical discoveries I forgot to attach itNo pic?
Attachments
I also decided to look into why my neutral light didn't work. Took the neutral switch/button out of the top of the case, and it's pretty slotted from years of friction. Even more frustrating is the fact that it just doesn't work at all. Is this a known failure point?
I'm realizing that building a harness is gonna happen quicker than I want.
I also decided that keeping the bike original would be cool, but it's wiring is FUBAR. No sense in trying to fix what already got cut, spliced, tangled, etc.
I'm realizing that building a harness is gonna happen quicker than I want.
I also decided that keeping the bike original would be cool, but it's wiring is FUBAR. No sense in trying to fix what already got cut, spliced, tangled, etc.
Similar threads
- Replies
- 214
- Views
- 25K
- Replies
- 98
- Views
- 8K