Yamaha XS650 Experimental Clutch

Extreamily interesting 2M ! How in the world you got that clutch top attached to your lathe is a work of genious ! LOL
very few people could have accomplished it ! well, Done ! and it was secure enough to face it too ! simply amazing !
..... i bet I know what's going on here.... you just wanted an excuse to use the lathe ! !!!!!! LOL
keep it up.... to me this is edge of the seat exciting stuff !!!! LOL
Bob..........
 
Mmmmmm........ Maple syrup

Yessir, lathe usin' excuses actively sought here.

Many folks may not find this kinda stuff useful, so I'm hoping for "entertaining".

The core thinking with these threads is that we're not back in the '70s, with factory fresh parts and "in-the-know" period mechanics. Mostly used and aftermarket parts carry wierd risk factors that I didn't have to worry about back in the dealership days. Blindly bolting up some of this stuff, without thoroughly inspecting it first, can introduce trouble. This particular clutch was carefully plucked from the amass of offerings, for its low mileage and near-pristine condition of its hub splines and basket fingers. That tiny speck of metal in the hub face looked like it may have been there a long time, and may have caused someone a bit of grief, labelled as 'problematic', and dumped on the market. What I would call a "gggGary opportunity". Who knows...
 
Too true.

I'll be right over 2M - but first...where the heck is Fredericksburg?
 
Lemme see, now. Where wuz I...

Item 3 - The lengths of the (6) spring screws (or aftermarket sleeves)

Another lathe opportunity. I'm still using stock clutch spring screws. Carefully chucked them up in the lathe by their threads, and found that EVERY one of them ran crooked. Probably a history of being smacked senselessly with an impact tool. Carefully straightened them all.

Then checked the fit of spring to screw face. ALL of these OEM screws have a slight rounding of the shaft where it meets the face. The springs don't fully seat here, and often jam/stick to the screw here.
ClutchSpringScrews01.jpg


Turned down these radiused corners so that the springs seat flatly.
ClutchSpringScrews02.jpg


I also found slight variances in the lengths of the shoulders, so trimmed those to get equal lengths.

Installing the clutch springs is a bit easier, now. The springs don't try to bind on the screw face while turning.

I don't think that the aftermarket spring spacer kits have these problems, but it wouldn't hurt to check.
 
Last edited:
Unfortunately, most of us don't have the means (a lathe) to do stuff like this. But I will be checking the condition of that 2mm washer behind the basket the next time I'm in there. I can do that, lol.

On those spring screws, won't the spring just spread open a bit and seat against the head once the screw is tightened down?
 
Item 4- The depths of the (6) spring seats in the pressure plate.

Another surface plate and depth gauge project.

PressurePlate-341.jpg


I got lucky this time. The spring seats were all within 0.005". Declared that good 'nuff. Recutting those seats would be a challenging task.
 
...Unfortunately, most of us don't have the means (a lathe) to do stuff like this. But I will be checking the condition of that 2mm washer behind the basket the next time I'm in there. I can do that, lol...

Hey, 5Twins!
Another excuse to get one, you ol' tool collector you.

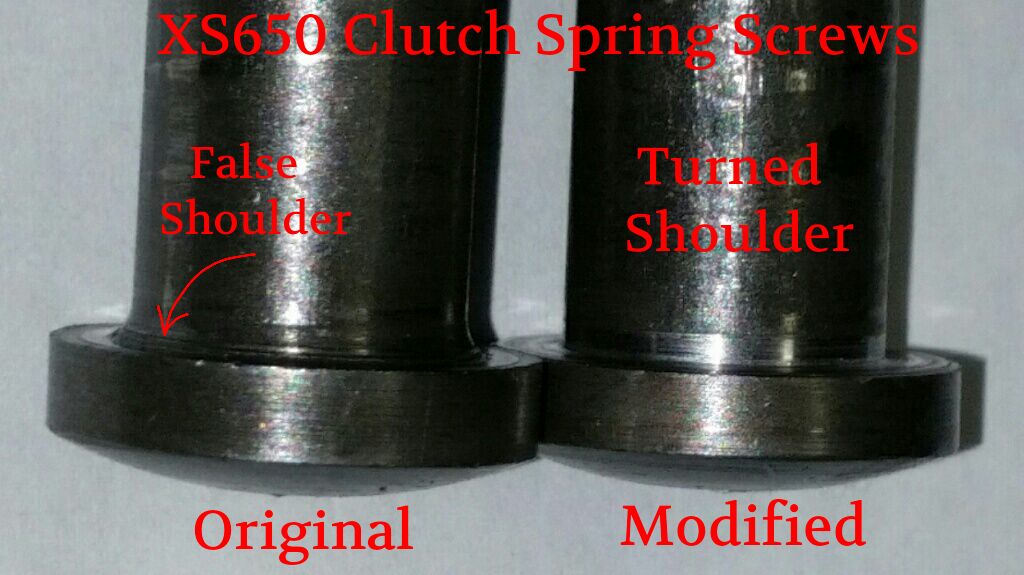
...On those spring screws, won't the spring just spread open a bit and seat against the head once the screw is tightened down?

Yes, they do, somewhat. I noticed this "unseated spring" phenomenon quite some time ago, and noticed that not all would fully seat, and many would jam at their partially seated position. Almost ordered the screw/sleeve kit to solve that issue...
 
Last edited:
Item 5- The (6) clutch springs, lengths and spring rates.

I've collected a batch of OEM 447 springs, all pass book specs for length. Hand selected the best lookers, sorted by length, and choose (6) that were closest to original length, and closest to each other in length. Max variance with these (6) is less than 0.010" (0.25mm). A little variance may be helpful, for the next task.
 
There are also "late" 447 springs. They were implemented along with the late 6 plate clutch. I'm guessing they're a tad stiffer because of the one less friction plate. They are marked with blue paint .....

LateSprings.jpg
 
About 1400 miles southwest from you.

Swing by gggGary's place, grab his polishing stuff.

And, bring yer boots. It gets deep 'round here...
Saddle up Pete I'll meet cha by the gate and we'll mosey on down south aways to visit Tex. And put the boots on before you get here.
 
Sounds good Gary - just as soon as I get my danged saddle back for the seat repair chap that is!

Lucille_Ball.jpg


At that point, Ah'lI fill-up my 'ole saddlebags with maple syup, hockey pucks and All Dressed chips, grabba 2-4 of BEvERages for the campfire, grab a coupla extra boxes of Shreddies for our breakfasts...and then, I've got my boots, and they are made for....walkin'...NO!....ridin' - and that's just what we'll do!

Nancy_Sinatra.jpg
 
Turned down these radiused corners so that the springs seat flatly.
clutchspringscrews02-jpg.98586

OK - back to serious stuff now.

Your work on this is excellent 5T - but I might suggest that next time, you put a bit of radius on the corner of those clutch spring screws. Those are fatigue loaded parts and having a sharper corner there may turn out to be a problem depending the stress level (and I could calculate if you could provide the spring stiffness and deflection plus the diameter of the screws). It may be that the stress level is so low that its no biggie - but in general, sharp corners and fatigue are not a good mix.

Pete
 
Mushing on...

Now comes the real tricky part. Assembling the pressure plate with its springs and screws, and have it run true. The (6) spring pockets can have varying height differentials with their spring seats and screw posts. The (6) springs can have subtle differences in length and springrate. The (6) spring screws can have different lengths. The total number of combination with that mix of (3) groups of (6) items is 6x6x6 = 216!

If the spring screws are identical in length (more likely with the aftermarket sleeve kit), then the number of combinations reduces to 36. Still enuff to make this complicated.

Rather than take meticulous measurements and derive a distribution scheme to assembling these parts, I chose to use a simpler method, like a "bubble sort" algorythm. A fair touch of OCD is handy here.

I screwed-up, not thinking ahead, while skimming the friction face of the pressure plate. I should've also cut a narrow, straight, parallel reference surface on the opposite side of the pressure plate. That area, near the edge, is already relatively flat, and wouldn't be adversely affected by the cutting.
PressurePlateTrue04.jpg


Then, an indicator could've been used on that pressure plate's reference surface, to check for runout.

Instead, I had to do this with the basket removed, and check runout from the backside friction face. Similar to the runout tests of the hub (boss), but with the Dial Test Indicator rotated forward to read the pressure plate.
PressurePlateTrue05.jpg
 
Back
Top