An Adventure in Firsts: '83 XS650 Heritage Special Build/Rebuild

Thanks, Jim!
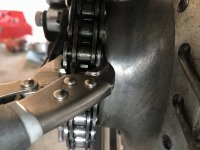
It's pretty close. You might consider giving it a go as is. If it leaks, you can always revisit it and try to get it a little more flush, but I think it'll work as is.
so just crank that sucker down good and tight. :smoke:
Now that's a welcome answer!
I'll do my best to get it in some more tomorrow first. Not trying to put that chain back on to take it back off soon after--then again, maybe it just needed a good thumping and it'll be fine next time. If not, I'll give it a shot as is!

Sounds like somebody may be going for a test ride tomorrow... Awoooo!
 
Yes, the sprocket nut needs to be very tight, something like 72-94 ft/lbs. You're trying to seal metal to metal so it has to be very tight.

Your pushrod seal may or may not take, you'll just have to try it and see. I can see in your 2nd pic that you appear to still have the original 8mm long pushrod bushing installed, and it looks a bit thin (worn). Once the bushing wears, the pushrod can wiggle around too much and sometimes even a brand new seal won't work.
 
I figure once I get it in (and replace chain and retorque chain sprocket nut) and run the bike, if it's leaking worse, then worse case I'll have to just do it again; all the seals I've ordered should be here by then haha. Aaaaand if I don't get it in, then...I don't know, I should be able to. I've learned not to trust what isn't working at the end of the day; so far, it's more because it's dark and the end of the day rather than there being a real problem.

Good progress!

Your comment worse case I'll have to just do it again is spot on. That's a proper insight to this restoring old motorbikes lark. You also observed that the edge of the hole has already been 'eased' by a PO. Any slight damage you might have done around the exterior of that hole doesn't matter too much, but clearly if you damage the inside of the hole where the seal has to make contact, that is likely to leak. You are learning to think about how it works and what needs to be kept good.

Pity the seal was such a pain to drive in - they usually go fairly easy but nothing seems to be easy on this bike. Your observation about doing a fiddly job at the end of that day when the light is poor is also spot on. Need to give yourself the best chance for things to go well. Try to use a socket nearly as wide as the seal and tap or drive the seal in straight. Bit of grease around the edge. Best to take the rod out to make access easier.

About the carbon brushes, if I understand correctly, 7mm refers to the total length if you took the brush out of its housing. So I think those are OK.
 
Yes, that 7mm wear limit on the brushes refers to their total length, and the best way to check that is with them removed. But, if the brushes are originals, they should have a wear line etched in the side at that 7mm point .....

h8CoO4m.jpg


PiJQ5jM.jpg


If you can see that wear line with them still installed, then you could simply measure what's left above it and add 7 to that to get the total length.
 
Got the new seal as flush as I could and then stopped because it started to warp in the middle. Took a fair amount of attempts to get the bike to start I imagine since it’s been sitting for several weeks now—or cuz one muffler was just sitting in exhaust not bolted tight . Anyway Ran the bike for 15+ minutes and no leak from the seal! I depressed the clutch a bunch of times to just to see if I could aggravate it to leak and it didn’t. Was gonna take it to see how the leak did riding...Now guess where I’m stuck again...
Dhotdvkufdscjii chain from hell!!!!!! Top piece won’t slide down the legs. I believe 5twins said they don’t carry this master link anymore otherwise I would just buy a new one. Can’t afford to replace the whole set.
Got an hour till dark, we’ll see...
 

Attachments

  • image.jpg
    image.jpg
    136 KB · Views: 144
Welp, no such luck for me today. Here's where I left the master link sent from hell to steal my time:
IMG_1716.jpeg


I had lock pliers on it, turned the screw as tight as I could so it was also pushing down, and then pushed as hard as I could many many times--won't move any more. Even gave my neighbor a go at it, nothing. Neighbor had to go to the store so grabbed me a bigger set thinking more leverage would help. They're pretty close to a vise except you don't get the great leverage of the bar, just a knob.. I was gonna post pics of each but my computer is being a butt.
Not expecting any magic solutions from you guys, though they're welcome of course, just updating. Really took the wind out of my sails today when this happened as I was moving along there for a second. Will try again Sunday when I have time again, and going to look up the master link again now

Checking out this compression gauge; cheap and straight forward. Doesn't say size of threads but I'm sick of waiting on a friend to use his gauge to test my compression.
Looked at cylinder again today...hoping to do the retorque next. I know we were talking about it cuz of the slight leak at bottom of cylinder, but you can also see old residue pattern coming from (I believe it's called) cylinder head gasket (seam where top and bottom of cylinder meet. (see below) I've never seen an active leak from here, just tiny oil residue weep at base of cylinder, but maybe that's runoff from the head... Gonna clean (mineral spirits + water rinse) before retorque and hopefully that'll address all the above. Not sure if I'd mentioned that old residue before so thought id throw it in.
IMG_1710.jpeg


EDIT: oh! and I was wrong about the size of my wrench for that sprocket. too small. Grabbing 36mm socket
 
Last edited:
Was that the master link that you removed from the chain or a new one? If it came off it’s got to go back on. If any tension was put on the chain when this part of the link was detached, there’s a possibility that the pins of the link have been “bent” outwards a bit. Maybe getting a new link would be the simplest solution. If you can’t get one easily try pulling the other part of the link off thechain and see it the two pieces fit together while in your hand. If the pins of the link are loose, the tension of the chain, although not tightened, could cause misalignment, preventing assembly. While in your hands you can see if the pins pass through the holes one at a time. If they do, the pins have gone out of alignment and are no longer parallel.

I believe that up to this point you have been cleaning a lot with mineral spirits. Have you tried brake cleaner? Nice thing about it is you can spray it in a stream with the plastic tube that’s usually attached to the can. If you catch the runoff with a rag, there’s no need to rinse it off afterwards. All the oily, greasy residue will be on the rag. Wear glasses when spraying this stuff as it could splash you in the eyes. Might be good for washing the goo from between the head and cylinder.

Yeah, same one. Finding new one seemed unlikely so just went with it thinking it'd be more cooperative now. Didn't put any tension on chain while master link was out...it was just hanging from tail light after I cleaned and oiled it. Once I saw it wasn't sliding back together easily, I did try fitting them together in my hand before I really went at it on the chain. The flat bit sat on the legs but won't go past the little divot (see pic below).
IMG_1554.jpeg

I didn't try banging it down in this form...didn't want it to go down not on chain. didn't try one at a time, just at same time.

It has to go down somehow if it was on before and I don't see good reason for it to have changed. Just might need a special tool to get enough force. I considered making the hole bigger with the Dremel today, but figured that wasn't wise considering what the chain does haha. Gonna keep looking for master link...it's just also that all I know about my chain is lm530 pro and I believe it was sold by parts unlimited. 5Twins saw they're no longer carrying the part but I"m still looking. Food this whole chain... https://www.ebay.com/p/1058936476 maybe it'll come to me stealing the master link off that...still cheaper than replacing chain and sprockets

Haven't tried brake cleaner, may look into it. I prefer to use the least gnarly/noxious stuff possible that still gets the job done for a variety of reasons, but for one, I need to bring most of my gear and products inside (and I have a very curious and able cat, and thankfully also closets).
 
There is just something not quite right about that drive chain. Nothing is supposed to be that much of a struggle. Even making allowances for, please forgive me, your relative lack of experience you should not have to use so much force to split a chain or replace the master link.

Maybe investing in a new chain, and sprockets too if you can manage that, will save you a lot of struggles and frustration?

On the cylinder head gasket, doesn't look too bad. Just clean it up and take a look every now and again when you're running the bike.
 
This is what i was worried about when i made the suggestion to use 2 levers, when removing the plate.........as you can see with a straight line the plate is bent...........weather it was bent before removing, ( i suspect is had been), driving a screwdriver in the center to remove it again would have made it worse.....

Take it off and hammer it straight against an anvil.......or what ever you have that can be used as an anvill. May need to use a small file or a dremel bit to de bur the holes that could be caused by the hammering on the plate

Chain Link.jpg
Chain Link.jpgb.jpg
 
If the chain is a throw away then cutting the link would be easiest.............If not, then you could try to do it this way....Run the chain link back ti the back of the rear socket as in the previous pic.........using 2 small screwdrivers, or something along those lines, gently drive then between the link plate and the previous/next link, (as per arrows), try to get as close to the end of the link plate, ............. use small increments, evenly, one end then the next, so as to keep the plate as square as possible. .......Using a back and forth motion it should work.......Well you know, hopefully, nothing to loose.........

just have to hope the ends of the link haven't been burred at all other wise the link plate may not pass over them.............you said you used a rubber hammer so they should b ok
View attachment 177859
maies-chain-copy-jpg.177859
 
I'm thinking that clamping vice-grips on the link between the pins as you did should overcome any "arch" or slight bend in it. I'm just wondering if you are using the vice-grips correctly here to get the most benefit out of them? You want to adjust them as tight as possible in the "open" position, so tight that you can barely clamp them shut, but still be able to do so. Clamp, release and tighten the adjuster screw a bit more, clamp, release, etc. This should slowly work the plate back on. Also, while clamped, you could tap the plate around the pins with a screwdriver and hammer. Then you would be getting the double benefit of clamping pressure and driving force. And, make sure the tips of the vice-grip jaws are centered on the link plates, in line with the pins. In your pic, it appears you have them slid on too far or in too deep.
 
Also, I don't think the master link in that chain you linked to will work for you. It's an o-ring chain and I don't think yours is? Also, it's a rivet type master link according to the description. You have to rivet them on and they can't be re-used. They need to be replaced with a new one any time you remove them. And that leads back to the original issue - you can't get them easily anymore.

If you want a new chain, you can get a nice standard type D.I.D. for the same money .....

https://www.ebay.com/itm/110-Links-...225247&hash=item56deb85380:g:1WwAAOSwZPpfAAP8
Is 110 links the std length?
 
530 series Master Links I've encountered in the last few years seemed to have perhaps only two different through pin diameter sizes? They do vary in width too depending on the chain manufacturer, style, side plate thickness. The side plate "damage" can be improved using a small round file but the side plates are a very hard grade steel. It seems likely that if you were to carry your chain to cycle shops or even a salvage business near by a better functioning master link could be found.
Good luck !
-R
 
Troubling thing is, after all the effort that master link was to remove and now re install, Why is anybody encouraging squishing it back together? Think about what it will take to remove again? I am still on the replace it Squad .. wish we all would just send our spares for fun cuz I don't even know why I have stashed used master links like others of us
:lmao:
20201113_191837.jpg
 
Back
Top