Yam_Tech314's official build thread

Eagerly awaiting the arrival of parts.

I am trying to lay everything out in an orderly fashion so it can all just go together once it's all here.

Spent all day cleaning components and scraping off old gasket material... That takes a longer time than I thought it would. Even with using lacquer thinner to soften things up.
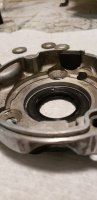
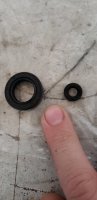
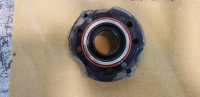
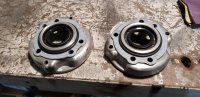
Got the points housings cleaned up, with new seals, new o-rings, and new gaskets. The lacquer thinner really helped soften all the nasty yellowed clear coating. I was able to remove almost all of it with a scotchbrite sponge alone. I fine sanded some edges here and there and got them looking pretty nice. It's a shame they'll be mostly covered... Still, I feel that cleaner components go together easier, and make leaks/problems easier to spot.

I also cleaned up the cam chain tensioner, and a few pieces of hardware here and there. I'm to the point now where Im finally running out of parts to clean. I even took the starter apart and fine sanded the copper, and cleaned all the old dust out with degreaser, dielectric greased it all, and reassembled it. Now it really is just a matter of time...

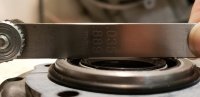
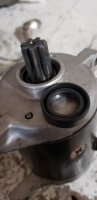
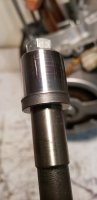
As far as the points cam goes, I polished it by chucking up a tapered punch in my drill, and lightly tapped the cam onto the tapered end, then gave it a good spin with 1000 grit sandpaper til it shined nice. I notice some grooves still, not gonna go nuts on it. Just wondering if that'll cause any issues later on, and if it should be replaced with a new one.
 

Attachments

  • 20210425_171821.jpg
    20210425_171821.jpg
    120 KB · Views: 88
  • 20210425_193028.jpg
    20210425_193028.jpg
    200.5 KB · Views: 81
  • 20210425_200400.jpg
    20210425_200400.jpg
    74.5 KB · Views: 89
I notice some grooves still, not gonna go nuts on it. Just wondering if that'll cause any issues later
YamTech,
Keep in mind, this is a 40+ year old, analog motorcycle, not the Space Shuttle. What you're doing, so far, is above and beyond the "production line" standard. It'll be better than fine. :thumbsup:
 
If you can catch your fingernail on the grooves then it will wear on the points block that rubs on the cam. How fast the wear will be, depends on the grove.
 
Make sure your new cam seals are pressed into the housings as deep as possible (without hanging out the back). That will get the seal lips onto the end of the cam as much as possible and they will have a better chance of sealing. You can also clean up the ends of the cam where the seal lips ride by buffing them clean and shiny with a Scotchbrite pad. This is an old mechanic's trick that works well on any shaft you're installing a new seal on. It won't remove any material but will clean and smooth the surface so the new seal has a fresh area to work on. This trick can even cure a slightly leaking seal sometimes.
 
I was careful to make sure I pressed the seals face down on a flat surface. They were yamabonded in because I mistakenly "over leaned" the inner surface of the points housing and the seals went in easier than I feel they should've. I laid each housing face down and hand pressed each seal in. I made sure they were flush, then wiped away excess Yamabond. After wiping I rechecked to ensure a flush fit, and felt for a wobbly seal around the edge with my finger. They're both nice, and uniformly installed. I'm confident on this.

I'll be sure to polish the cam before installing the housings!
 
5 Twins... Reflecting on what you said, by "as deep as possible" you're referring to me flushing the back of the seal to the back of the housing, in other words, the OPPOSITE of what I did?? Looking for some clarity here, but I'm guessing you mean the opposite since the cam is tapered and pushing the seal deeper into the housing plate would give it more bite onto the cam...
 
Looks like you've got them right, pushed in from the front as deep as they'll go. I just can't tell from your pics if they're pushed in absolutely as far as they'll go without hanging out the backside. Every MM counts here because the seals don't fit very far onto the end of the cam.
 
I'll take a close up for ya! Lol


The feeler gauge sits flat against both the seal surface, and the housing surface. If this is the proper orientation then I'm happy to say I did it right. If not, then the original ones were in wrong too :umm:;)
 

Attachments

  • 1619478756298411764263886395951.jpg
    1619478756298411764263886395951.jpg
    93.4 KB · Views: 78
  • 1619478834766850252888378400639.jpg
    1619478834766850252888378400639.jpg
    77.8 KB · Views: 99
5 Twins... Reflecting on what you said, by "as deep as possible" you're referring to me flushing the back of the seal to the back of the housing, in other words, the OPPOSITE of what I did?? Looking for some clarity here, but I'm guessing you mean the opposite since the cam is tapered and pushing the seal deeper into the housing plate would give it more bite onto the cam...
From the buildup thread in Tech...


Untitled.png
 
Could anyone help me identify this tiny seal? It's smaller than my fingernail, and I can't think of where it would belong... Maybe it was a universal seal kit and it's for a later model??

I also don't know what the other seal is for, these two are evading me.
 

Attachments

  • 20210509_145032.jpg
    20210509_145032.jpg
    85 KB · Views: 66
Took a loom clamp from work to secure my front brake line. I like the final look. It's really coming together.

I also FINALLY received my goodies from Heiden Tuning.
I got a starter gear repair kit that has been installed, a set of O-rings for the starter motor, they're on, and the starter system is fully complete now.

I also got a long one piece push rod for the clutch, new steel and fiber plates, new clutch springs and screws, air filters for my carbs, brake pads for front and rear (I got the supers, hopefully they're longer lasting)

I got new piston wrist pins to go nicely with my circlips as well...

I got carb boots, and last but not least, a strap for the battery.

Totaling $430 and a month and one weeks waiting... Been busy at work in the garage ever since.

With the clutch fiber plates, I should soak them in oil for a day before installing correct? And I should use only the same type of motor oil that I'll run in my final product?
 

Attachments

  • 1621386286043976826893852972846.jpg
    1621386286043976826893852972846.jpg
    136.8 KB · Views: 89
  • 16213863331188349850726820983236.jpg
    16213863331188349850726820983236.jpg
    117.8 KB · Views: 68
Yes, don't use a lighter oil like 10-30 or something. Most of them are "energy conserving" and have anti-friction additives. They would most likely make the clutch slip.
 
Well, I bent two of the four wrist pin clips tonight trying to do a flat head screwdriver install method...


I might have and buy the ring installer tool on eBay, or a forum member if I can find a good deal on one.

In other news, I got the clutch basket torqued in, and all the crankcase stud bolts final torqued.

I'm ready to follow the top end build up thread closely when I get new pin clips...

Slowly rolling along.
 
For the first time since I've been the owner of this XS650 it has working front hydraulic brakes. It had a really beat up stock dual line w/splitter set up that didn't work when I bought it, and now it has a single -3 braided SS line fitted with stainless steel 20° banjo compression fittings. I have brand new front brake pads, a fresh paint job on the dust,, and dirt free brake caliper and caliper mount. As far as I'm concerned it's basically a brand new system... Brand new pads, brand new fluid, brand new lines, brand new banjo fittings... You get the idea.

The piston is not new, neither is the bleeder valve, or the mounting hardware. Other than that, I polished and reamed (ever so slightly) the bleeder valve so it was clean inside and out. I chucked it gently into my drill, and used 1000 grit to get the remnants of minor pitting out of the tapered end, and I must've done a good job because it couldn't be a tighter pull. It has a better brake feel to it than my 2019 Honda Rebel... I'm proud to say my first attempt at building a braking system from the ground up was a success!
 

Attachments

  • 16216288255391944197653249228770.jpg
    16216288255391944197653249228770.jpg
    92.3 KB · Views: 63
  • 1621628909071191737741503273378.jpg
    1621628909071191737741503273378.jpg
    121.5 KB · Views: 69
  • 16216289699675143895199844493313.jpg
    16216289699675143895199844493313.jpg
    86.7 KB · Views: 87
Last edited:
Nice work! Re. Rotella, use the original dinosaur 15W-40, not the new semi-synthetic. The dino oil has JASO MA and MB (wet clutch and centrifugal clutch) ratings. The new stuff is rated only JASO MB, meaning it's approved for use with centrifugal clutch but not wet clutch. Your cam and rockers will be grateful for a little shot of ZDDP additive.
 
Okay. So use the "rotella 15W40"
I'm going to assume it will say "semi synthetic" or presumably I can read the container and look specifically for an MA and an MB?

I'll be doing some reading tomorrow. I'm about ready to assemble my clutch set up, and put both side cases back on! Before I know it this thing will be in one piece.

Heads up to all of you who grew up with points and condensers.... I may need a lot of guidance on that subject when the time comes... Most people my age swear on buying an electronic ign. (Which may come in the future) but I'd love for the shakedown and first few years of seat time to be on a fully stock p+c bike with mechanical electronics. It would make me feel even more proud than I do with the brakes.
 
Back
Top