Ok... So I studied the diagrams in a bit more depth. I think I need to mention that so far all O have wired up to the bike is the ignition switch, the battery, the coils, points, condensers, etc. There isn't an engine stop switch, signals, or horn wired up. Essentially I haven't wired any instrument switches yet. Is this an essential part to getting power to the rest of the components on the motorcycle? My guess is that the engine stop switch is important, as it acts as a pathway to allow power to flow from one component, through the switch, to the coils(?)
-
Enjoy XS650.com? Consider making a donation to help support the site.
XS650.com receives a small share of sales from some links on this page, but direct donations have a much greater impact on keeping this site going.
You are using an out of date browser. It may not display this or other websites correctly.
You should upgrade or use an alternative browser.
You should upgrade or use an alternative browser.
Yam_Tech314's official build thread
- Thread starter G_YamTech_314
- Start date
Yeah... kill switch sends power to the coils and safety relay, which feeds the starter solenoid. It needs to be connected.Ok... So I studied the diagrams in a bit more depth. I think I need to mention that so far all O have wired up to the bike is the ignition switch, the battery, the coils, points, condensers, etc. There isn't an engine stop switch, signals, or horn wired up. Essentially I haven't wired any instrument switches yet. Is this an essential part to getting power to the rest of the components on the motorcycle? My guess is that the engine stop switch is important, as it acts as a pathway to allow power to flow from one component, through the switch, to the coils(?)
“What happens when you turn your key on”
From @XSLeo , it’s a good read.
http://www.xs650.com/threads/what-happens-when-you-turn-your-key-on.9625/#post-98983
From @XSLeo , it’s a good read.
http://www.xs650.com/threads/what-happens-when-you-turn-your-key-on.9625/#post-98983
I got a real rough set up going now... I'm getting power to coils now, and also power to the points. I have accomplished that much. Which means (hopefully) to my knowledge it's wired correctly. When I turn the motor over the light illuminated. And when I loosen the adjusting screws for the points housing I can turn the light on and off. Guessing that's good!
Now... Which line is the fire mark... The one in front of the f or the one behind it..? In the video it looks to be the one in front. Or is it more of a timing range?
Now... Which line is the fire mark... The one in front of the f or the one behind it..? In the video it looks to be the one in front. Or is it more of a timing range?
Attachments
Yes, between the lines is static or idle fireOr is it more of a timing range?
Cool. I'm learning a lotta stuff real fast right now, so sorry in advance if being bombarded with questions isn't something you're in the mood for...
I set my mark right in the middle of the lines for the fire mark... The light comes on at the very moment the first line meets the timing mark. I'm okay with this, but I'm guessing that means my timing is a bit advanced. The thing I find interesting/confusing is that the light stays on for approximately 1.75 full rotations of the crank... Is this due to it firing as soon as the light turns on, but because the crank moves 1/4th the speed of the cam, it takes more than one full rotation for the points cam to close the contact point??
I set my mark right in the middle of the lines for the fire mark... The light comes on at the very moment the first line meets the timing mark. I'm okay with this, but I'm guessing that means my timing is a bit advanced. The thing I find interesting/confusing is that the light stays on for approximately 1.75 full rotations of the crank... Is this due to it firing as soon as the light turns on, but because the crank moves 1/4th the speed of the cam, it takes more than one full rotation for the points cam to close the contact point??
X77S
Let's do this!
If I'm thinking correctly the cam is 2 to 1 crank.
The light's on when the points are open. Light goes out when the points close. When the points are closed, the coil is charging. This is called dwell.... dwell time, dwell angle... all the same. So what you're describing, the points being closed for .25 turns.... is 90° of crank rotation. That's your dwell angle. 5twins knows the numbers better than me, but that seems a bit excessive.Cool. I'm learning a lotta stuff real fast right now, so sorry in advance if being bombarded with questions isn't something you're in the mood for...
I set my mark right in the middle of the lines for the fire mark... The light comes on at the very moment the first line meets the timing mark. I'm okay with this, but I'm guessing that means my timing is a bit advanced. The thing I find interesting/confusing is that the light stays on for approximately 1.75 full rotations of the crank... Is this due to it firing as soon as the light turns on, but because the crank moves 1/4th the speed of the cam, it takes more than one full rotation for the points cam to close the contact point??
That sounds about right. The dwell is 93°, and that's about 1/4 of 360° which is one revolution. So the points are closed (and the test light is out) for about 1/4 of each revolution.
Yes, the idle timing is given as a range on the points models. It's speced at 13° to 17° BTDC. The mark in the middle of the range marked with the "F" is 15° BTDC. Since the advance unit advances the timing a set amount (25°), where you set the idle timing will determine where the full advance ends up. You don't want it to over-advance so it's best to set the idle timing at that center "F" slash mark or in the area to the right of it (13° or 14° BTDC). That will result in a full advance of 38° to 40° BTDC. Many of us run our timing set over near the right slash mark (slightly retarded). This assures it will not over-advance and personally, I think the bike runs better that way. It seems to produce more and better power in the upper RPMs and at high speeds.

Yes, the idle timing is given as a range on the points models. It's speced at 13° to 17° BTDC. The mark in the middle of the range marked with the "F" is 15° BTDC. Since the advance unit advances the timing a set amount (25°), where you set the idle timing will determine where the full advance ends up. You don't want it to over-advance so it's best to set the idle timing at that center "F" slash mark or in the area to the right of it (13° or 14° BTDC). That will result in a full advance of 38° to 40° BTDC. Many of us run our timing set over near the right slash mark (slightly retarded). This assures it will not over-advance and personally, I think the bike runs better that way. It seems to produce more and better power in the upper RPMs and at high speeds.
Okay cool! So my terminology needs some updating but I wasn't COMPLETELY off the mark, no pun intended.
This is very useful info, and I'm happy to be learning so much about it. I'm also now fully understanding why it's so important for the cam chain to be set properly before this procedure can be done. It's really cool to see how it all has to work in conjunction to produce a positive end result. Neat!
I also read up on battery specs and I think mine is toast. It doesn't come close to the 13vdc mark, and that's a number for a battery at 50% power throughout it's lifespan. I'm guessing mine has a dead cell. A new battery would likely help me more than I know.
X77S
Let's do this!
I'm enjoying these trouble with "x" threads, because I learn with you. Often before I get to the area it pertains to. I know basics of timing etc, but I don't always know what mark is best to use or what to change to make it better.
So I appreciate your pain and sacrifice lol.
So I appreciate your pain and sacrifice lol.
Be sure to check timing in both retarded and advanced positions. If the weights in the advance governor (AKA "ATU") are worn, that 25* interval will stretch, so that timing can advance too far when rpms pick up, even when correctly set at idle. Much has been written on this, a few searches will turn up several good fixes. I like gggGary's solution better than the one I used to use. Look 'em up.
Once the bike is running, be sure to check the timing again with a timing light. The static timing method isn't always 100% accurate and also, you can't check the full advance timing with it. This is something you need to do to make sure you're not over-advancing.
So, if your idle timing is set correctly, you may be wondering how the timing can over-advance. Well, the advance unit can develop wear and slop. As I mentioned, it advances the timing a set amount, 25°. That's when it's new and/or not worn. As it wears and loosens up, the amount it advances can start to grow (26°, 27°, etc.). This is one of the reasons the idle timing spec is given as a range, so you can compensate for advance unit wear but still have in spec idle timing. Advance unit wear is also why you always want to check your timing at idle and at full advance. You wouldn't know if advance unit wear was happening if you didn't do a full advance timing check. Here's how I like to run mine. The rotor mark is a few degrees below the full advance slash mark (40° BTDC). I'm probably running at about 38° full advance .....

So, if your idle timing is set correctly, you may be wondering how the timing can over-advance. Well, the advance unit can develop wear and slop. As I mentioned, it advances the timing a set amount, 25°. That's when it's new and/or not worn. As it wears and loosens up, the amount it advances can start to grow (26°, 27°, etc.). This is one of the reasons the idle timing spec is given as a range, so you can compensate for advance unit wear but still have in spec idle timing. Advance unit wear is also why you always want to check your timing at idle and at full advance. You wouldn't know if advance unit wear was happening if you didn't do a full advance timing check. Here's how I like to run mine. The rotor mark is a few degrees below the full advance slash mark (40° BTDC). I'm probably running at about 38° full advance .....
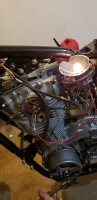
Power to coils 
Fuel delivery
Carbs on correctly
Battery voltage good
Legs that work
Haphazardly installed exhaust held on by one bold each
Will it run?
Fuel delivery
Carbs on correctly
Battery voltage good
Legs that work
Haphazardly installed exhaust held on by one bold each
Will it run?
Here's a better video of the idle sound, and overall better clip of it running unassisted. If I'd had the choke turned on the first time it would've been a cleaner first start, but hey... I'm not really too familiar with it all in one piece yet!
Your exhaust is not bolted down at all??? In your first video, both collars fell off indicating it was not sealing up. Take a couple of minutes and secure that down. I know how exciting it can be to get it first started up, but please make sure you are buttoning things up. Last thing you want is for all your hard work to be undone by overlooking small details or rushing things too soon.
Your exhaust is not bolted down at all??? In your first video, both collars fell off indicating it was not sealing up. Take a couple of minutes and secure that down. I know how exciting it can be to get it first started up, but please make sure you are buttoning things up. Last thing you want is for all your hard work to be undone by overlooking small details or rushing things too soon.
I'm appreciative of your concern. The exhaust is coming back off tonight, and getting a thorough cleaning. I'm going to also pull the foot pegs and other parts off again to gain full access to the motor once more. I'm ordering all new hardware for the exhaust, and taking the time to make sure it's all just right. I bolted the exhaust down in one spot on each side and put the squish washer in each side loosely, which isn't the best idea, but it had surprisingly strong exhaust coming from the mufflers, so the leaks that existed weren't hateful. It's in no way shape or form close to rideable. But the motor being done, and knowing that it runs is a huge step, and strong motivator for me to button every other aspect of the bike up ASAP.
She lives! That's massive. As Willis says, bit of patience but it's all down hill from now on.
Lol downhill in a good way I hope...
Similar threads
- Replies
- 214
- Views
- 25K
- Replies
- 98
- Views
- 8K