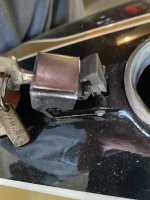
Does anyone have a picture of how the gas cap pieces are put on the tank?


-
Enjoy XS650.com? Consider making a donation to help support the site.
XS650.com receives a small share of sales from some links on this page, but direct donations have a much greater impact on keeping this site going.
You are using an out of date browser. It may not display this or other websites correctly.
You should upgrade or use an alternative browser.
You should upgrade or use an alternative browser.
1973 TX650 Gas Cap
- Thread starter BowlingSS
- Start date
The lock I do know how to install. It is just the latch. It was not on the tank when I got it from Greg. I did have to drill the pin holes. I might have to remove some paint in the location of the latch.
Thanks.
Thanks.
Last edited:
The latch is tricky to install. You DO NOT have the spring correctly oriented in your pics. The latch should be straight up-and-down, not laid over like in your pic. Remove the lock to get it out of the way. The trick is to partially insert an awl, or a thin drift, or a pick, or a drill bit, or a nail or something part way through one side. Then, install the hinge pin through the other side, eventually pushing the awl or whatever out.
Last edited:

This is on a 74 but looks the same as your 73.
Edited my previous post. You DO NOT have the spring correctly oriented in your pics. Correct orientation is in Mike G's pic. You need to flip the spring over.
Still having problems. And I thought the 72 cap latch was a pain. The spring does not look right. Is the spring on right?


Your spring is oriented correctly, but it looks like you forcibly unwound it when installing. The "U" of the spring should point towards the front of the tank. I'll bet your U is pointing towards the back.
Is this the right way?

I took a picture of mine as installed.

You can just see the square loop down at the very base of the latch, toward the filler opening. The latch is very stiff so the loop could be toward the front with the latch removed. To be honest I thought about removing the latch to take a picture of it at rest but after feeling how stiff it is I decided discretion is the better part of valor and left it installed.
The picture in post #7 looks about right but installing it doesn't look easy. You could install it with the vertical spring legs unhooked, get everything installed and then hook the spring legs behind the latch.
Hope this helps.
Last edited:
Just to prove it to myself I just did it the way I was thinking.
First install with the legs unhooked.

Then hook the legs behind the latch. I used a dental scraper (cuz it was handy but many things would work) I got with a pick and a mirror from CVS pharmacy.

Sorry the flash washed out the spring leg but you can still see it if you stand on one leg with your head cocked at a 45 degree angle to the left. I tried to edit the picture to show things better but my software is pretty basic as is my ten+ year old camera.
First install with the legs unhooked.

Then hook the legs behind the latch. I used a dental scraper (cuz it was handy but many things would work) I got with a pick and a mirror from CVS pharmacy.

Sorry the flash washed out the spring leg but you can still see it if you stand on one leg with your head cocked at a 45 degree angle to the left. I tried to edit the picture to show things better but my software is pretty basic as is my ten+ year old camera.
Last edited:
That worked. Thanks a lot.Just to prove it to myself I just did it the way I was thinking.
First install with the legs unhooked.

Then hook the legs behind the latch. I used a dental scraper (cuz it was handy but many things would work) I got with a pick and a mirror from CVS pharmacy.

Sorry the flash washed out the spring leg but you can still see it if you stand on one leg with your head cocked at a 45 degree angle to the left. I tried to edit the picture to show things better but my software is pretty basic as is my ten+ year old camera.
Bill
I forgot the clips. I will do that at a later date.
73TX650Twins
XS650 Member
Practically impossible to install that latch with the springs latched. Like Mike G says, hook the legs of spring behind the ears on the latch after the latch and spring are installed.
Glad it helped Bowling 

Similar threads
- Replies
- 4
- Views
- 1K

