-
Enjoy XS650.com? Consider making a donation to help support the site.
XS650.com receives a small share of sales from some links on this page, but direct donations have a much greater impact on keeping this site going.
You are using an out of date browser. It may not display this or other websites correctly.
You should upgrade or use an alternative browser.
You should upgrade or use an alternative browser.
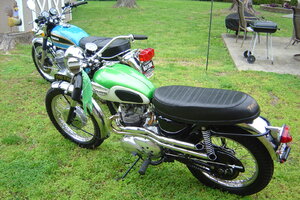
I am back with a Yamaha
- Thread starter Britman
- Start date
Britman
XS650 Addict
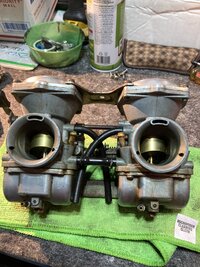
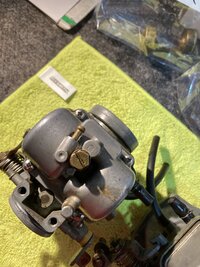
Starting rebuilding the carbs yesterday and I do have Z-8 needle jets and 4M1 needles. The Z8 jets are a little bunged up, it looks as if someone prior to me jerked them out with pliers and of course the o rings are petrified. I have found that replacements are rarer than a loveable Mother-in-Law, no major site like Jets R Us carry them, or they are sold out. Mike's does have reproductions but cast out of something other than brass and not rated that high. For the time being I am going with the originals and have ordered 1mm x 4mm replacement o rings made for Suzuki carbs but will work with the Z-8 needle jets if I understand correctly. I know guys, one step forward, two steps back. As a guy I used to work with was fond of saying "If it was easy, your Sister would be doing it"........
Last edited:
LTGTR
XS650 Addict
Britman
You say in your post you are going to order 1mm x 4mm orings for your Z8 needle jets.
Here's my experience which from past memory doesnt line up with what 5Twins or Jim have advised in the past. Its most likely I just haven't done it right.
The photo shows the 1mm x 4mm orings which are supposed to be the correct ones. My wife and I spent fucking hours trying to get them to fit with every technique and lubricant under the sun. Its as if they were too big and some of the oring just woudnt go in with the neddle jet. In the end I just gave up and put the bowl on and said fuck it. Now, the bowl may have ended up pushing it into place but it would take a miracle to take up the extra oring that was sticking out.
I took the advise of 5Twins or Jim or Gary (sorry) and got original Yamaha and Suzuki ones from CMSNL/partzilla (sorry) and if you look at the photo you can clearly see they are smaller - approx 3.2mm x less than 1.00 mm - hard to measure.
As you can see I bought a lot of them because of the freight cost.
I havent fitted any of the new ones yet but I can easily see they are smaller which will be a massive advantage when I go back to tackling the job. Also - they are at least genuine which is also an advantage and gives me confidence.
Just thought you may want to know this before ordering the big ones notwithstanding you may have more luck or a better technique than me at fitting them.
Regards Ray.
Britman
XS650 Addict
Thanks for the update Ray. I actually found two o rings in a small package in my stash of Japanese carb parts, they fit perfectly and I have no idea what they were ordered for, but it pays to keep everything. Prior to the find I had experimented with a couple of the smallest o rings I could find in the hardware store. Like you I found they were close but no cigar, even with trying to careful trim them to fit with a razor blade they would not seat. If you look at the needle jet under magnification there is a small band at the top of the groove and o ring has to be a perfect fit.
I located a good complete set of 76 B38's on E bay yesterday that were priced decent and had a make an offer option. It was vendor I had bought a lot of Honda parts from in the past and he accepted a much lower amount than posted, so they are on the way. I am waiting to see what is on the inside, hopefully some rare Z8's, if they have been keep stock. Regardless it doesn't hurt to have a backup, I take after my Grand-father who used to wear a belt and suspenders.....
I located a good complete set of 76 B38's on E bay yesterday that were priced decent and had a make an offer option. It was vendor I had bought a lot of Honda parts from in the past and he accepted a much lower amount than posted, so they are on the way. I am waiting to see what is on the inside, hopefully some rare Z8's, if they have been keep stock. Regardless it doesn't hurt to have a backup, I take after my Grand-father who used to wear a belt and suspenders.....
Yes, it's difficult to get the needle jet o-ring to seat into the carb body on the Z-8 and Z-6 needle jets because the o-ring groove is so close to the shoulder. I just lube it up and install the float bowl. Over time, it works its way in. On the Z-2 needle jets where the o-ring groove is further away from that shoulder, they push right in and seat no problem with the 1 x 4 o-rings.

Britman
XS650 Addict
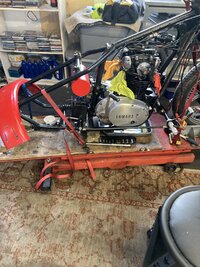
The extra B38 E bay carbs arrived today and overall I am very pleased. They are complete and both the slides and enricher are free. The only faults I can find is that several of the bowl screw holes are stripped and one vent tube in the right bowl has some JB Weld or one of its cousins around the base. I plan on tapping out all of the bowl holes the next biggest size up I can get away with in either Metric or SAE, rebuilding them after a good clean, and jet a little fatter than the set I have already done. Hopefully it may make dialing the bike in somewhat easier when that day comes. Regardless I never mind having an extra set on the shelve incase another 650 comes along in the future.
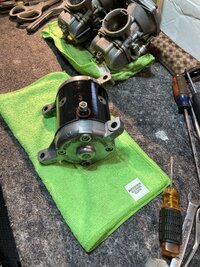
I cleaned and detailed the starter, at my age kicking for me is a last resort. New brushes have gone into the alternator also. I an waiting on a clutch pushrod seal, yes I messed the one and only one I had on hand up during a failed install attempt. The seal hole edge had now been smoothed, two seals are coming to be sure, and I am also using the freezer and heat gun method the next time around.
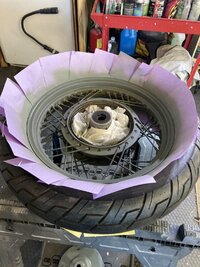
I will starting to prep the tins for paint soon and have to decide on a color. Wheels will be coming off for a good clean and I really have my doubts about the condition of the chrome. I know for sure there is no money in the budget for powder coating but I have seen some decent results with either epoxy appliance paint or automotive paint with 2k clear after the correct prepping. This is always my favorite part, when you get out that big tube of lipstick and smear it on the pig. Really enjoying the process, of course as we all know, there is no bad day in the garage.......
I cleaned and detailed the starter, at my age kicking for me is a last resort. New brushes have gone into the alternator also. I an waiting on a clutch pushrod seal, yes I messed the one and only one I had on hand up during a failed install attempt. The seal hole edge had now been smoothed, two seals are coming to be sure, and I am also using the freezer and heat gun method the next time around.
I will starting to prep the tins for paint soon and have to decide on a color. Wheels will be coming off for a good clean and I really have my doubts about the condition of the chrome. I know for sure there is no money in the budget for powder coating but I have seen some decent results with either epoxy appliance paint or automotive paint with 2k clear after the correct prepping. This is always my favorite part, when you get out that big tube of lipstick and smear it on the pig. Really enjoying the process, of course as we all know, there is no bad day in the garage.......
Attachments
So, you know, those wheels have a very unique spoke pattern. If you can refinish them to your satisfaction, ok. If you want to coat them, I've found Cerakote a better option than paint or powder (there are air-cured formulas though I prefer oven).
And.....Mikes has reproductions pretty cheap:
https://www.mikesxs.net/yamaha-xs65...html?fits-motorcycle=Yamaha/XS650/XS650J/1982
https://www.mikesxs.net/yamaha-xs65...html?fits-motorcycle=Yamaha/XS650/XS650J/1982
And.....Mikes has reproductions pretty cheap:
https://www.mikesxs.net/yamaha-xs65...html?fits-motorcycle=Yamaha/XS650/XS650J/1982
https://www.mikesxs.net/yamaha-xs65...html?fits-motorcycle=Yamaha/XS650/XS650J/1982
That rear rim that JP linked to is too narrow. 2.15" is the stock size for the 18" rear wheels but the 16" ones are wider. You want a 2.50" rim but I don't see any offered alone, only in this kit .....
https://www.mikesxs.net/yamaha-xs650-wm-2-15-x-16-x-48-hole-rear-rim-and-spoke-kit.html
However, if you wanted to change to an 18" rim, there is this one on clearance .....
https://www.mikesxs.net/yamaha-xs650-wm-2-15-x-18-x-48-hole-alloy-rim-34.html
https://www.mikesxs.net/yamaha-xs650-wm-2-15-x-16-x-48-hole-rear-rim-and-spoke-kit.html
However, if you wanted to change to an 18" rim, there is this one on clearance .....
https://www.mikesxs.net/yamaha-xs650-wm-2-15-x-18-x-48-hole-alloy-rim-34.html
Last edited:
Britman
XS650 Addict
As Mr. Clint Eastwood said "A man has got to know his limitations." There are several things I have never done in the motorcycle world, one of them is lace a wheel from scratch. (I have also never owned or ridden a BMW motorcycle, really can't explain that one.) Lacing would be a procedure I really don't feel I would be comfortable doing no matter how many You Tube videos I watched. Like I said, I will see how they come out with a deep clean and buffing. Steel wool and rubbing compound have brought a few back in the past that turned out be good looking 5 footers, maybe with a little chrome paint thrown in for good measure. There is no substitute for a lot of elbow grease and patience. I have never heard of Cerakote, but will check it out.....Thanks gentlemen......
Lacing would be a procedure I really don't feel I would be comfortable doing no matter
Yeah, but you're with us now - lots of things are possible
")

I never re-laced a rim until I did. It's not that hard and kind of fun.
I'm gonna' try to do mine. After all, GGGary is only a click away if I mess up.I never re-laced a rim until I did. It's not that hard and kind of fun.
Britman
XS650 Addict
For anyone else with stripped bowl screws, here is what worked for me. 8/32 half inch screws and tap the holes with the same size tap. Just FYI, I had to blunt the tip of the tap to get good threads on the corner hole on both carbs where height is an issue. Bowls are tighter than my Uncle Jack, he used to wash and reuse paper towels and had nothing but fast food condiment packets in the cupboard......
Attachments
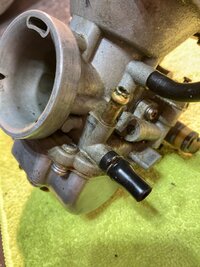
Loctite Stripped Thread Repair is The Boss for that particular repair.For anyone else with stripped bowl screws, here is what worked for me. 8/32 half inch screws and tap the holes with the same size tap. Just FYI, I had to blunt the tip of the tap to get good threads on the corner hole on both carbs where height is an issue. Bowls are tighter than my Uncle Jack, he used to wash and reuse paper towels and had nothing but fast food condiment packets in the cupboard......
Britman
XS650 Addict
Let's talk oil leaks.....I am glad I also own a vintage Triumph, so I have experience.....I thought at first it was the barrel nuts under the motor, they were dripping even with no oil in the motor, changed the crush washers and walked away thinking I had done a good job. Filled it with oil and and cranked it over for a few minutes to prime the the engine since it had been sitting empty for awhile, and was greeted with nice fresh oil on the lift floor. It is the sump plate gasket, I can see the flow. I don't know if I kinked it installing the new filter or just didn't get it seated. I tried tweaking the 6mm bolts a little more, but no luck. I am ordering two this time just to be sure, and looks like the silicone will also be making an appearance after a good clean. I am pleased it is not the clutch pushrod or countershaft seals, they are dry as a bone, so I know I have good install on those. This "Old Girl" is really giving me a run for my money. Of course I understand nearly all of the issues are related to sitting outside with a barbecue grill cover as protection for over two years. I scrubbed the rear wheel spotless today while I did my fifthly black truck, and made the decision the chrome was too far gone. Roughed it up and hit it with etching primer. I am going to let it cure for a few days and then epoxy black appliance paint was the paint contest winner......
Attachments
Hmm....I've not experienced it before, but perhaps the plate has become "unflat" and needs some surface-plate workand was greeted with nice fresh oil on the lift floor. It is the sump plate gasket,

RTV


Britman
XS650 Addict
I was planning on using the sheet of sandpaper and glass pane trick to check for warpage before putting it back up again. I am going to inspect very closely.....