SpookyWizard
The real magic is that I haven't blown myself up!
So about a year ago I purchased a "1980 bobber project"

I had to gather some tools and make sure she had plenty of time to get settled in (11 months) so in the meantime I decided to do some warm up jobs, restoration of a fuel tank and make a rear fender!
I have a little fiberglass experience so whipped up a fender using a spare wheel to get the rough shape, cleaned then filled and faired the fuel tank, after that a nice coat of paint, nothing fancy here just whatever was in the paint cabinet at work


After a long time of just looking at the bike and wondering how to start i took the plunge, no idea and therefore no worries!
I manhandled the engine out and propped it up on some scraps of wood which was a nice visual representation of how I was propping my hopes up for having a running XS650 at the end of this!

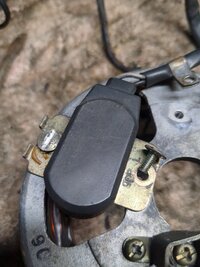
The previous owner was kind enough to strip some of the screws saving me the trouble of doing it myself!
Following along Two wheel workshops video s on YouTube and a workshop manual i got the top end off surprisingly easy, though a few missing bolts and nothing torqued up helped speed things along!
I did drop the camchain into the crank case which I tell myself is just motivation to do the bottom end.
A few quick inspections and everything seems In fairly good nick, rocker box is free of any signs of wear, pistons were really covered in carbon and oil but seem to be good underneath it all, gudgeon pins and conrods have minimal play etc. I still need to check the tolerances but hoping a rebore isn't needed. I have however given myself a fun challenge of working out which piston came from which cylinder...
I didn't get many photos of this bit but I'm getting it all vapour blasted so will upload some when it's looking nice and clean.
Moving on to the bottom end, again following along Two wheel workshop's excellent video series I managed to remove all the gubbins and the sepperate the crank cases, I followed the guide on bolt order but found that it was kind of redundant as only half of the were torqued up so I really hope the cases aren't warped or damaged!

Pulling the crank and gear clusters out was the last thing I did tonight, which gave me great satisfaction as barley a fortnight ago I had never touched anything engine related much past topping up oil but now I had stripped down and engine!

I have lots of cleaning, organising and inspection to do before starting my attempt and putting it all back together again in the correct order and hopefully getting her running!
I will try to update this as I continue, this is about 2 week's worth of occasional evenings working on bits.
If you managed to get through all of this then well done and thank you for taking the time to join my journey into madness...I mean motors!
I had to gather some tools and make sure she had plenty of time to get settled in (11 months) so in the meantime I decided to do some warm up jobs, restoration of a fuel tank and make a rear fender!
I have a little fiberglass experience so whipped up a fender using a spare wheel to get the rough shape, cleaned then filled and faired the fuel tank, after that a nice coat of paint, nothing fancy here just whatever was in the paint cabinet at work
After a long time of just looking at the bike and wondering how to start i took the plunge, no idea and therefore no worries!
I manhandled the engine out and propped it up on some scraps of wood which was a nice visual representation of how I was propping my hopes up for having a running XS650 at the end of this!
The previous owner was kind enough to strip some of the screws saving me the trouble of doing it myself!
Following along Two wheel workshops video s on YouTube and a workshop manual i got the top end off surprisingly easy, though a few missing bolts and nothing torqued up helped speed things along!
I did drop the camchain into the crank case which I tell myself is just motivation to do the bottom end.
A few quick inspections and everything seems In fairly good nick, rocker box is free of any signs of wear, pistons were really covered in carbon and oil but seem to be good underneath it all, gudgeon pins and conrods have minimal play etc. I still need to check the tolerances but hoping a rebore isn't needed. I have however given myself a fun challenge of working out which piston came from which cylinder...
I didn't get many photos of this bit but I'm getting it all vapour blasted so will upload some when it's looking nice and clean.
Moving on to the bottom end, again following along Two wheel workshop's excellent video series I managed to remove all the gubbins and the sepperate the crank cases, I followed the guide on bolt order but found that it was kind of redundant as only half of the were torqued up so I really hope the cases aren't warped or damaged!
Pulling the crank and gear clusters out was the last thing I did tonight, which gave me great satisfaction as barley a fortnight ago I had never touched anything engine related much past topping up oil but now I had stripped down and engine!
I have lots of cleaning, organising and inspection to do before starting my attempt and putting it all back together again in the correct order and hopefully getting her running!
I will try to update this as I continue, this is about 2 week's worth of occasional evenings working on bits.
If you managed to get through all of this then well done and thank you for taking the time to join my journey into madness...I mean motors!