It’s starting to look pretty great Daniel! Can’t wait to see it come together! 


I've taken another photo in the daylight because the previous photo doesn't really show the tone correctly.
View attachment 217736
The Cerakote used is called crushed silver. I chose this over clear because the R6 top yoke (photos to come in good time) that I'm using has had some welding done to it and therefore couldn't be polished so I thought why not coat certain choice components in this shade.
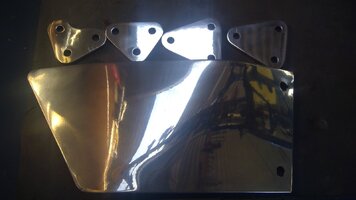
Here are the exercise pieces from the fabrication course that I'm doing, nothing special (although to me they are) but all of the techniques that you need are utilised minus welding.
View attachment 217737
Daniel.
Come on now, moon, aluminium must always be polished after the bending and beating. That is an unwritten law. There is a product called 'Glisten', which when used with adhesion promoter is supposed to stick pretty well to polished aluminium. I haven't tried it yet, but intend to. Cerakote is also supposed to be pretty good for polished aluminium, but it's only available as a kit with gun and other associated accessories in my part of the world, so I won't be trialing that.I've taken another photo in the daylight because the previous photo doesn't really show the tone correctly.
View attachment 217736
The Cerakote used is called crushed silver. I chose this over clear because the R6 top yoke (photos to come in good time) that I'm using has had some welding done to it and therefore couldn't be polished so I thought why not coat certain choice components in this shade.
Here are the exercise pieces from the fabrication course that I'm doing, nothing special (although to me they are) but all of the techniques that you need are utilised minus welding.
View attachment 217737
Daniel.


I think that was a good choice on the case finish. I'm anxious to see what you plan for side-cases' finish and the top-end. Those cases will set-off nicely a set of polished sidecases and a top-end in a slightly contrasting tone (perhaps).
Hi DanielI’m go to polish the side casings & valve covers.
Then have the cylinder & head coated in the same crushed silver Cerakote. I’m also thinking of then mechanically removing the coating off the tips of the fins and then polish these surfaces.
Daniel.


Digitally mapped? That's cheating! What's the fun in having a part that you don't spend hours filing and grinding on? Nice job.Quick little Sunday evening update.
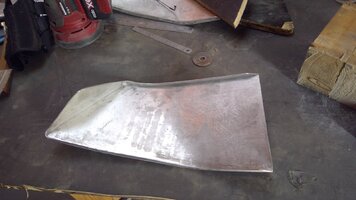
I've been smoothing out the exterior weld on cowl MK1, I say MK1 because I've began to make another just for practice (the bug has well and truly bitten) I've also been trying to finalise how I'm going to produce the bottom section of the cowl, the piece that will be fixed to the frame.
As I mentioned in another thread I've began planning out my undertray/base pan. I've seen this method done before and always loved it for how clean it looks. My plan is to TIG a 2mm thick plate between the tubing of the frame and then weld 'mounts' onto the top side of this to locate the battery & Motogadget M-Unit plus little guides for any cabling.
I'm in the unique position after having my frame digitally mapped to be able to have a rendering done to fit perfectly. I'm going to have the final piece made 4mm undersize to account for the thickness of material and then so after welding in place I can undergo the arduous task of blending it all into one seamless form.
View attachment 218595
On another note I've also had an exact reproduction of the factory rear sprocket made but in 7075 520 pitch.
View attachment 218596View attachment 218597View attachment 218598
Daniel.
Digitally mapped? That's cheating! What's the fun in having a part that you don't spend hours filing and grinding on? Nice job.
I feel a little better now.I’ll still spend hours making it look like it grew there though if that’s any consolation?
Daniel.
")


Looks amazing! It’s the little details that set builds apartI've mentioned it before but I'm using 5EB R6 yokes and a Cogniton Moto stem on my build.
Something I've struggled with for sometime is what to do in regards to the steering stops. I've seen on @Bjorn's thread that he was using a similar setup and noted his solution to the problem and appreciated his results but wanted to try something different (please read elaborate)
My first step was to remove the factory stops and compare their original location to @Bjorn's chosen local.
View attachment 220120
View attachment 220122
We then tapped the stops and drilled the yoke so a M3 bolt could act as a post to secure them prior to welding.
View attachment 220123
View attachment 220124
I wanted the yoke to look as close to the factory item as possible with the relocated stops, so after welding they were worked to resemble the original offering.
View attachment 220126
View attachment 220127
Heaps of work for something no one will ever notice!
Daniel.
Looks amazing! It’s the little details that set builds apart


Nice work! Although, I was expecting a “I decided to make a titanium frame” post haha