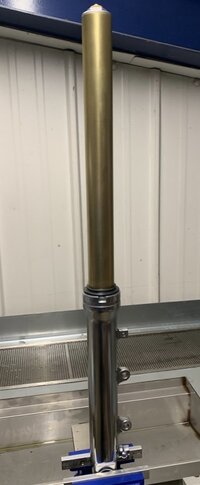
You've got a hell of a good finish on those fork lowers, I couldn't get mine as evenly shiny as that.I got sent a really exciting photo from Rick tonight...
View attachment 232820
It's the rear wheel for my build all laced up (Excel Takasago valanced & dimpled rim, Buchanan's spoke nipples & stainless butted spokes and a Cognito Moto hub). This feels like a huge milestone to reach and a rolling chassis is in sight.
Whilst I'm at it here's another couple of teaser pics'.
View attachment 232821View attachment 232822
These are my 5EB R6 fork lowers polished and coated in clear Cerakote and the accompanying stanchions coated in Ti Nitride.
The forks are currently awaiting rebuilding with all new genuine Yamaha seals & bushes, 5wt Oil & 110mm air gap and Ohlins springs for 90KG rider weight.
Daniel.
-
Enjoy XS650.com? Consider making a donation to help support the site.
XS650.com receives a small share of sales from some links on this page, but direct donations have a much greater impact on keeping this site going.
You are using an out of date browser. It may not display this or other websites correctly.
You should upgrade or use an alternative browser.
You should upgrade or use an alternative browser.
“Garage built, shed built”... stable built!
- Thread starter Bewarethemoon
- Start date
You've got a hell of a good finish on those fork lowers, I couldn't get mine as evenly shiny as that.
I can’t claim credit for any of the polishing, I don’t have the time to get the results I’ll be happy with.
I have polished lowers to a comparable standard but, and it’s a huge but, the time it was took me was stupendous, no way I can find that kind of time these days.
I have a guy I use for polishing and his work is outstanding (as you can see here) and I’ve always been happy when the rates he charges. First thing he ever polished for me were my hubs and I’ve not looked back since.
Daniel.
Last edited:
Sure, it's your credit score and your conscience.Does that mean I can ignore my credit card statements?
So as some of you may remember, some time ago I had my XS1 cylinder head ported via the service that Craig Weeks' offered.
The CNC machine & porting model did most of the hard work but there were some areas I wanted to work.
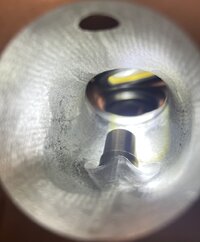
I started with the intake ports
The porting model didn't address any casting ridges/flaws in the port. You may also notice the slight step or channel between the reworked guide boss and walls of the port. I wanted to gently 'smooth & blend' things here to minimise any excess turbulence.
You may also notice the step or graduation in the valve guide itself (these have been modified to Harry Lillie's specs'). For the same reasons as stated above I wanted to 'blend' that too.
Finally I aimed to leave a uniform finish of 80 grit on all surfaces.
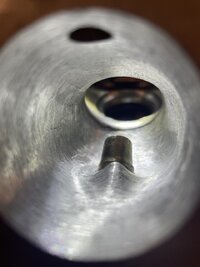
Any feedback would be very much appreciated as although I have done a lot of research into the topic it's my first time doing the work.
Daniel.
The CNC machine & porting model did most of the hard work but there were some areas I wanted to work.

I started with the intake ports
The porting model didn't address any casting ridges/flaws in the port. You may also notice the slight step or channel between the reworked guide boss and walls of the port. I wanted to gently 'smooth & blend' things here to minimise any excess turbulence.
You may also notice the step or graduation in the valve guide itself (these have been modified to Harry Lillie's specs'). For the same reasons as stated above I wanted to 'blend' that too.
Finally I aimed to leave a uniform finish of 80 grit on all surfaces.

Any feedback would be very much appreciated as although I have done a lot of research into the topic it's my first time doing the work.
Daniel.
Little bit of a media heavy post tonight gentlemen but I think some of you will find it interesting.
Whilst researching Elephant foot valve adjustment screws I came across this post (#37) by @TwoManyXS1Bs in the following thread.
https://www.xs650.com/threads/broken-elephant-foot-valve-adjuster.46584/page-2#post-771830
It really piqued my interest and I wanted so see if I could achieve it so with the help of my machinist friend Luke...
First up Luke made a fixture to hold the rocker arm and allow us to choose the optimal path for the EDM hole.
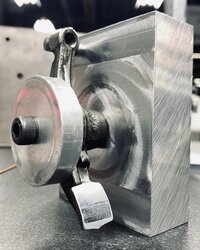
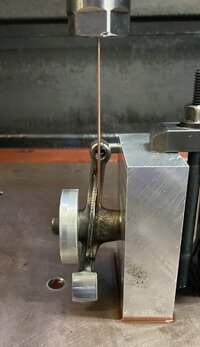
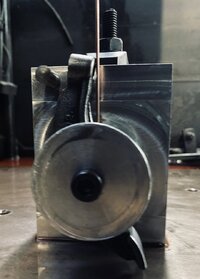
Then onto the magic of the EDM machine.
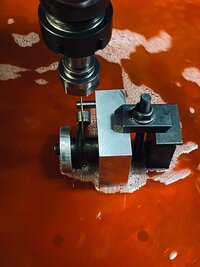
Job done.
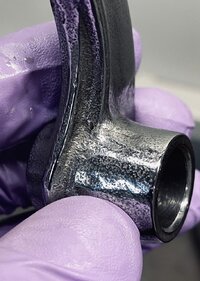
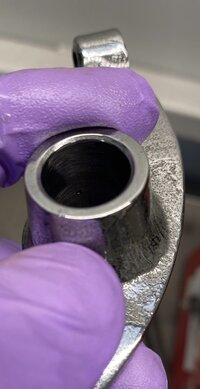
Daniel.
Whilst researching Elephant foot valve adjustment screws I came across this post (#37) by @TwoManyXS1Bs in the following thread.
https://www.xs650.com/threads/broken-elephant-foot-valve-adjuster.46584/page-2#post-771830
It really piqued my interest and I wanted so see if I could achieve it so with the help of my machinist friend Luke...
First up Luke made a fixture to hold the rocker arm and allow us to choose the optimal path for the EDM hole.


Then onto the magic of the EDM machine.

Job done.


Daniel.
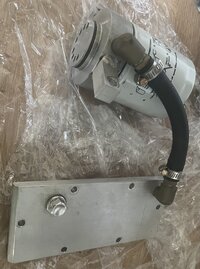
That plate replaces the sump?
That plate replaces the sump?
Yes, I think I’m going to design one that looks closer to factory though with the same fin pattern & sump plug in the middle maybe?
Daniel .
An oil filter needs an inlet and an outlet. I am confused as to where this will mount and how the oil flows. I am certain there is a simple explanation that I am missing.This arrived this morning all the way from Australia by the fine fellow known on this forum as @hotdog
View attachment 233749
Daniel.
An oil filter needs an inlet and an outlet. I am confused as to where this will mount and how the oil flows. I am certain there is a simple explanation that I am missing.
Hi @Kevin Werner
This explains the beginnings of my foray https://www.xs650.com/threads/oil-spot-ted.63291/
Further on in the thread is a link to another thread that this assembly features in.
Daniel.
So this filters the oil but it doesn't seem to be in the oil supply line.
So this filters the oil but it doesn't seem to be in the oil supply line.
Evening gents,
It's been a few weeks since my last post but things have been happening, some of them aren't ready to post yet but have been alluded to elsewhere on the forum.
What I can post is my new top yoke... let me explain.
Whilst consulting with Ian Davis of ETTO Motorcycles (who just happens to be a little bit of a motorcycle chassis geometry/suspension guru due to previous employment) we discussed how all the changes that I'm making will negatively influence handling and as performance is paramount to me on this build I want to do all I can to ensure that things are as optimal as they can possibly be.
I'll start on the front end, the early R6 forks are shorter than the XS650, 755mm versus 768mm. I'm using an 18" diameter rim versus the stock 19".
Then on the rear another 18" rim versus the stock 19". All of this along with the longer Ohlins shocks would leave the bike looking like it was 'diving' under heavy braking, all the while handling like a shopping trolley, so to remedy this Ian suggested designing a top yoke with a 38mm step or rise so that is what I did.
I wanted to try and emulate the profile of the early R6 yoke I had originally intended on using.
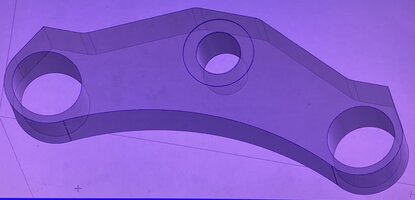
Then I thought whilst we're at it why not imbed a Motogadget Motoscope Mini.
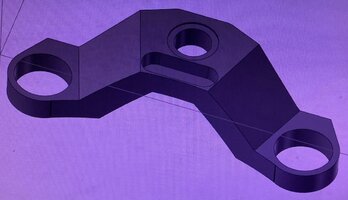
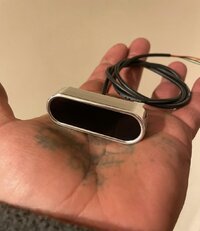
For material I looked at what others like Cognito Moto use so went with 6061.
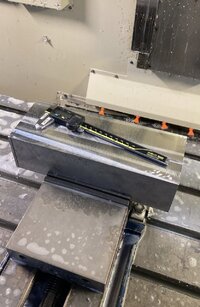
I've found it immensely satisfying watching the form I saw in my minds eye emerge step by step from a lump of material and I hope you all do too.
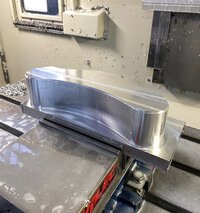
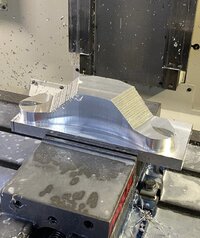
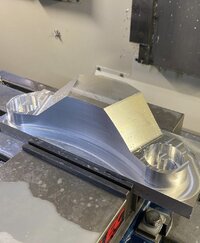
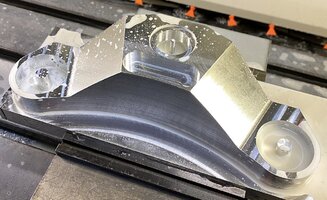
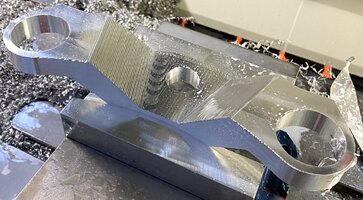
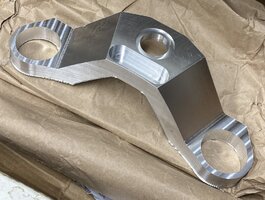
I cannot put into words how super happy I am with the final piece, I had every faith in Luke but he really has outdone himself.


Daniel.
It's been a few weeks since my last post but things have been happening, some of them aren't ready to post yet but have been alluded to elsewhere on the forum.
What I can post is my new top yoke... let me explain.
Whilst consulting with Ian Davis of ETTO Motorcycles (who just happens to be a little bit of a motorcycle chassis geometry/suspension guru due to previous employment) we discussed how all the changes that I'm making will negatively influence handling and as performance is paramount to me on this build I want to do all I can to ensure that things are as optimal as they can possibly be.
I'll start on the front end, the early R6 forks are shorter than the XS650, 755mm versus 768mm. I'm using an 18" diameter rim versus the stock 19".
Then on the rear another 18" rim versus the stock 19". All of this along with the longer Ohlins shocks would leave the bike looking like it was 'diving' under heavy braking, all the while handling like a shopping trolley, so to remedy this Ian suggested designing a top yoke with a 38mm step or rise so that is what I did.
I wanted to try and emulate the profile of the early R6 yoke I had originally intended on using.

Then I thought whilst we're at it why not imbed a Motogadget Motoscope Mini.


For material I looked at what others like Cognito Moto use so went with 6061.

I've found it immensely satisfying watching the form I saw in my minds eye emerge step by step from a lump of material and I hope you all do too.


I cannot put into words how super happy I am with the final piece, I had every faith in Luke but he really has outdone himself.
Daniel.
Last edited:
Now that’s a gorgeous piece. Good stuff!
Absolutely amazing. Very well done!
Absolutely amazing. Very well done!
I can’t take the credit for anything but the design brief, Luke did all the leg work and I couldn’t be happier with what we/he have achieved.
Daniel.
Now that’s a gorgeous piece. Good stuff!
I wholeheartedly agree, should look even more so after a little smoothing/mild polishing before crushed silver Cerakote.
Daniel.
rehar
rehar
If this hasn't been nominated for the XS650 Calendar yet...
Similar threads
- Replies
- 5
- Views
- 3K

