Thanks 5T, that's great to hear. I ended up snapping a ring when trying to remove them so reusing wasn't ultimately in the cards, but good to know that things are generally looking good.
-
Enjoy XS650.com? Consider making a donation to help support the site.
XS650.com receives a small share of sales from some links on this page, but direct donations have a much greater impact on keeping this site going.
You are using an out of date browser. It may not display this or other websites correctly.
You should upgrade or use an alternative browser.
You should upgrade or use an alternative browser.
1974 TX650A Restoration Project
- Thread starter SomervilleXS650
- Start date
-
- Tags
- 1974 build thread tx650a
Now for a little before and after (this part is fun). I degreased all the top end components and vapor blasted them to prep for reassembly. I was very pleased with how they came out 


I need a moment...and a cigarette...

That's me on my brandy-new '74 TX650A back in the day. I REALLY like that Cinnamon Brown color and AFAIK, the '74 is the only year it was available.
Love your vapor blaster and the results it gives! Don't do a lot of mechanical work any more, but if/when I do, I might just have to build me one of those.
Following this and looking forward to the updates.
That's me on my brandy-new '74 TX650A back in the day. I REALLY like that Cinnamon Brown color and AFAIK, the '74 is the only year it was available.
Hey Downeaster! Always great to see another New Englander that knows the misery of trying to squeeze the riding season well beyond what is reasonable haha.
That's awesome!!
 I feel like the '74 is a bit of a rare beast. I love the Cinnamon Brown too, and you'll see I tried to pay homage in the rebuild (hope you agree I did it justice). Feel like it screams 1970's more than any other stock color I've seen.
Wow - those parts look excellent Somerville - like new!
One key part to check is the front timing chain guide (the long “fixed” one - not the one on the movable timing chain tensioner). That front guide is really the one mechanical part on the XS650 (aside from the #4 starter gear hair clip) that seems to fail.
The failure mode is either that the plastic guide track disintegrates and you get lots of little bits of black plastic in the oil filters (always check both filters) or that the entire track de-bonds from the aluminium shoe and falls down into the engine sump, more or less in one piece. Either way, the engine will still run but it makes a nasty noise.
Anyhow - it is well worth checking the condition of that front guide. While OEM engine parts are normally preferable, I did a fairly comprehensive study in my thread entitled “Lucille pulls another one on me” and found that the aftermarket guides from MikesXS are dimensionally very close to the OEM part and should function just fine. Unfortunately, the supply of OEM front guides appears to have totally dried up - you used to be able to find them all the time, but now, crickets.
Anyhow, just a thought when you have it all apart.
Pete
Last edited:
Super impressive results! It took me an eternity to get my motor that clean using nothing but elbow grease!
Well done!
Well done!
Alright, let's throw some more up here...
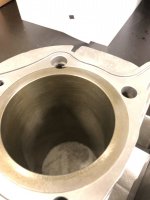
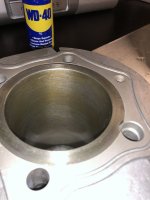
Below is the inside of the jug before and after vapor blasting. Found in one of the threads a lot of discussion and debate about cylinder honing. I went down far more of a rabbit hole then I intended, I'll tell you. There's one rather compelling article from a fellow named Pete Snidal in 1999 that makes a case for not honing, despite the general consensus that you hone when replacing rings. I think there are a lot of debates about this, probably quite a few on this board in fact, but I ultimately decided a light hone felt like a pretty safe bet and that if I used a FlexHone brush-type, I probably couldn't muck anything up too badly. I ended up buying one, using it and reselling it pretty quickly, so not a bad $15 net cost to do it. Ended up with a light cross hatching that seemed OK, I was a little skittish about going overboard, so I probably erred on the side of not enough over too much.


Below is the inside of the jug before and after vapor blasting. Found in one of the threads a lot of discussion and debate about cylinder honing. I went down far more of a rabbit hole then I intended, I'll tell you. There's one rather compelling article from a fellow named Pete Snidal in 1999 that makes a case for not honing, despite the general consensus that you hone when replacing rings. I think there are a lot of debates about this, probably quite a few on this board in fact, but I ultimately decided a light hone felt like a pretty safe bet and that if I used a FlexHone brush-type, I probably couldn't muck anything up too badly. I ended up buying one, using it and reselling it pretty quickly, so not a bad $15 net cost to do it. Ended up with a light cross hatching that seemed OK, I was a little skittish about going overboard, so I probably erred on the side of not enough over too much.
Attachments

Thanks Pete, great advice. Thanks to your referenced thread (and many other that have touched on the subject) I was keenly looking out for the condition of the 'slipper'/backstop/shoe/whatever-you-want-to-call-it in the front of the cam chain tunnel, and similarly keeping an eye out for any chunks that may have migrated down into the sump or side filter. Good news on both counts was that the unit appeared in pretty good shape overall, which again, makes me believe that despite the miles on the ol' girl it was actually in pretty good shape. I was obviously planning to replace it, because let's not push my good luck here, and I found the really stellar thread that @Jim had started where he was actually modding a unit from another bike with some really slick countersunk Hi-Lok fittings. I was planning to do the same and he kindly informed me that Hoos Racing had actually started spec'ing some that were OEM quality. So I have my Mike's one as a spare, and ended up getting one from Hoos, and it seems very well made. (I've got starter bendix woes as well, but we'll get there haha).
Thanks Bob! A couple months of killing myself on those basket case Honda's really inspired me to try to work smarter, not harder on my Yamaha.Super impressive results! It took me an eternity to get my motor that clean using nothing but elbow grease!
Check out Hoos Racing for front guides.
http://www.xs650.com/threads/new-front-guide-stopper.56531/
http://www.xs650.com/threads/new-front-guide-stopper.56531/
Check out Hoos Racing for front guides.
Yup, thanks for the link Skull, those are them. Can concur with the general opinion so far that they feel a little more robust in fit/finish than the one from Mike's although I won't disparage since I might need it someday...
Yup, thanks for the link Skull, those are them. Can concur with the general opinion so far that they feel a little more robust in fit/finish than the one from Mike's although I won't disparage since I might need it someday...
Didn't read the previous post properly, or i would have seen you knew........who knew.......
At this point I had a decision to make (lots of pics ahead)...
I had no intention of splitting the cases when I started on this project. It seemed like that would be taking it to the next level in a way that was pretty intimidating, to be honest given my pretty limited experience. I also thought that this was the best chance of screwing something up irreparably, and I really didn't like the idea of being the guy that turned a perfectly functional bike into a useless pile of parts that he sells on craigslist. So all that being said, I removed the clutch plate and basket, kickstart assembly, starter drive assembly, primary drive assembly and started to try to clean up the bottom end of the motor a bit. I removed the sump plate and sump and, no surprise here, it was caved in around the inlet to the oil pump. There were no chunks, but the oil was pretty gnarly looking, which was a little concerning since I had changed it only a few months before and had only put about 500 miles on it.


The other thing that became apparent pretty quickly was that no amount of scrubbing by hand was going to come anywhere close to how my nice, clean vapor blasted top end looked. So I was faced with what I imagine is a pretty common problem on a project like this....where do you stop?!? Chasing the dragon, going down a rabbit hole, whatever you want to call it, I knew that if I left the bottom end as-is, it would bug the shit out of me, no matter how good everything else looked. So before I could think better of it, I loosened all the case bolts (in order, gradually), and started to tap with the dead-blow. They came apart after only about 10 minutes of coaxing all around, and before I knew it, I was looking at the tranny and crank and there was no going back


I decided not to break down the main or drive axles, and just degrease and inspect for worn teeth, broken/bent dogs, or anything that might scream 'replace me'. Same with the crank, I don't have a press, and had no grand re-phase plans, so just a degrease and inspection of the lateral 'wiggle' around the connecting arms and the main bearings. From my inexperienced eye (and the few measurements I could do w/ feeler gauges), everything seemed pretty OK. So these components, along with the shift drum and forks would just get a degrease and wipe down prior to reassembly.


As for the cases, well, since i had them out, why not blast them. Word of warning here....if I were to re-do this, I might try to seal off all the oil passages completely to protect them from the media. I did NOT do this, and as a result, I probably had to do 10 times the neurotic rinsing, pipe-cleanering, spraying, re-rinsing, etc about a hundred times to make sure the all the media got out. the good thing about vapor blast media, is that it is really fine, and unlikely to block any passages, which obviously would be disastrous. The risk is that it all just gets rinsed out and accumulates somewhere besides the filter, like in the top end, or god forbid around the piston rings or something.....essentially turning your nice rebuilt engine into a kind of oscillating sander that destroys itself. But, I'm (reasonably) confident I got all the media out from everywhere. Other tricky bits were the 'shifter post", which is actually one of the more mysterious pieces in the motor, and couldn't find a lot about it even on this forum, except in passing. I couldn't remove this, even taking out the screw. It felt either pressed or 'sealed' in somehow. So I left it in and rinsed the bejeezus out of it. Same goes for the pressed in needle bearing where the shift drum seats in the motor. I taped over this and still rinsed it a million times, and feel confident that there's no media in there as it spins freely and easily.


So I will say, glad I cleaned the cases, they came out pretty good, but this is an area where my little blaster has trouble keeping up. It's hard to get a consistent finish with the size gun and flowrates I have over larger flat areas; the inconsistencies show up a lot more. But, hey, can't complain for a DIY unit.
I had no intention of splitting the cases when I started on this project. It seemed like that would be taking it to the next level in a way that was pretty intimidating, to be honest given my pretty limited experience. I also thought that this was the best chance of screwing something up irreparably, and I really didn't like the idea of being the guy that turned a perfectly functional bike into a useless pile of parts that he sells on craigslist. So all that being said, I removed the clutch plate and basket, kickstart assembly, starter drive assembly, primary drive assembly and started to try to clean up the bottom end of the motor a bit. I removed the sump plate and sump and, no surprise here, it was caved in around the inlet to the oil pump. There were no chunks, but the oil was pretty gnarly looking, which was a little concerning since I had changed it only a few months before and had only put about 500 miles on it.
The other thing that became apparent pretty quickly was that no amount of scrubbing by hand was going to come anywhere close to how my nice, clean vapor blasted top end looked. So I was faced with what I imagine is a pretty common problem on a project like this....where do you stop?!? Chasing the dragon, going down a rabbit hole, whatever you want to call it, I knew that if I left the bottom end as-is, it would bug the shit out of me, no matter how good everything else looked. So before I could think better of it, I loosened all the case bolts (in order, gradually), and started to tap with the dead-blow. They came apart after only about 10 minutes of coaxing all around, and before I knew it, I was looking at the tranny and crank and there was no going back
I decided not to break down the main or drive axles, and just degrease and inspect for worn teeth, broken/bent dogs, or anything that might scream 'replace me'. Same with the crank, I don't have a press, and had no grand re-phase plans, so just a degrease and inspection of the lateral 'wiggle' around the connecting arms and the main bearings. From my inexperienced eye (and the few measurements I could do w/ feeler gauges), everything seemed pretty OK. So these components, along with the shift drum and forks would just get a degrease and wipe down prior to reassembly.
As for the cases, well, since i had them out, why not blast them. Word of warning here....if I were to re-do this, I might try to seal off all the oil passages completely to protect them from the media. I did NOT do this, and as a result, I probably had to do 10 times the neurotic rinsing, pipe-cleanering, spraying, re-rinsing, etc about a hundred times to make sure the all the media got out. the good thing about vapor blast media, is that it is really fine, and unlikely to block any passages, which obviously would be disastrous. The risk is that it all just gets rinsed out and accumulates somewhere besides the filter, like in the top end, or god forbid around the piston rings or something.....essentially turning your nice rebuilt engine into a kind of oscillating sander that destroys itself. But, I'm (reasonably) confident I got all the media out from everywhere. Other tricky bits were the 'shifter post", which is actually one of the more mysterious pieces in the motor, and couldn't find a lot about it even on this forum, except in passing. I couldn't remove this, even taking out the screw. It felt either pressed or 'sealed' in somehow. So I left it in and rinsed the bejeezus out of it. Same goes for the pressed in needle bearing where the shift drum seats in the motor. I taped over this and still rinsed it a million times, and feel confident that there's no media in there as it spins freely and easily.
So I will say, glad I cleaned the cases, they came out pretty good, but this is an area where my little blaster has trouble keeping up. It's hard to get a consistent finish with the size gun and flowrates I have over larger flat areas; the inconsistencies show up a lot more. But, hey, can't complain for a DIY unit.
OMG, you've really done it now!
My personal suggestion - replace the sump oil filter which seems to be a weak point. My XS has the Smedspeed conversion, have a look here:
http://www.xs650.com/threads/miss-november-xs2-tribute.55057/page-2#post-598561
Exchanged the sump for one converted to use a spin-on oil filter. Instead of a filter which will stop rocks you have a modern element which should catch smaller detritus down to combustion by-products and is easy to swap at oil change time. Actually, it replaces the side filter element as well. I've recommended these before but I have absolutely no connection with Smedspeed. I don't know if he will ship to the US but it must be worth at least asking?
BTW, your cases looking really good.
You are doing a superb job here and moving so fast! I have to ask, are we seeing this done in real time? You are smart for splitting the cases, I stopped there and have always regretted it. While you have it apart, check your crankshaft, the early cranks ( 256 motors ) had round lead slugs placed in the crank for balance weights.
They can become loose over time and ( rarely ) dislodge and lock up the motor. Just give them a poke to see if you can move them around.
They can become loose over time and ( rarely ) dislodge and lock up the motor. Just give them a poke to see if you can move them around.
Thanks for the feedback everyone.
I thought this thread would be more interesting to try to keep as chronological as possible (again, thinking of myself here, and what I found useful when doing this). Jim, Airwolfie, Carbon, those were all really helpful to see the soup-to-nuts process). I'm hoping to have the whole journey posted up here in the next couple days, which will (hopefully) coincide with me getting the bike out on the road!
5T, yes, I figured as much. My filters were pretty gross as well. That was actually a big driver to open the cases, along with the aesthetics, was that I knew I had some pretty gnarly sludge down in there, and it just seemed a little silly to me to have that opportunity to clean it out and not do it, especially considering all the other work w/ the top end rebuild.Your "new" oil was probably so dirty simply because it was flushing out long term past gunk build-up.
Haha, no Bob, definitely not in real time, I really wish I had though. First broke things down in October, and I'd say this post is about at Christmas now. Seems fast when I just post it all, but for every step I probably did a ton of reading the shop manuals and combing through these forums, bookmarking, pulling excerpts, etc. I'm not joking when I say I feel like I know a lot you hahaha. The vapor blaster was also being built in real time and I'd only ever really find time here and there on the weekends so it just took a while, busy with work and the wife, etc. I'd always meant to open an account and document things in real time, but any free time I had felt better spent actually working on the thing and not just talking about working on the thing.You are doing a superb job here and moving so fast! I have to ask, are we seeing this done in real time?
I thought this thread would be more interesting to try to keep as chronological as possible (again, thinking of myself here, and what I found useful when doing this). Jim, Airwolfie, Carbon, those were all really helpful to see the soup-to-nuts process). I'm hoping to have the whole journey posted up here in the next couple days, which will (hopefully) coincide with me getting the bike out on the road!
Wow - you are doing a really nice job on all of this - but I must say, is it just me - or does Somerville have one pretty snazzy looking shop in which to work.....?

My personal suggestion - replace the sump oil filter which seems to be a weak point.
Raymundo....thanks for the advice! You know, I went back and forth with sump filter options for a while. I was really excited to find those SmedSpeed, after reading the MANY threads out there about the sump filter, and it's poor design, and that lousy exposed corner that always caves in, and how the replacement filters from Mike or MMM are better, but still not great, etc etc etc. You know, I honestly don't recall why I didn't look into one of those. Feels like a million years ago now haha. I'll tell you what I did do, was fashion a little shield for the vulnerable end based on some folks I've seen here doing the same. There was a guy named Billy Jones that was selling them that I talked to....I have to laugh, his reply was:
"If you'd like to try making your own I make them out of galvanized nail plates like these: https://www.lowes.com/pd/USP-5-in-x-3-1-8-in-20-Gauge-Galvanized-Nail-Plates/3374512
Most of what you are paying me for is my time spend driving to and from the store and the post office. No fancy tools, drill, angle grinder, vice, hammer, and center punch. If someone else wants to start making them I'm cool with that as I'm retired and don't care."
So anyways, I took his advice as it seemed easy enough, and plus I thought I'd save Billy a trip to and from the store

Welcome to the forum!
The '74 was probably the lowest production of all the 74 up models, some say about 12,250 units. Really nice to see one with factory paint.
I can only imagine how frustrated you may be that the frame will not fit in your blaster!
The '74 was probably the lowest production of all the 74 up models, some say about 12,250 units. Really nice to see one with factory paint.
I can only imagine how frustrated you may be that the frame will not fit in your blaster!
Wow - you are doing a really nice job on all of this - but I must say, is it just me - or does Somerville have one pretty snazzy looking shop in which to work.....?
Haha Pete, that's a keen eye. Teardown pics are in my basement (White pegboard, epoxy floors), which I actually did build pretty recently and is actually is snazzy, for a basement! But I'm sure what you're referring to is in the machine shop at my office where all the vapor blasting happens. I'm fortunate that is available to me off-hours and is largely neglected these days TBH. So that's probably the really snazzy one ha.