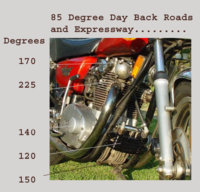
A Collection of XSJohns Mods

650Skull

Cockytoo
Top Contributor
Messages
11,029
Reaction score
15,655
Points
813
Location
FNQ Australia
8-1 COMPRESSION

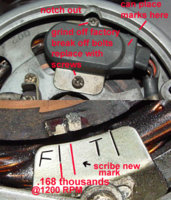
Just like taking the cam out and putting another in its place........stone simple...........there is one drawback and one good thing........a brand new chain I don't think would go on because the head is .040 thousands higher..........BUT a good used chain will return to it to factory like new adjustment......and I have taken these used chains apart and inspected the rollers and pins and found no visible or measurable wear.....just that every link has kind of broken in and the entire length of the chain is a bit longer.......not wore out just a bit longer.........The engine will run much cooler and quieter and have better pulling power at lower rpm's and the timing should be retarded 1/8” from the F mark at 1200 rpm to give it that great pull at lower rpm's….without effecting the high end very much at all…..

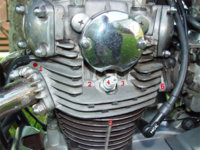
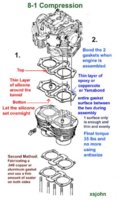
Preparing the head gaskets.........I used 2 used factory gaskets.........but using 2 new gaskets would work fine except you will have to torque it a few more times till the gaskets stabilized and the final torque should be 35lbs and no more using anti seize on the head bolts……

First a ""thin"" layer of high temp silicone with the end of your finger around the tunnel portion on both sides of each gasket that mate with the engine and left overnight to cure before installing...the silicone will squish down then and not out.........just a '''thin'''' layer of silicone..........Then a layer of Yamabond between the gaskets when it is put on the engine

Here is the sequence for preparing the gasket

1......apply a very "thin" later of silicone to both gaskets around the chain tunnel on one side only...the side that will be upward and on the other gasket the side that would be downward that fit against the engine cases…...a very thin layer with the finger......let set overnight to cure.....then on assembly use a good sealer in between the 2 gaskets and place them together as you assemble the engine.....the silicone surfaces being on the outside top and bottom.....

2….I spray pam on the 2 engine surfaces so when disassembled the gaskets won't stick and can be used again.....replacing the ‘Very” layer of silicone around the chain tunnel of course on the gaskets.....pam is optional but it does save the gaskets for reuse..........

3….Timing…….when using taller gears it is best to retard the timing 1/8” from the F mark at 1200 rpm….so it will pull down to too without getting cranky using 2nd around corners.............

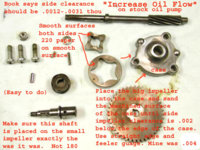
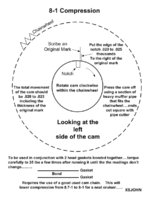
The cam "has" to be moved within the chain wheel to place it back to stock configuration....raising the head turns the cam forward...I built a jig to see how many degrees the extra deck height was effecting the valve timing....securing the chain and then placing the gasket under the chain wheel....found it to be 2 to 2 1/2 degrees (advanced when raised 40-45 thou)...these things are already advanced to the wall....to put the cam back to stock position with the raised head....FIRST I marked it where the cam is pressed on the chain wheel....then I moved the cam clockwise 20-25 thousands (retard) when looking at the notched side of the cam…..”have” to move the cam or you will experience artificial leanness from too much advance....has to do with the intake closing event….closes to soon and the cylinder won’t fill completely....(found that out the hard way)....if you play with this you will "have" to do that also.......easy to push the chain wheel on and off the cam with a 8” piece of heavy muffler pipe that fits on the chain wheel and cut cleanly with a pipe cutter and using a hydraulic press........
....takes me a couple of hours or more to move the cam.....couple of tries or more to get it in the right position and degree it.........hope all this makes since........really is a very simple mod and we are only changing the cam and nothing else...........and a new cam chain will not fit on the new configuration……..and good used chain is required (seems we all have them) and the adjustment will return to like new adjustment because the cam rests .045 thousands higher as well as the head…….


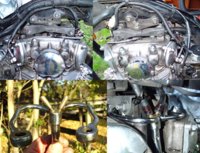
Pretty straight forward lifting the head....a good manual is handy....and following the instructions on centering the cam in the engine and making the gaskets...............chain wheel has to be removed and repositioned.......as for timing a light is the only way that's accurate for me..............

And it's good to have 145-150 compression to start with.........lowers it to 135.....wouldn't do this to a wore out engine............hold the throttle open on a warm engine while using a compression gauge...........

this does make them a lot more user friendly especially in the summer...........ad it will loose just a bit on the high end but with the timing retarded and the lower compression it pulls wonderful at the lower rpms and also has a lower exhaust note........a poor mans Harley one might say...or a smart mans Harley....Tee He...

xsjohn
 

Attachments

  • head gasket prep 2.jpg
    head gasket prep 2.jpg
    58.6 KB · Views: 2,894
  • 8-1 compression.jpg
    8-1 compression.jpg
    134.2 KB · Views: 2,170
  • best timing (80-84) .jpg
    best timing (80-84) .jpg
    132.1 KB · Views: 3,720
Last edited:
TOP END COOLER

Used a xs850 cooler. XS750-XS850-XS1100 are the same... Works better that I thought it would and is quite simple.....

xs750. xs850, xs1100 are the same cooler. .Some even have covers.... I used that one because it lined up with the frame down low and the fittings pointed too where I wanted to go. .. I mounted it low so it wouldn't get in the way of air flow. .. Both inlet and outlet of the cooler need to be up (on top) for sure......So the oil can't drain back............FJ1100 cooler won't work right vertically..........I wouldn't try it that way it will take to much to much time to push the oil up in the cooler and the fill time will mean no oil plus you are adding a different gravity factor that could change the output from my calculations........
A big wide cooler is not what I wanted but it would work... Personal preference....The only benefit I can see for a larger cooler would be traffic but I am not sure it would make a huge difference without a fan....If you use an XS cooler make sure it has the fittings.....I ground the huge fittings off and used rubber tubing.....Clean the cooler, paint with satin paint and bake in oven 250 for a couple hrs........Ended up using a screen to cover the front (Wal-Mart stationary letter holder 2 bucks)...Need to cover the front of the cooler--70 degrees and below...Tubing could be smaller....They work......Have 2.5 thou on mine....................one with cover ---250116496853 ---In combination with a good laser thermometer tuning you can ride them all day at 90 degrees at 225-230 head temp instead of frying them......


Adding the cooler drops the head temps and actually cools the lower end….Before the cooler going anywhere in the summer even 30 or 40 miles the engine would start sounding like hell after it got fully warmed up..…Now even the hot clattering startups are gone…………Filter is a good thing too..

Remember the head temps will be down say 15 degrees but the cylinders can still get hot......Be sure of your mixtures if you plan to run hard like the expressway.....Check with infrared thermometer and play with mixtures to try to keep the cylinders below 250 degrees in hot weather....
.....

I don't think complete systems cool the top end oil like the cooler I designed for the XS's because the oil is moving through the cooler to quickly and is also being heated up in the main oil galley.. My cooler runs at 135 degrees at 70 on a 90 degree day at 70-75 my head will be 225-230 degrees on a 90 degree day..lower end runs at 180 degrees and the oil filter is 150 degrees... Bet you were running 275 degrees or more head temp and the cylinders were seeing 300 or more. It can fry soon if you continue doing that...Mine used to heat like that too....Your carbs may be to lean also especially if they are the newer 34s. I have beaten this subject until I feel like no one is listening.......A 20 dollar laser thermometer and some carb main needle dicking with will save a big ugly hassle and actually make these things run quite well.......I raised my needles until I found what was too much then I set them where they wanted to be....Not hard.....Just raising the mj is not the real answer for tuning them properly...Gearing would be another issue for me...


.....

Here is the XS cooler with screen and cover for below 70 degrees.....It is still working but has been cut back for colder weather...
Used Wal-Mart letter holder (stationary dept) for the screen and drum plastic covering for the cover...comes in a zillion colors..had some black..

It is hard to get good plug readings on short runs........I settled on a 135 with stock type air boxes and stock exhaust......If carbs are set for just plunking around they can get lean when put to real work....The hotter the ambient temp the more critical tuning is......I always set my carbs a tad on the rich side because of summer and sometimes run a hotter plug in the winter...I have to cover the front of the oil cooler at 70 degrees and below....


Not bragging but mine works 3 times a good as I ever thought it would...I can't get over how it cools the lower end also. Spin on 145 degrees top cooler 130 degrees. It was 75 degrees today with the front covered. When the front is covered it still performs better than I thought it ever would. ...Shouldn't run the engine to cold though...seems like 225 degrees head temp is ideal for these things.....Not hard to figure...If you feel like wearing a light jacket then the front should be covered....That easy....I don't bother draining it when I change oil.....Really cold weather may build a total cover like the do the Harleys...

Engine and top end really runs quieter and smoother......

Laser tuning helps a bunch too......

A round piece of aluminum or brass and a drill and a file...That's what I did... . I don't have a lathe either.....Make the restriction as pictured above so the lip will ride on the hose as to prevent oil from passing around it or bond it in......The restriction also has to have some length to it for proper restriction.....Say 5/8" or so....

I opened the original restriction so the cooler would see the same pressure as the main oil galley.....Then meter it with the correct size restriction as close to the top end as reasonable.....Fastest way to get cool oil for hot starts.......From .116 to .125 compensates for the extra length and gravity to keep the flow as same as the stock flow......


.My design does not force more oil to the top...it just cools the oil...There is a small amount of drag in the oil flow because of the extra distance of the tubes and gravity ...Tried the original size restriction size and found it too small... Not good...have got 3000 on mine with no problems....you don't want problems....or do you....if you absolutely have to be stubborn about this open the original restriction to .125...(1/8")...Mikesxs has the original restriction....I made my restriction in 15 minutes with a piece of aluminum round stock a drill and a file... Brass would be easy to work with also...Steel would work.....

The reason for the field side restriction is so there is plenty of pressure in the oil cooler to eliminate noisy hot starts...........My design actually lets the cooler see the pressure that is in the main oil galley....

* Original restriction was .116 thou at the base of the oil tube which needs to be opened up say .200 (could be 3/16 could be 1/4 inch) so the oil will move to the cooler unrestricted the restriction should be .125 on the "going to the head" far side (field side) of the cooler ....Don't change my design it works perfect...............................In other words the oil follows to the cooler unrestricted form the main oil galley...Then the .125 restriction holds back the correct amount of oil to lube the top end correctly with 120-140 degree oil..


I have really been watching everything to make sure things are ok.......Maybe a third of a gallon a minute at 3200 rpm...Sure has made mine pull the tall gears 18/29. Seems like you can go on forever and it just stays the same....Little longer warm-up and I have been covering the front of mine below 75 degrees if I am staying out of traffic

XSJohn.


Q; what’s the flow-rate through the cooler like John?

A: ..Same as it was stock.
*From a PM XSJohn Sent me when discussing, MikesXs High volume oil pump and opening the restrction to compensate
"Skull.........With the high volume oil pump you could go to .140 thousands .......the original is .166 thousands and you could just bore the hole in the original at the base of the oil riser tube.......just have the inlet and outlet on the oil cooler upward and the best place for the oil cooler is in front of the front engine mount as not to block any air flow......and the wind deflectors I designed are great.........xsjohn"


Here is a link to xsjohns post on the top end cooler

http://www.650rider.com/index.php?name=Forums&file=viewtopic&t=1525&highlight=Air+boxe+Mods
 

Attachments

  • oil_temps_copy_314.jpg
    oil_temps_copy_314.jpg
    71.6 KB · Views: 2,801
  • screen_and_cover_342.jpg
    screen_and_cover_342.jpg
    105.3 KB · Views: 2,345
  • plug.jpg
    plug.jpg
    113.5 KB · Views: 2,209
  • cooler_2_1_.jpg
    cooler_2_1_.jpg
    119 KB · Views: 2,550
  • top_end_oil_cooler_.jpg
    top_end_oil_cooler_.jpg
    133 KB · Views: 2,908
Last edited:
INTAKE OILERS

The cam is spinning forward and the oil is being slung up front leaving the intakes in the back with a lot less oil and this I think is causing the intakes to be noisy and crapping out the valve tips....added oiliers to the intakes.....pretty easy to change the jets in the covers and they come off for adjusting valves pretty easy......used older bit longer mikuni 150 MJ's and tapped them and placed a pilot jet inside it ......the aperture in the pilot I used a .022 thousands aperture....these older Jets are a bit longer and hang out over the large spring retaining washer...........just tapped them to the end of banjo bolts taken from another oilier tube......later I tapped the jet out and used a pilot jet inside of it (see later in this post)....bit of tricky work and the position of the banjo bolt is pretty critical .....the elephant feet with this oil method should make the valve tips and adjusters last .....maybe even with the stock adjusters......the exhaust valves are getting plenty of oil so they last......

....I drilled and tapped the end of the banjo bolt and threaded it in.....need the older mikuni jets (like enduro jets in the 70's that were a bit longer and it hangs over the big spring washer....just runs on it........

On the nut inside the cap use like some plastic that comes on packaging to make another gasket in there that is not too thick.....so it won't waste oil by leaking there.

Also I drilled a hole in the side of the nut which is a head bolt sliced and flattened a piece of drill stock and hammered it in so it sticks out maybe 1/4 inch...the peg hits the cover on the side.....this keeps the nut inside from spinning when you tighten the banjo bolt from the outside and prevents leaks cause you can get the banjo real tight...

On the rubber hose connections I roughed up the metal and used heavy copper wire around the rubber tubing a few times and twisted the two ends of the wire.... makes a good tight fit so I didn't have to use a ugly clamp for the connections.......

Heat the oil tube while it is on the engine in the front and tweak it out a bit so the connections will clear the head........no heat it can break the copper connection.....the head of the oil tube where you drill and tap is copper and plenty thick for drilling and tapping.........

For the connection to the top of the existing oil tube used long amal jets and drilled them out and smoothed the edges by putting a drill bit through it and spinning it on the grinder until it would be the right size........largest hole in this jet is ok...it's just to transfer the oil not to hamper it....

NOW....for the tricky part....the original restriction for the top end is at the base of the oil tube......is .116 thousands...When I mounted the top end cooler I drilled it out like .200 thou or more .....I fashioned a restrict-or and put it above the top end cooler and used .125 thou (1/8) drill because the cooler would slow the flow because of the added length of the tubes and the cooler.......now with the addition of the oilers, I used a 9/64" (.140) for the main restriction above the cooler....then the .025 restriction at each intake valve.....

Without a cooler I would still use a 9/64 (.140) restriction at the base of the oil tube when using the oilers.......

Here is how I connected to the oil tube..........found some old Amal main jets and trimmed them down and tapped the top of the oil tube and also epoxied them in......this way the cover can be removed easily..

Inside the cover I used some older mikuni main jets in the covers....they are a bit longer and let the oil run on to the spring retainer plate which will spatter to the valve tips as the valve goes up and down..........

Was a bit disappointed that it wouldn't spray but the oil will spatter off the large valve spring retainer to the valve adjuster and valve tip........

Found that just a real small stream on the large washer that holds the valve spring works good.........the aperture in the pilot jet should be exactly .022..... thousands...tried a lot of different sizes.....some waste oil others wont flow...took caliper to music store for .022 plain steel guitar string.....to bore the exact hole....some .024 guitar strings sizes are really .022....ect

Bored a older enduro jet and tapped in a pilot jet..........easier to get the hole right than trying to close a main jet........had to shorten the pilot stem and slightly narrow it so it would fit inside the main jet..........

All that is needed is a bit more oil there.......as long as it gets on the valve retainer washer it will get in there to lube the valve tip and adjuster because of the valve raising and lowering so quickly splattering the oil across everything there...............then also add the elephant feet to the intakes when the engine is down.....the combination of both should make the adjuster and valve tip erosion and valve noise moot........hopefully.......I have only had a chance to put a couple of hundred miles on the new oiling system and it seems to be quieter and run along better.......too cold to go on and on like in the summer.....freezing my ass......being so scrawny and all....

Removing that dam or notching it across the intake side of the head so the cam can sling some more oil rearward might be an good answer too........anyone tried that....BUT WHAT IF TOO MUCH OIL SLINGING AROUND IN THE BACK CAUSING A HEAVY MIST LIKE IT DOES IN THE FRONT ----- GETS INTO THE BREATHER AND OUT TO THE AIR CLEANER......THAT WOULD BE A BUMMER FOR SURE........

The cam is on the down swing towards the back so less would be slung rearward and from a lower angle and it has already slung most of the oil off forward.........

Reset valves on my 80 back to .004........not a sound....tried .006 and you could hear them then........book says .0025.....starting it cold it has to warm up too long before it will idol right.........couldn't stand the racket before the oilier at .004......now .004 is stone quiet..........

If anyone is thinking about this which I am sure no one is.....I would have come in from the top with ...see below center........and use pilot jets at .022 thou...

.just opened the intakes to see if they would tick at .006....and they do..........I have checked the exhausts numerous times hot and they are still .006.......don't suppose it would hurt to come down a bit on them do you....like a loose .004 hot..........

With the intake oilier I now run the exhaust at .006 and the intake at .005......this advances the intake timing a bit and gives it more low end pulling power and more smoothness at cruise........

.Intake valve oilers stayed for sure....hear absolutely nothing from the valves at 4 and 6 thou.....

XSJohn.
 

Attachments

  • intakeoilerpcXS John.jpg
    intakeoilerpcXS John.jpg
    85.5 KB · Views: 2,649
  • head_test_points_copy_718.jpg
    head_test_points_copy_718.jpg
    111.5 KB · Views: 1,962
Last edited:
MODIFYING THE NOS OIL PUMP

on assembly just make sure the pump doesn't bind........turns freely.....if it does move or flip the parts (impellers) around till it doesn't bind......here is how to set the side clearance and smooth the sides of the impellers...........good side clearance increases flow...........

Smooth the sides of the impellers on sandpaper first then....Sand aluminum cover on flat surface with sandpaper.......turning the cover and measuring often........you hold the straight edge across the cover with the impellers inside of it and then use a feeler gauge to see how far the impellers are indented in the case....... 2 thousands is good........

Use no sealer on the impeller case........it will increase the side clearance and reduce the efficiency of the pump.................

High performance pump has wider impellers.........with 75 thou on mine and a paper oil filter (slows flow 15-20 percent) and a top end cooler and intake valve tip oilers I have never seen anything inside the engine that looked oil starved........and I run the stock pump.....

I lightly sanded the sides of the impellers on a flat surface to reduce the manufacturer’s grooves and then set the side clearance at .002 thou..............

Just install the impellers the way it makes since to you and then spin the pump once it's installed........if it doesn't catch then go for it.....if so move them around till it doesn't....the impellers are symmetrical so all will be good......

Setting side clearance..........rotate the cover (the one you took off) as you sand it so you get it the same all the way around.......""go slow""...........measure frequently......and maybe the side clearance is good already............won't know unless you measure it......

When I did mine about 55 thou ago there was a slight catch as I spun it when I finished and put it together......so like I said above I changed the impellers around and the second time there was no catch....... been that was way since.........mine had no marks.....

XSJohn.
 

Attachments

  • oil pump clearances .jpg
    oil pump clearances .jpg
    78 KB · Views: 1,836
Last edited:
MODIFYING AIR BOX

I am not much on pods.......the stock air box on the electronic bikes can be made to rock.......adding the third air inlet and removing the walls inside the cover make's it breath much better......possibly even being neutral........real easy to do......

First I tried 5/8 ID tubing and noticed a bit of difference and it didn't change mixtures....THEN.....got some 1" ID black tubing from Lowe's and Dremeled the oval hole in the air box a bit smaller than the tubing for a forced fit and notched the tubing on the grinder so it says put.....easily.....and no increase in intake noise........noticeable increase on the zip everywhere and smoother "free"......but it enriched the mixtures.....?

some people are at 4000+ altitude.....this will effect mixtures.....the bike will get richer as you go higher.....although the CV does compensate ....there has to be a limit...

Not sure what would happen with stock carbs ....but with my kit I actually had to turn the mixture screw in 1/2 turn and use the thin spacer ......was running the medium spacer before the mod.......now the air box is neutral and does not restrict ......must be the reason to shift to the leaner spacer......doesn't make since but that's what happened .....should have got leaner....??? ....only good explanation is the box is neutral and not effecting carburetion.....


THIS MAY END UP BEING A GOOD MOD FOR RE-JETTED BIKES AT HIGHER ALTITUDES........be prepared to change mixture settings with the larger inlet.......


Tested the extra air inlets and they work great with the extra inlet shown above.....and no stinking noise either.....here is how I build my filters......get the original filter off and build your own........even towel will work...and was looking at one of those cheap Wal-Mart blankets for some decent filter material too...I used some thin insulation from some old Sherwin-Vega speakers but there is probably endless stuff out there that would work .....and it's free....just cut it a tad wider and an inch longer and glue it where it overlaps on the end only....not the sides......pods are noisy ....expensive and they can rain on the parade........and the little pods will hose everything up......

What ever you do don't open the breather hole on the back of the head .....it is at .220 thou.....I opened it to .250 and now I have to close it......will darken plugs......xsjohn.

Note: Look at the picture of the air box and note the removal of the plastic either side of the hole where the screw goes through.........

Link to xsjohns post on Air Box
http://650rider.com/index.php?name=Forums&file=viewtopic&t=2291
 

Attachments

  • air box 1.jpg
    air box 1.jpg
    74.7 KB · Views: 1,778
Last edited:
FAIRINGS FOR ENGINE COOLING

Mine already runs cool..........both sides are the same at about 220-225 at 85-90 ambient...........this it seems drops another 10-15 degrees and is pretty easy........bending the emblem brackets a bit............plan to use some carbon fiber I have from a hood but aluminum would work fine.....this one is stiff cardboard for testing.............guess mine could be exaggerated some more.......but not needed.........plan to put them on both sides after I have decided the shape........

230 degree cylinders on both sides @ 65 mph on the expressway 15 miles ......... engine was already at operating temperature before the run....ambient 85 degrees..........225 @ 55MPH.......about 54 mpg........done with all that temp stuff......now my starter is grinding again......off on something else........and I have to change the back tire AGAIN.....

And for all of you that think that retarding the timing a bit makes them run hot .....it doesn't on these....just smooths out the lower rpm that we use most of the time....especially with taller gears....mine is set .168 thousands to the right of the F mark at 1200.....and will remain there....


Finished the louvers out in carbon fiber......think they accounted for about more 10 degrees on mine which was already low ....might account for more on a stock machine .......

Well I said I was done but saw another inconspicuous place especially on mine where the air could be ducted better and not easily seen..........

Now 225 degree cylinders @ 55 ....90 Degrees ambient.......

Follow up....70mph @ 88 ambient.......cylinders were 222 degrees......seems the faster I go the cooler it runs now......that's a switch and a blessing ......

So running them cooler could be viewed as a "performance modification".....

Note: Look at the pics and you will see another fairing (front louver) xsjohn made to direct air from below the light onto the top of the motor.
 

Attachments

  • front louver.jpg
    front louver.jpg
    134.8 KB · Views: 1,484
  • louvers 4.jpg
    louvers 4.jpg
    147.5 KB · Views: 1,617
  • louvers 3.jpg
    louvers 3.jpg
    145.9 KB · Views: 1,665
  • louvers.jpg
    louvers.jpg
    115.6 KB · Views: 1,607
Last edited:
COOLING THE STATOR/ROTOR

Make a small spacer and open up the stator housing cover to keep the charging system cool. Rain does not seem to affect the workings of the Charging system, not recomenderd for off road or dusty riding. To add more cooling you could drill some holes in the side cover in front of the stator housing.

Will help in prolonging the life of your Stator and Rotor.........xsjohn
 

Attachments

  • xs650_cooling_the_stator_and_rotor__825.jpg
    xs650_cooling_the_stator_and_rotor__825.jpg
    115.7 KB · Views: 3,430
Last edited:
DIMPLED CLUTCH PUSH-RODS

Here is how to fix the problem of hogging out the push rod seal and bushing.......the rod wanders on the ball and this stabilizes the rod when the clutch is engaged.....divits have to be in the exact center of the 2 rods.........I spin it in a drill and used a Dremmel spinning with a grinding tip........holding the rod close to the work and the Dremmel at a 45 degree angle to get the divots right..............xsjohn

This mod prolongs the life of the clutch push-rod seal. This was done to the 2 rod Original type set up

Centering Clutch Push Rods.jpg long push rod and worm bolt mod1.jpg
 
Last edited by a moderator:
XSJOHNS NEEDLE KITS

22mm black floats 81-84.........27mm brass ones 80......good luck with all the rest... that myself suffered but no more.......best years for these bikes but the most help that is needed to get them right...........including timing........... The book says from the float gasket surface........Of all I have seen that all the gaskets are bonded to the float bowl so what is meant is form the surface (without the gasket) where the gasket goes....to the top of the float surface with the carbs turned upside down and not with the float seat spring depressed at all....just sitting there so to say..........

xsjohn


If you guys want some terrific needles for your BS34's......PM me......
I finally determined that the factory needles no mater what you do to them will never run right and will eventually destroy your engine....Lots of years work and they are really good......These carbs have a lot more potential that even I realized...

Secondly these engines run 25 degrees hotter on the right side.....these kits help compensate for this allowing the engine to run at it's full potential......right cylinder running hotter occurs on all XS's and not just those with the BS'34 carbs.....the jet needle (main needle) is the single most important part on the entire motorcycle and almost always overlooked.........

Dropping overall cylinder temperatures 20 degrees.........and boosting power output considerably........and correcting the right cylinder temperature at the same time.......

You engine will run...quieter...smoother.....cooler.....start easier......develop more horse power and last longer.........and be a bunch more fun to ride......

I think these are the best carbs that Yamaha ever made for the XS except for the needles.......fix this and these are great.........no other modification to the the carb is necessary........for those who don't want to dismantle their carbs the kit comes with a shim for the 132.5 stock main jets and stock air filters and pipes....and a shim for the 135MJ and larger for advanced modifications.....

FOR PODS AND PIPES
For much greater improvements replace the 42.5 pilot jets with 45 or in some cases a 46 custom pilot for more extreme mods.......Stock air jet is 135.....personally I like the 135 air jet because mine runs along smoother at cruise with mine..."SMALL CONICAL PODS WILL CAUSE STUMBLING AND OVER RICH CONDITIONS".........

IGNITION
The best ignition is the stock electronic TCI ignition.......the mellow advance curve below 3000 rpm allows for a steady cruise.......Yamaha did it right...I still prefer to retard mine 2 degrees or about 3/32 to 1/8"" to improve the cruise even more......some of the other add on electronic ignitions do not maintain the factory advance curve and go to full advance below 3000 rpn which will give you a jerky chain snatching cruise.....be warned.......

SPARK PLUG CHART www.dansmc.com/Spark_P...talog.html

..SATISFACTION GUARANTEED .....these will save you a lot of tuning hassles and time...instant money back if your not tickled pink.......no questions asked.........

..................................
With straight open exhaust or very free flowing a few of my customers have found the custom 46 pilot I came up with is the best..........not available but I will tell you how it is done......have to have a real micrometer......Chinese one may or may not be accurate...


BS34 deceleration ............popping free flowing exhaust relief............

Local music store......the extra guitar string box......look for 18 plain steel guitar string.....package will lie so you have to measure.......find one that is .018 thousands.......exact is best......this gives you a 46 pilot.........just debur the end of the string and push it through a smaller pilot jet...bit of a challenge but it will go with a little persuasion.....little valve grinding compound or comet to get them both the same.....them set mix screws at 1 turn to start with........

Now offering a 134 Custom main jet ........

xsjohn

John Underwood....email address...........xsneedles @ gmail.com


Joe with those big pilots you have to be careful......I do the same thing with mine.......if you set them so it starts perfect with no choke after setting and cooling down you probably have them way to far out......I am running the exact 46 custom pilot as your and mine are set just a bit below 2 turns....it will run at 2 1/4 turns and sound wonderful but the plugs cant take it.....there is nothing I can see wrong with the big pilot you just have to be careful not to set it too far out.....start taking it down and check the soot on the outside ring after 10 miles or so of easy riding......and new plugs take forever to soot up on the outside ring.....just wipe the black used one with a rag and go for a 10 mile "easy" ride which will be more on the pilots.....what you are looking for is just a very faint trace of soot to almost none on the outside ring.....and set both sides """independently"""......and just a tiny turn is a lot with big pilots......

And on short runs the left takes a lot longer to warm up than the right so it can take more of a beating on beer runs......make your test runs at least 10 miles so the thing can warm up decently....tuning is a practice in brinkmanship for performance.....and the more fuel you give these things the better they seem to run but there is a limit.....you want to be right under that limit.....but heavy MJ's will wash the rings.....been there and done that.......the 135 is plenty for the BS34's.....and stock needles will give you decent performance on the very high end with the 135 but will leave you very lean in the mids and lower throttle settings.....that's why people are trying the 137.5's and bigger to try to get away from that only to find later they have washed the rings and still have a lean piece of crap in the mids and lower throttle setting with no real torque.....cranking the pilots out only to foul plugs at lower throttle......Hence that is why I have been diking with needles and may just end up jamming one in my arm....(joke of course)....and people bitch about 42 dollars while I sit here for 2 or 3 hours working on each set and try to help as much as I can.....well let them find out the hard way.......I did....

And you are running the first sets I sent out that were for the 132.5 main Jets.....and I have a feeling 135 could cause you trouble unless you had real free flowing exhaust because the needle slope was a bit heavier on those than my current sets for the 135MJ....there is only two or three of those sets out there and am not hearing any problems from them..(yet)

But if the left is your only problem I would think it is your mixture setting or check the compression on both sides to see what you have ....150 is enough......130 on that side and you could have problems......

Cold it won't idol ....yes till it stops and 360 is one turn....the 80 carbs were the leanest and I used to run my mix screws at almost 4 turns with those epa log needles.......if you stick with the logs then I would use a 45 pilot at least and

Custom Air Jet: I use a custom 46 in mine....even with the R/L richer custom needles.....47.5 would be to touchy I would suspect.......and not necessary even with heavy mods......46 pilot is easy to make with an """exact""" .018 thou debured guitar string......just jam it in the tiny ho...could even use a .016-.017 first to make it easier to get the big Johnson .018 in there. A little valve grinding compound or comet to get them both the same
http://www.650rider.com/index.php?name=Forums&file=viewtopic&t=3630&highlight=Air+boxe+Mods


.I think the BS34’s were mechanically the best carbs Yamaha made for the XS’ …and have some real good potential if set up correctly…..Here are some examples below that I have run across……

BS38 slides are 2.91 ounces each
BS34 slides are 1.82 ounces each

Lighter slides equals quicker throttle response……..

BS34 has better viton tipped float needle and almost refuses to leak……

The pull choke arrangement is more precise ……….

The BS34’s are 2 LBS lighter than the BS38’s…..the BS34 seem to deliver more usable tork ......But the bs38' are easier to change MJ's........and may have better hight rev potential.......
 

Attachments

  • 78-79 Jet Needle Assembly.jpg
    78-79 Jet Needle Assembly.jpg
    40 KB · Views: 1,194
  • needle re-spope follow-up.jpg
    needle re-spope follow-up.jpg
    174.5 KB · Views: 1,421
  • UNDERWOOD_1A.jpg
    UNDERWOOD_1A.jpg
    46 KB · Views: 1,530
  • XSJohn's BS34 needle instructions.jpg
    XSJohn's BS34 needle instructions.jpg
    286.4 KB · Views: 1,072
Last edited:
Wow, good job, Skull! This thread definitely should be in the Tech section.

Reading through John's comments regarding his fairing -- did he happen to mention who made it? I have an old universal Shoei fairing that I mounted on my '81 for a while. Honestly didn't care for it -- buffeting around my head and shoulders increased with it on.

I bought one of those cafe style fairings you see advertised everywhere for my cafe project, but I may or may not install it. I kinda doubt it'll make much difference with regards to directed airflow around the engine. I think the "wings" he fabricated to direct the flow onto the top of the engine was a clever idea, though. Kinda reminds me of the little winglets you see nowadays that have sprouted around the front fenders of modern GT race cars.
 
Reading through John's comments regarding his fairing -- did he happen to mention who made it? I have an old universal Shoei fairing that I mounted on my '81 for a while. Honestly didn't care for it .

I remember him saying the fairing was on it when he bought the bike. I think Jayel's is the same
 
Just ran into this XSJohn mod.

Here is a pic of my spare carbs ........on the back side of the rod there is indents on the rod that ride on the ball and spring to give preslected choke positions (full mid and off).......Back there I also added intermediate indents to the rod that lets it have more preset choke positions......stock it has half choke and full choke and off indents........now mine has full choke and one position between full and half......and another position between falf and off.....gives me more choices and reduces fast idol to where I want it at the moment.........I'ts hard to get it positioned in between the indents......so I added more choices.....
t_choke.jpg
 
Back
Top