74 TX650A Project – AKA “The Parts Bike”

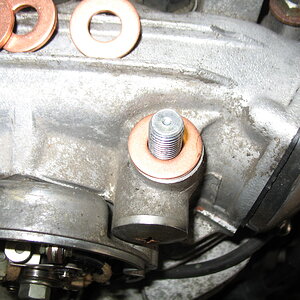
I had some more "tweaking" to do yesterday after getting the wheels back in. When I tried to spin the rear wheel, it had a pretty good drag it on coming from the brake. I had sanded the drum half-heartedly to get the worst of the rust off but apparently there was enough left to cause some drag so I sanded it completely clean. I put the wheel back in but there was still more drag than I liked so I spun the wheel a bunch to make rub marks and the leading and trailing edges of the shoes needed a little sanding to allow the wheel to spin freely.

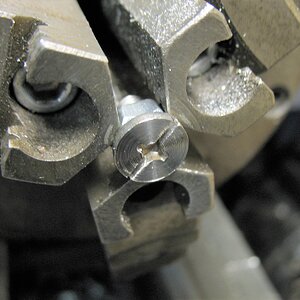
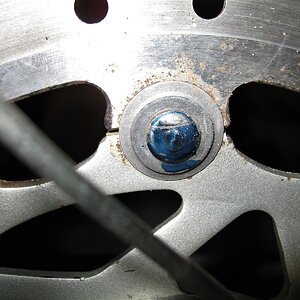
While spinning the front wheel, I heard tick, tick tick... as the lower inside edge of the caliper hit the back side of the disk buttons. I never really looked at them as they were smaller than the front side of the buttons, but they were also taller. I put some machinists blue on the buttons and spun the wheel a bunch to mark-up the buttons and the caliper.


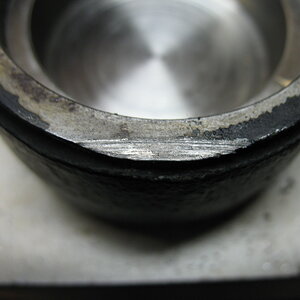
I little work with a file and now there is about 0.060" between the caliper and the disk buttons.


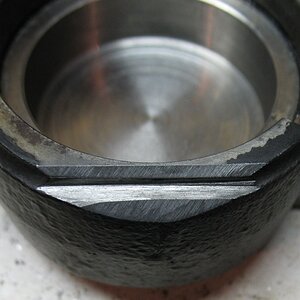
The chamfer at the bottom of the caliper wasn't required for clearance, it was just easier to file the whole surface to remove the sharp corner next to the bore and it reduced the weight by at least 1/2 a gram which should increase cornering speed and flick-ability in quick left-right transitions...:rolleyes:

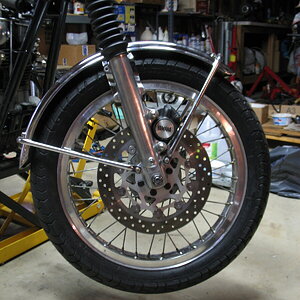
Hopefully this helps anyone thinking of putting an FZR, or similar modern disk on a bike with the twin piston caliper.

 
Well thank you very much Mailman! I'm glad you are enjoying my project! Reading all of the great build threads on here (your XS2 being one of them:thumbsup:) has made me try and up my game.

I've also been trying to post more of the little, simpler things than I generally might because of my nephew. He recently bought back one of my deceased dad's bikes from a local enthusiast, so one of dad's 83 Heritage Specials in back in the family which is super cool! (Dad's looking down on him with a mile wide grin, I'm sure.) I've been answering his questions and helping him by text and phone (makes it MUCH harder from 400 miles away) to get it back on the road and realized how much I assume he knows the simple things (he's doing great and getting there quickly) we all take for granted so I've been trying to post with him, and other newbies like him in mind. So please bear with me if some of my posts seem rather obvious.

I've been trying to get him to start a thread on here as you guys are the most helpful, patient bunch with newbies on the planet. I'll keep working on him.
 
I bought the stickers for the handlebar switches and decals for the side covers from Diablo a while ago and decided it was time to put them on. I started with the right-hand switch. (The left is good enough I'm going to use it as-is, call it preserving originality) I didn't have any good pictures of what the outside of the switch looked like after brake fluid leaked all over it from sitting but I did have one of it soaking to loosen-up all the crud inside, so here's a before and after of the switch.


The sticker set must have been meant for a similar (maybe 75?) but not identical model, so I had to be a little creative. The headlight on-off switch sticker was much taller than the recess in the switch housing so I could use just the "on off" part or just the "lights" half of the sticker, either fit in the recess, or do that plus add the other half of the sticker above or below it but stick it on the surface. I decided to put the "on off" in the recess and the "lights" above. I also found some 40-year-old Testors red model paint which amazingly was still liquid and painted in the dots for the kill switch and the recess in the lights switch. It won't satisfy any concours judge but it's passable.

The "OFF-RUN-OFF" for the kill switch was also too long to fit in the switch recess and even trimming the space between "OFF" and "RUN" wouldn't shorten it enough to fit so rather than cut a letter off of both "OFF"s I just lopped off an "F" but instead of thinking of it as a bodge, I prefer to think of it as adding character...we'll see if anyone notices.


When I got the bike, it was missing the left-hand side cover, so I bought a replacement in "meh" condition, but the decal was in terrible shape. It was very straightforward applying the decal using the instructions linked to in Jim's "Painting Tins" thread. (Thanks Jim!) Here's the before and after.


The decals, again, weren't an exact match (I'm guessing they match a 75?) as the lettering colors were more silver than white, or the original was just that faded.

The right-hand side cover was in much better shape, but the word "ELECTRIC" had faded away to nothing, so I cut that out of the decal and added it on top of the original decal.

 
Great job on refurbishing that switch, it’s always nice to be able to save an original component. And I think your side covers came out great, they have that nice original paint patina but cleaned up nicely. The good thing about those side covers, is that being on opposite sides of the bike, no one will ever notice they’re not the same.
 
I cleaned the carbs quite a while ago but didn't have the JBM diaphragms, O-rings or float bowl gaskets to finish them, so I put them aside. Now that it's getting to be time to put them on, I decided to finish them today. First, let me say Mike's float bowl gaskets ain't the best (I'm being kind.), it took quite a bit of trimming to get them to fit. I should have known better but didn't remember bad comments about those particular gaskets. Lesson learned. Everything went well except the left-hand slide drops faster than I would like. I tried blowing/sucking on the choke outlet with the ports plugged and it holds pressure/vacuum well. Just to be safe, I put Hylomar on the choke gasket even though it didn't seem to be leaking from there, and it didn't help. Next, I checked the flatness of the top of the carb body, and it wasn't very flat. I draw filed and sanded the top of the body and the carb top on a flat piece of granite but that didn't help either. I will continue to investigate.

To set the float level, I rigged-up a "Rube Goldberg" stand to check using the clear tube method that made it easy to make changes while the carb stayed in the "stand". The carb is clamped in a Black and Decker Workmate and checked for level, side to side and front to back, with a large syringe used to fill the float bowl. (Actually, it was supposed to be for measuring two stroke oil but it was useless for that) After checking the float level, I just dump the gas into the same measuring cup I used to fill the syringe, remove the float bowl, remove the float, make the adjustment, put it all back together and check again. It took a couple of tries to get each float set correctly. This is what the set-up looks like...


...and this is the before and after settings. The before is the float level as the carbs came off the bike which looks like they would have been pretty lean.


Just for grins I'm going to check the float height with a caliper and see what it is.
 
Last edited:
I did some more digging into the carbs and I came away with more questions than answers.

I re-checked the choke passages and plunger and there are no leaks and nothing wrong with any of that. I have four slides, two with stock diaphragms and two with JBM's, and no matter which slide I use in which body they act the same so that tells me there is nothing wrong with either carb body. Which means the slide that drops fast (like three seconds fast) has something to do with either the slide or the JBM diaphragm but I have no idea what it is. Note I'm not saying anything is wrong with the JBM diaphragm because I can't find anything wrong with it. Nothing visual or dimensional seems wrong with the slide and blowing through the connection at the slide/diaphragm with the holes in the bottom plugged doesn't show a leak. I filled the groove in the carb body with grease to make sure it was sealed to the body and the slide still drops fast. I can't find any holes in the diaphragm stretching it in front of a light bulb. I marked it "drops fast" and if I get real curious or real bored I may check it again someday.

I also went back and checked float heights with a caliper and, with both fuel levels even with the bottom of the flange (like the "after" picture above) the left float height measurement is 21.7mm and the right is 21.5mm even though the manual says it should be 24mm. I checked the fuel levels in each carb twice and they were very repeatable. There doesn't seem to be anything wrong with the float needles or seats and the floats don't have fuel in them and pass the dunk in hot water test. Again, I have no idea why they would be so far off and yet have good fuel levels but they do.

Whether the carbs are good or not will have to wait until I can get the bike started and run it some. They will either work or they won't, if they won't then I will have to do more investigating.
 
On my XS2 , my left carb was driving me crazy, the slide would just drop instead of coming down slow. What it turned out to be was the carb had the wrong choke plunger in it, it was too small diameter and it let air get by it.
Ironically I had bought a new choke plunger, but I looked at it and saw it was a different size from what I had and assumed it was wrong. :laugh2: 
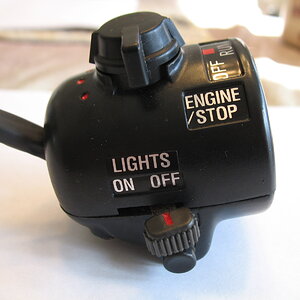
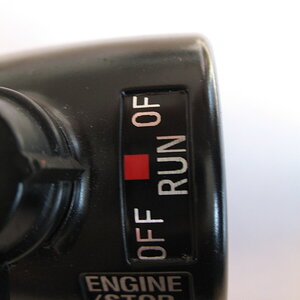
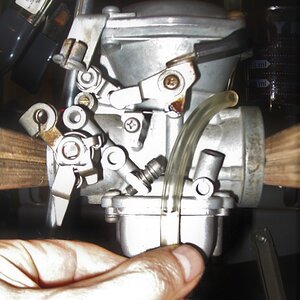
PS, I’m sure you already know this, but I’ll say it just in case. The choke has to be in the on position to test your slide. Here is a link to my choke issue,

post #508

https://www.xs650.com/threads/mailman’s-xs2-a-full-on-restoration.51520/page-26#post-546829
 
Last edited:
I don't have a -38 body to take a pic of... or much experience with 'em for that matter.... but here's a pic inside a -34 body. The red circle is the passageway leading to the choke. The red x is a machining passageway that's plugged after drilling, so disregard it. Don't know for sure but there must be similar in your 38's.

What I'm gettin' at is you could plug the choke passageway (silly putty, tape or some such....) and get a better idea where the leak is. If you plug it and the slide then drops normally, you know it's in the choke circuit. If it still drops fast, it's the diaphragm or sealing issues with the body, slide or cap.
Justa thought....


Untitled.png
 
Thanks for the input Mailman and Jim.

I think I did a poor job of explaining my multi-diaphragm/left right carb testing, so I made up a chart outlining what I did.

The reason I don't believe the problem is with the choke or the carb body is that three of the slides drop slowly in both carb bodies with no other changes. Only slide #1 drops fast and it does that in both the left and right carb bodies. It seems most likely there is either a leak in the diaphragm itself or in the diaphragm to slide seal. I put a thin bead of super glue all the way around the groove in the slide before installing the diaphragm so there is no looking at or removing the diaphragm to inspect either surface. The other possibility is that the hole the needle passes through the slide or the bleed vacuum bleed hole next to it leaks more than the other slides but they look identical so that doesn't seem likely.

Whatever it is it's not that big a deal since I have both slides now dropping slowly in both carbs. I would just like to find out if I did something wrong installing the JBM diaphragm so I don't do it again if I need to in the future.

I find the float level/fuel level issue more of a potential problem. If the 24mm float height setting spec. is correct, then the fuel level is 2+mm too high and the engine will run rich. If the fuel level (clear tube) is correct, then why do I have seemingly the only set of BS38's that require a 22mm float height.

Or maybe I just think too much...If it runs rich I will try the 24mm float setting and see how it runs. At least the non-linked carbs are a bit easier to remove.

1649976598027.png
 
Also, Mailman your link and your timing are perfect. I have exactly the same questions as you did on how to set up and sync the non-linked carbs initially and, what do you know!!, a couple of posts down and there it all is! Thank you sir. Bookmarked...
 
Last edited:
Today I did a couple of little jobs.

I went over the bike and tightened up all the bolts I left loose in case I needed to disassemble something, now it's a little more done and I didn't want to forget about them.

I've had the bronze sealing washers for a while and decided it was time to retorque the head and install the washers. It never ceases to amaze me that somebody thought those rubber coated washers were a good way to fasten a cylinder head. They always look like they are oozing out from under the acorn nut. They look pretty much (Ok, exactly..) like everyone else's...


I also wanted to get the rear fender installed but first it needed some minor alterations. I got the bike minus the rear fender and turn signals. I managed to find decent examples of the standard taillight and turn signals from an XS650B but not a fender as standard fenders seem to be rather pricey. The guy who sold me the lights had some really rough standard fenders but also had a pretty nice special fender that he wanted gone so I bought that plus what I think is a 77 front fender in reasonable shape that found a home on Dad's Bike to replace the bunged up one it came with. Even though it wasn't exactly what I wanted I couldn't say no since he was selling it all cheap.

The special fender has four holes for the taillight, three for mounting the light and one for the wire loom to pass through and run under the fender. The standard taillight uses the same two holes nearest the back edge of the fender to mount one end, plus a third much further forward. The original hole for the wiring loom would be covered up by the rubber damper on the standard light but I needed to do something to make the unneeded third mounting hole less noticeable. I had some stainless M6 Philips head screws left over from another project but the head was kind of tall and stood out next to the mount so I cut a straight slot in it and faced off the head in the lathe to make it about half the original height.


It isn't exactly invisible but stands out a little less now. Then all the fender needed was the third mounting hole drilled in it plus another hole nearby to take a grommet and allow the wiring loom to run under the fender like it is supposed to.


All mounted up, anybody really familiar with standards would notice it's not quite right but I think it's in keeping with the spirit of the project.

 
If you listen real close, I think you'll hear the bottom side of that fender talking to you. Hear it? It's saying "wash me ..... wash me .....", lol.
 
Believe it or not, I did clean it some. I scraped literally about two pounds of grunge from under there, so much the fender was noticeably lighter afterward. I thought about cleaning it really good...no, no kidding, I did! But I decided that with the new grunge slung up by the chain plus the existing grunge it should make an excellent long-term preservative. :wink2:

...plus I don't want to take it off again. If it continues to harangue me, I'm getting hearing aids and then turning them off out of spite.
 
If it's a rider who cares what the underside of the fender looks like.
If it's a garage queen see above.
 
Last edited:
Back
Top