I don't have a standard fender to compare to but that would make sense with the "custom" theme of the special. Still, for about $20 total investment I can live with it. Good to know though.
-
Enjoy XS650.com? Consider making a donation to help support the site.
XS650.com receives a small share of sales from some links on this page, but direct donations have a much greater impact on keeping this site going.
You are using an out of date browser. It may not display this or other websites correctly.
You should upgrade or use an alternative browser.
You should upgrade or use an alternative browser.
Wow! That's a bunch shorter.
Must be lighter too..that's it, it was a weight saving measure. Yeah, that's the ticket...
Must be lighter too..that's it, it was a weight saving measure. Yeah, that's the ticket...
That weight savings can equate to an extra 18 mph if combined with an ultra shiny polish.... The weight savings will net you .5 mph.Wow! That's a bunch shorter.
Must be lighter too..that's it, it was a weight saving measure. Yeah, that's the ticket...
The polish can add 17.5 mph depending on how much super shiny shine you can get out of that chrome...

I decided to tackle the last major electrical job (assuming I don't let the smoke out) and installed the instruments, handlebar switches and headlight bucket so I could connect everything in the headlight. While installing the instrument cluster, I didn't like that the gauges weren't entirely solid in their mounts, so I cut some 3/16 x 3/4 PVC adhesive foam insulation (Home Depot stuff) into 1/4" wide strips and stuck them on top of the foam instrument insulators and that tightened things up nicely. (Sorry, no pictures but you all know what gray foam looks like.)
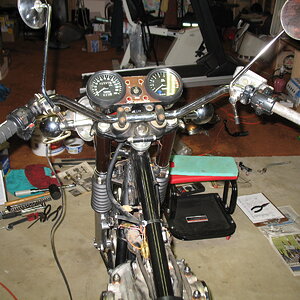
With the bucket installed we have electrical spaghetti...
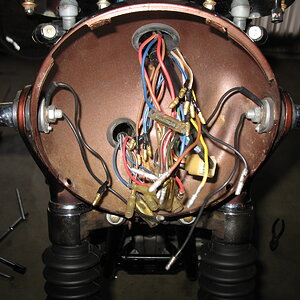
A couple of hours later (electrical is not my most favorite thing) and we have connected electrical spaghetti. I always have to cross my fingers and pray to the electrical gods at this point as I'm partially color blind so I'm never entirely confident I have everything connected correctly.

I hooked up a 10 amp battery charger to the battery leads and, fingers crossed, turned the key on and...no smoke! The switches all energize the things they are supposed to but the flasher doesn't flash it buzzes. Just one time out of many tries it flashed the left indicators so maybe it will spontaneously fix itself at some point. Also the brake light doesn't work using the brake pedal, not sure if it's the bulb or the switch yet but the parking light works.
This job was a good bit easier on Dad's Bike as there are more connectors and fewer individual wires to deal with but I'm glad it's done.
With the bucket installed we have electrical spaghetti...
A couple of hours later (electrical is not my most favorite thing) and we have connected electrical spaghetti. I always have to cross my fingers and pray to the electrical gods at this point as I'm partially color blind so I'm never entirely confident I have everything connected correctly.
I hooked up a 10 amp battery charger to the battery leads and, fingers crossed, turned the key on and...no smoke!
The switches all energize the things they are supposed to but the flasher doesn't flash it buzzes. Just one time out of many tries it flashed the left indicators so maybe it will spontaneously fix itself at some point. Also the brake light doesn't work using the brake pedal, not sure if it's the bulb or the switch yet but the parking light works.This job was a good bit easier on Dad's Bike as there are more connectors and fewer individual wires to deal with but I'm glad it's done.
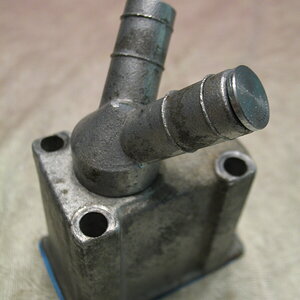
I had some free time this afternoon, so I decided to make a plug to plug one side of the dual outlet breather which I understand cuts down somewhat on the oil drips under the bike.
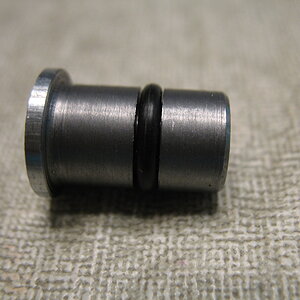
A parting blade worked nicely for cutting the groove and it fits nice and snug in the outlet with about 0.010" of "squish" on the o-ring.
I'm going to put both hoses back on (for no particular reason other than it's the original hose) so the hose will keep the plug in and should the next owner want to return to two functional outlets for whatever reason, they can pop the plug out and go back to original.
Last edited:
Be careful with blocking one tube though. I did that and not enough pressure got out of the crankcase and I ended up with a weepy base gasket. I went back to both hoses open but using the check valves at the end of the hoses as 5T recommends and that seems to have solved the issue. The check valves greatly reduce the air coming back into the crankcase as I understand it. I have them both draining into a small catch can now.
Thanks Van, I'll keep an eye out for leaks. If it does, the plug is easy enough to remove and try other avenues.
I'm a little surprised that would cause a leak as the later single outlet breather had a smaller ID than the dual outlet IIRC. They also changed the baffle so maybe that is part of the equation as well. We shall see.
I'm a little surprised that would cause a leak as the later single outlet breather had a smaller ID than the dual outlet IIRC. They also changed the baffle so maybe that is part of the equation as well. We shall see.
After some family issues took some of the wind out of my sails for a while and then other projects needed attention, I’m back working on the Parts Bike. The first order of business was to finish up the brake line that was started back in May or June. When I left it, it was just a little longer than I wanted once the bars were adjusted so I trimmed the end off and installed the master cylinder side fitting, check that one off the list.
For more details (Part numbers, more pictures etc.) see my post in a brake line thread from last year.
https://www.xs650.com/threads/brake-hose-tank-screws.61901/#post-744051
To keep the line from flopping around I made a clip out of some stainless sheet I had and attached it to a tab on the right headlight ear.
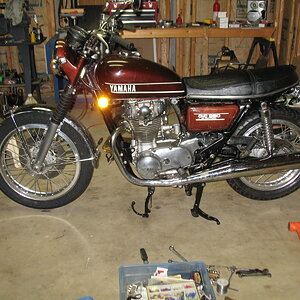
With that complete I removed the MC and stripped the last of the clearcoat and put the brake switch on and guts back in and installed back on the handlebars. I still need to make a small harness to connect the MC mounted switch to the harness connector that used to attach to the pressure switch on the lower triple clamp, another project for another day. After routing the clutch cable, I put the left side engine cover, gear lever and foot peg back on which helped make the bike look more complete. Next I put the chain on so I could finally install the exhaust, which has been sitting in the same spot for almost two years.
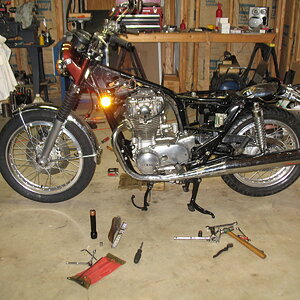
Much better, now it’s starting to look like something.
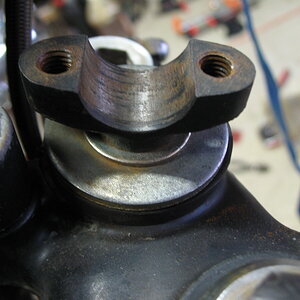
While working on the master cylinder I noticed the handlebars were looser in their mounts than felt right so I pulled them and added a washer to tighten them up. They weren't very thick but tightened everything up nicely.
For more details (Part numbers, more pictures etc.) see my post in a brake line thread from last year.
https://www.xs650.com/threads/brake-hose-tank-screws.61901/#post-744051
To keep the line from flopping around I made a clip out of some stainless sheet I had and attached it to a tab on the right headlight ear.
With that complete I removed the MC and stripped the last of the clearcoat and put the brake switch on and guts back in and installed back on the handlebars. I still need to make a small harness to connect the MC mounted switch to the harness connector that used to attach to the pressure switch on the lower triple clamp, another project for another day. After routing the clutch cable, I put the left side engine cover, gear lever and foot peg back on which helped make the bike look more complete. Next I put the chain on so I could finally install the exhaust, which has been sitting in the same spot for almost two years.
Much better, now it’s starting to look like something.
While working on the master cylinder I noticed the handlebars were looser in their mounts than felt right so I pulled them and added a washer to tighten them up. They weren't very thick but tightened everything up nicely.
Last edited:
Today’s project was to try my hand at seat repair. I have done a complete seat cover replacement before but never attempted a repair and the seat still has its 50-year-old seat cover in very good shape (for its age) so I decided it was worth trying to preserve it. I guess I should qualify my statement “very good shape” by adding that someone in the past decided to provide me with a challenge by cutting out a roughly 2” x 2” section of the seat from the back of the seat. Still can’t fathom what would possess someone to do such a thing to a perfectly good seat but there you have it…
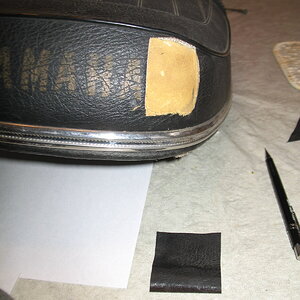
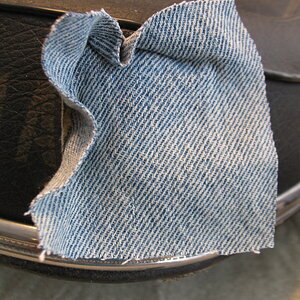
So that’s what I have to start with. First, I cut a rough sized piece of seat vinyl (a leftover from the before mentioned cover replacement) to trim to size later. It doesn’t match exactly but that’s what I have, the grain is smoother and shallower but it’s better than the other basket weave pieces I have. Next, I cut a piece of denim about an inch bigger than the opening and stuffed it into the opening, edges folded inward, and used a butter knife to work it under the seat cover until it laid flat. I then let the hot glue gun get good and hot before gluing the perimeter all the way around about ¼” back from the edge and then again just barely inside the edge pressing down just behind the nozzle to get it to lay flat.


I then carefully trimmed the vinyl patch as close to zero gap as I could and started gluing it from the center outward, first on one half and then the other but staying away from the cut edge. I then glued each edge right up to the edge of the opening.
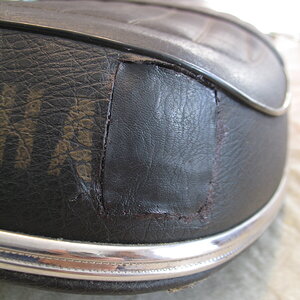
It’s far from perfect but should be serviceable and more or less fits in with the rest of the bike as well as my “cash conscious ethos". If the look bothers me down the road (pun intended), I will try some of the techniques that Dogbunny showed in his thread to improve the look. I never had any illusions it would match perfectly but It’s an improvement and good enough for now.
So that’s what I have to start with. First, I cut a rough sized piece of seat vinyl (a leftover from the before mentioned cover replacement) to trim to size later. It doesn’t match exactly but that’s what I have, the grain is smoother and shallower but it’s better than the other basket weave pieces I have. Next, I cut a piece of denim about an inch bigger than the opening and stuffed it into the opening, edges folded inward, and used a butter knife to work it under the seat cover until it laid flat. I then let the hot glue gun get good and hot before gluing the perimeter all the way around about ¼” back from the edge and then again just barely inside the edge pressing down just behind the nozzle to get it to lay flat.
I then carefully trimmed the vinyl patch as close to zero gap as I could and started gluing it from the center outward, first on one half and then the other but staying away from the cut edge. I then glued each edge right up to the edge of the opening.
It’s far from perfect but should be serviceable and more or less fits in with the rest of the bike as well as my “cash conscious ethos". If the look bothers me down the road (pun intended), I will try some of the techniques that Dogbunny showed in his thread to improve the look. I never had any illusions it would match perfectly but It’s an improvement and good enough for now.
Good repair and right price too.
Thanks lakeview!
After the patch, I cleaned up the seat with mild soap and water and then gave it a light coat of baby oil. I found a couple of websites that recommended it so I thought I'd give it a try. If it doesn't soak in I can always wash it off and try something else.
Next on the checklist...
Solder and shrink tube the left-hand rear turn signal wire that was cut by a PO.
Install gas cap with new seal. I didn't know there were two more seals in the cap. One disk shaped seal between the two sheet metal halves and one that seals between the disk and the post in the metal cap, the disk was in pretty good shape but the other was toast. If they leak, I will have to get the other seals and do it again.
The remnants of the post seal are the crumbly stuff in the center of the cap "guts".
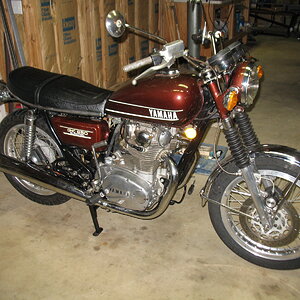
I also installed the petcocks with copper crush washers (the fiber washers didn't survive removal). I tried to put the tank on but found the rear post had been bent so had to get that vertical again and the tank went right on. I couldn't resist installing the gas tank, and side panels to see it more finished.
Tomorrow I can start putting the carbs, airboxes and cables back on and the list will be pretty short at that point, at least the things I know about. There's almost always some unexpected something...
After the patch, I cleaned up the seat with mild soap and water and then gave it a light coat of baby oil. I found a couple of websites that recommended it so I thought I'd give it a try. If it doesn't soak in I can always wash it off and try something else.
Next on the checklist...
Solder and shrink tube the left-hand rear turn signal wire that was cut by a PO.
Install gas cap with new seal.
I didn't know there were two more seals in the cap. One disk shaped seal between the two sheet metal halves and one that seals between the disk and the post in the metal cap, the disk was in pretty good shape but the other was toast. If they leak, I will have to get the other seals and do it again.The remnants of the post seal are the crumbly stuff in the center of the cap "guts".
I also installed the petcocks with copper crush washers (the fiber washers didn't survive removal). I tried to put the tank on but found the rear post had been bent so had to get that vertical again and the tank went right on. I couldn't resist installing the gas tank, and side panels to see it more finished.
Tomorrow I can start putting the carbs, airboxes and cables back on and the list will be pretty short at that point, at least the things I know about. There's almost always some unexpected something...
HVC Cycle used to sell the rubber bits for your gas cap rebuild. I bought them some years ago and happy with quality. Not sure if they still sell them.
Found it.
https://hvccycle.net/fuel-cap-internal-seals-hvc20064a/
https://hvccycle.net/fuel-tank-cap-seal-for-rd250-350/
Found it.
https://hvccycle.net/fuel-cap-internal-seals-hvc20064a/
https://hvccycle.net/fuel-tank-cap-seal-for-rd250-350/
Thanks willis! They have all kinds of goodies on there! Even though the company is focused on two strokes there's lots of crossover on the little parts to our vintage scooters.
Those cap seals can be a little confusing. Here is some info on when I re-did mine. Be sure to read the whole thing though as I had to correct my own mistakes. Been on mine a few years now and seals are tight with no leaks.
https://www.xs650.com/threads/correct-gas-cap-gaskets-needed-for-1973-tx650.54076/page-2
https://www.xs650.com/threads/correct-gas-cap-gaskets-needed-for-1973-tx650.54076/page-2
That's very helpful. Thanks again willis.
Also, the baby oil looks like it’s being absorbed well, about half the seat looks dry now so I'll coat it again and keep adding for as long as it keeps drawing it in.
Last edited:
You have the elusive proper sidestand! Nice. I still need to get my hands on one of these for my '74, should anyone have one, especially in Canada. Bike looks great!
Thanks Van Islander, your restoration has provided both information and inspiration for me, outstanding job you did!
I think the sidestand is from a '76 which is shorter (a good thing) but doesn't have the sheetmetal piece to hold a rubber bumper. I had it in with a pile of parts I got from the Micapeak board. I do have the original side stand but it's a bit bent-up so this one will do for now and when/if I get the motivation, I will work on restoring the original.
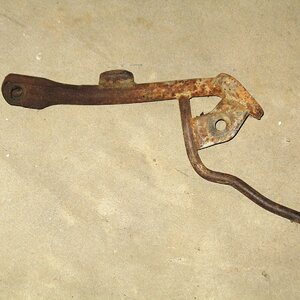
I read in the original road test that this sidestand was both so long as to be hard to use (as in leaning the bike to the right to clear the ground) and also hold the bike a bit too upright, so I'm not that motivated at present.
I didn't get much done yesterday thanks to a data breach and Iphone repair problems, but I did manage to find all the airbox mounting hardware and hopefully all the fuel line I will need to install the carbs.
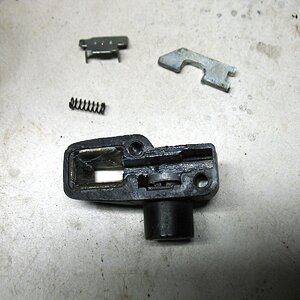
I also noticed the seat lock was pretty stiff when trial fitting the seat so I took it apart and cleaned everything up, a little fresh grease and it works "slicker'n snot on a doorknob" now.
I think the sidestand is from a '76 which is shorter (a good thing) but doesn't have the sheetmetal piece to hold a rubber bumper. I had it in with a pile of parts I got from the Micapeak board. I do have the original side stand but it's a bit bent-up so this one will do for now and when/if I get the motivation, I will work on restoring the original.
I read in the original road test that this sidestand was both so long as to be hard to use (as in leaning the bike to the right to clear the ground) and also hold the bike a bit too upright, so I'm not that motivated at present.
I didn't get much done yesterday thanks to a data breach and Iphone repair problems
, but I did manage to find all the airbox mounting hardware and hopefully all the fuel line I will need to install the carbs.I also noticed the seat lock was pretty stiff when trial fitting the seat so I took it apart and cleaned everything up, a little fresh grease and it works "slicker'n snot on a doorknob" now.
Damage Inc
XS650 Member
Sorry for the brief thread hi-jack...I still need to get my hands on one of these for my '74, should anyone have one, especially in Canada.
@TX650A Van Islander have you tried contacting Don @
https://gentlemansagreementusedvintage.godaddysites.com/
He's in Manitoba but seemed to have a lot of Japanese bikes being parted out. I got a TX750 swing arm for my XS650 build from him this summer. Might have the parts you need and on the north side of the 49th...
Sorry for the brief thread hi-jack..
No worries Damage.