-
Enjoy XS650.com? Consider making a donation to help support the site.
XS650.com receives a small share of sales from some links on this page, but direct donations have a much greater impact on keeping this site going.
You are using an out of date browser. It may not display this or other websites correctly.
You should upgrade or use an alternative browser.
You should upgrade or use an alternative browser.
81 XS650 hard tail build thread
- Thread starter miketweedie
- Start date

Could you tell me the brand of the tank you used please? Thanks!Got the forks done and reassembled, thanks again @jetmechmarty
Upon taking a closer look at the progressive springs, it appears they had already been cut down some amount. I put a Hugh's 2" lowering kit in, so I had to cut 2" off the springs, but the fact that they are already cut was concerning. Much googling and procrastinating later, I finally committed and went for it. My forks are the later style, with the pre-load adjuster in them. Once assembled and filled with oil I can compress the fork about 1" with absolutely no pre-load, which seems very wrong. With the adjuster in the middle there is barely tension, and at the lowest setting there is sufficient preload, but that doesn't seem right to me. Does anyone have input on this? It might be safest to buy a new set of springs and cut those 2" to fit.
For now at least it is back together and I can get going on my rear brake etc.
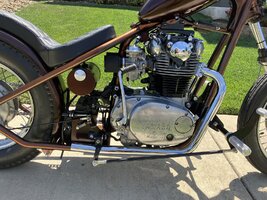
Pic of the stance, I'm pretty happy with it.

miketweedie
XS650 Addict
It is a deep tunnel P-Nut from lowbrow. I like the look, but it requires either a Hugh's or a custom top motor mount and the petcocks are a bit of a pain. Also, and this is not a shot at Lowbrow by any means, but the mounting tabs were not straight.Could you tell me the brand of the tank you used please? Thanks!
The Hugh's mounts are good, I have them on my tracker. Lot's of guys run no top motor mount with no issues. I don't use one on my bobber.
Your Wassel style tank looks really good!
Your Wassel style tank looks really good!
miketweedie
XS650 Addict
Thanks guys. As expected work is crazy again and I havent touched it in over a month. I'll finish it someday.
You can go without the top motor mount, I've ran a few like that with no problem. I have the same P-nut tank on my bike now.It is a deep tunnel P-Nut from lowbrow. I like the look, but it requires either a Hugh's or a custom top motor mount and the petcocks are a bit of a pain. Also, and this is not a shot at Lowbrow by any means, but the mounting tabs were not straight.
X77S
Let's do this!
If you don't name that bike "Blue Steel", you are missing an opportunity of a lifetime.
miketweedie
XS650 Addict
Haha you're not wrong!If you don't name that bike "Blue Steel", you are missing an opportunity of a lifetime.
miketweedie
XS650 Addict
Bought a cheap 21" HD wheel for a test fit. It has some pretty "special" spokes, but it as cheap enough to justify as a "test" wheel. It looks kinda huge, but I think I like it. If I stick to the 21" plan I'll run a spool wheel and sell this "beauty". The more I look at it, the more I'm kinda thinking mag wheels are ok... we shall see.
Also got a rear disc setup from Pandemonium (thanks Dan!) which I'm stoked on. Uses the stock front rotor, and a Brembo caliper. Gotta fab some spacers to make everything straight, but in mock-up form I'm pleased. It will also work with the 16" HD spoked wheel I grabbed, so depending on the front setup I'll decide which wheel to use.
Pics for reference. Nothing exciting, and a dirty garage as usual.
I can't tell what brand of front wheel that is, but it looks like a quality item from the pic. Does it have a flange for a rotor on the opposite side and 19mm (3/4") ID bearings?
I love the rear brake set-up! I run one of those calipers on the front (not the brkt of course): good stuff.
I love the rear brake set-up! I run one of those calipers on the front (not the brkt of course): good stuff.
miketweedie
XS650 Addict
Thanks! It's off a 1999 Sportster, and has the flange on the opposite side. Unfortunately I didn't do my homework, and it has the older Timken style bearings not the new sealed ones, and I am thus far unable to source replacement bearings for an easy swap. That said, I paid $100 for it with the tire, so it isn't hugely upsetting.I can't tell what brand of front wheel that is, but it looks like a quality item from the pic. Does it have a flange for a rotor on the opposite side and 19mm (3/4") ID bearings?
I love the rear brake set-up! I run one of those calipers on the front (not the brkt of course): good stuff.
If anyone knows of a replacement bearing to make it fit the XS 17MM axle I am interested! The existing bearing is the Timken LM-11949
The bracket/caliper setup from Dan is amazing. I'll need to figure out the spacers for it, as the bike was originally a mag drum, but all that will happen once I decide which rear wheel I'll use. Clearly the rear tire is toast, but I needed it mounted so I could get started test-fitting things. First time I have swapped a tire using tire irons, and wow did that suck.
fred nurk
XS650 Enthusiast
your got 3 options 1 . tapered bearing number 30303. 17x45x15.25 . op2. 17x45x12 seald bearing run 2 in each side of the hub that gives you 24 mm width you wont nead a seal because your using seald bearings. op3. take your wheel to bearing shop and tell them what you need.Thanks! It's off a 1999 Sportster, and has the flange on the opposite side. Unfortunately I didn't do my homework, and it has the older Timken style bearings not the new sealed ones, and I am thus far unable to source replacement bearings for an easy swap. That said, I paid $100 for it with the tire, so it isn't hugely upsetting.
If anyone knows of a replacement bearing to make it fit the XS 17MM axle I am interested! The existing bearing is the Timken LM-11949
The bracket/caliper setup from Dan is amazing. I'll need to figure out the spacers for it, as the bike was originally a mag drum, but all that will happen once I decide which rear wheel I'll use. Clearly the rear tire is toast, but I needed it mounted so I could get started test-fitting things. First time I have swapped a tire using tire irons, and wow did that suck.
miketweedie
XS650 Addict
Thanks guys! I'll pull the wheel off this eve and have a look at the ID. According to the Timken data sheet, the OD of the cup is 45.237 mm
I think a trip to the bearing shop is a good idea.
I think a trip to the bearing shop is a good idea.
miketweedie
XS650 Addict
OK, so no update on the wheel situation... something about working 60 hours a week doesn't mix well with projects.
BUT, I have a question for any of you that have built chops/bobs before. I want to hide as much of the electrical as possible to keep things clean. I'm currently on the fence about running a Hugh's PMA kit and going kick only, as that would eliminate the need for a battery, but the "electric leg" is obviously pretty handy, especially for tuning. Time will tell on that. What I am trying to figure out is where I can hide the TCI box (or CDI equivalent) as it's pretty damn ugly. I don't want to run a fake oil tank, and without a battery I wont have a battery box, so where can I hide it?
One thought I had is, "if I don't run a battery I won't need a starter, so I could remove that and build a bracket in the void", but what if I want to keep the starter?
Another thought was I might be able to fit it under the tank next to the coil, but will that be a recipe for interference and cause more harm than good?
So, has anyone come up with a solution? Is there a good place to hide that bugger? Any input is appreciated.
takehikes
XS650 Addict
miketweedie
XS650 Addict
Well the trials and tribulations of learning to weld continue...
I fabbed up a mount for my rear M/C using 1/4" plate, but I can't get a weld to penetrate and hold tight. After some texts with a friend who actually knows what he's doing I turned the voltage way up, the wire speed way down, and pre-heated the connection. The last attempt looks better, but I ran out of steam and called it a night before cleaning it all up. Today I'll grind it down and give it the ol' hammer blow test. I'm using my little 110 machine, as my garage still isn't wired for 220, so I won't be surprised if it fails again. If so I'll have to either remake the bracket out of thinner plate, or get the garage wiring updated. For items like the coil mount etc. my welds have held up great, but this thicker material just isn't getting hot enough and frankly I don't think I want to trust that for something as critical as my brakes, especially since it is rear brake only...
Ah, the learning curve. Never a dull moment.
Do yourself a favor and get a proper welder that is capable of welding .250" plate. That, BTW, takes some serious amperage that the 110V machine cannot generate. Trust, spoken from experience!Well the trials and tribulations of learning to weld continue...
I fabbed up a mount for my rear M/C using 1/4" plate, but I can't get a weld to penetrate and hold tight. After some texts with a friend who actually knows what he's doing I turned the voltage way up, the wire speed way down, and pre-heated the connection. The last attempt looks better, but I ran out of steam and called it a night before cleaning it all up. Today I'll grind it down and give it the ol' hammer blow test. I'm using my little 110 machine, as my garage still isn't wired for 220, so I won't be surprised if it fails again. If so I'll have to either remake the bracket out of thinner plate, or get the garage wiring updated. For items like the coil mount etc. my welds have held up great, but this thicker material just isn't getting hot enough and frankly I don't think I want to trust that for something as critical as my brakes, especially since it is rear brake only...
Ah, the learning curve. Never a dull moment.
The master cylinder shouldn't need that heavy a plate for a mount, depends on the design. Pics or sketches may help us help you.
Is this a 110VAC MIG machine?
Is this a 110VAC MIG machine?