Vee
XS650 Enthusiast
So I'm starting this thread because I hi-jacked van islander's tx quest for a daily rider thread. https://www.xs650.com/threads/van-islanders-tx650a-quest-for-a-daily-rider.60831/page-17#post-781701. Just want to give a shout out to everyone on that thread that gave me good advice on how to sync the carbs using the butterfly flap method and shining a bright light through them. Hoping I won't have to fiddle too much with them once I get the bike started.
I'm going to pick up my journey from a real late stage in the game because unfortunately I didn't really find this forum until I was halfway into the project and didn't take many pictures. To the well seasoned and experienced members I don't think my post will offer much but I think to the green builders like I was before starting this project it will be a good resource for avoiding headaches that a lot of experienced people just take for granted. This leads me to today's headache......
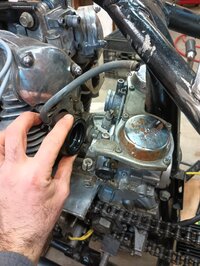
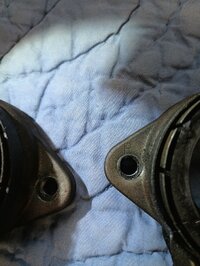
When you are reinstalling your carburetors do not put the manifolds on first! Slide the two attached carburetors in between the post of the frame and the engine. Tilt them back Then install your manifolds. Old 1980 manifolds should be labeled with a left and a right stamped on the rubber. Once you have the manifolds on you going to want to play something pretty heavy in front of the bike or chock the wheel somehow because pushing two metal carburetors into 40-year-old rubber is a challenge. I don't know if it's recommended but I sprayed the tiniest bit of white lithium grease on a rag and rubbed the boots/manifolds just to give a little bit of lubrication and not rip the rubber. After kicking and screaming for about 30 minutes and trying a couple different methods the job was complete.
I know this is basic basic basic but there has to be idiots like myself who pull their hair out over this stuff. Throughout my build so far I found that these are actually the problems that beat me down the most and combined all together, eat up a lot of time.
So just to re-iterate this thread will be more of a "green" builder trying to get smart sort of thread. I'm going to try and explain/diagram small puzzles encountered that may perplex new builders and potentially save you hours on your build. I'm also going to try to rate and review aftermarket parts purchased for my build. There also may be some shotty metal fabrication tutorials for non-essential components. Any question, comment, concern encouraged. No such thing as a stupid question/post. Good luck to everyone out there building!
I'm going to pick up my journey from a real late stage in the game because unfortunately I didn't really find this forum until I was halfway into the project and didn't take many pictures. To the well seasoned and experienced members I don't think my post will offer much but I think to the green builders like I was before starting this project it will be a good resource for avoiding headaches that a lot of experienced people just take for granted. This leads me to today's headache......
When you are reinstalling your carburetors do not put the manifolds on first! Slide the two attached carburetors in between the post of the frame and the engine. Tilt them back Then install your manifolds. Old 1980 manifolds should be labeled with a left and a right stamped on the rubber. Once you have the manifolds on you going to want to play something pretty heavy in front of the bike or chock the wheel somehow because pushing two metal carburetors into 40-year-old rubber is a challenge. I don't know if it's recommended but I sprayed the tiniest bit of white lithium grease on a rag and rubbed the boots/manifolds just to give a little bit of lubrication and not rip the rubber. After kicking and screaming for about 30 minutes and trying a couple different methods the job was complete.
I know this is basic basic basic but there has to be idiots like myself who pull their hair out over this stuff. Throughout my build so far I found that these are actually the problems that beat me down the most and combined all together, eat up a lot of time.
So just to re-iterate this thread will be more of a "green" builder trying to get smart sort of thread. I'm going to try and explain/diagram small puzzles encountered that may perplex new builders and potentially save you hours on your build. I'm also going to try to rate and review aftermarket parts purchased for my build. There also may be some shotty metal fabrication tutorials for non-essential components. Any question, comment, concern encouraged. No such thing as a stupid question/post. Good luck to everyone out there building!