With your intakes upside down, your carbs are tilted up in the back. That's gonna affect float height as well as fitting the side covers. Might have some petcock interference too.
-
Enjoy XS650.com? Consider making a donation to help support the site.
XS650.com receives a small share of sales from some links on this page, but direct donations have a much greater impact on keeping this site going.
You are using an out of date browser. It may not display this or other websites correctly.
You should upgrade or use an alternative browser.
You should upgrade or use an alternative browser.
Adopting another problem child
- Thread starter Wingedwheel
- Start date
Yea I noticed that but thought once I had them hooked into the air boxes they would be more level. Is that not the case because of the way the boots are made?
Correct. The carb flange face on the head is angled forward slightly. The boots are cut (angled) to compensate for that. With 'em upside down, you're gonna find that nothing's gonna want to fit.Is that not the case because of the way the boots are made?
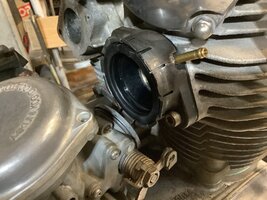
Well, if the tin shrouds fit, the manifolds should mount up correctly and the vacuum nipple should clear the valve cover. I think that besides having them upside down, you've got them switched side to side. There is a specific right and left one. Here's what a correctly mounted one should look like. The vacuum nipple should angle up and towards the outside .....


Genuine ones will be marked "R" and "L" as well (for right and left side).
Genuine ones will be marked "R" and "L" as well (for right and left side).
Yep I understood that but I thought by flipping them I could alleviate that however I’m finding that’s not the case. It’s the right side that is problematic. I’ll post a pic shortly but I think I have a solution.
Last edited:

That worked out so much better.
Well, that should work. Note the two nubs at the top on the rubber lip around the hole where the carb inserts. When they're on top like that, it indicates you have the manifold installed and oriented correctly. One more note - the correct, thick manifold gaskets, which I see you have, compress quite a bit after install. You may want/need to re-torque them a couple times before the mounting bolts stop getting loose because of gasket compression.
Yep plus one on the re-tourque. I’m also going to revisit the dimple mark on the brake pivot. I took a good look and on this one you can actually see a difference in the two cam sides. One is def more aggressive.
Something else I'll mention are the carb top screws. Yamaha used two different lengths here, slightly longer ones for the 4 inner screws that go through the butterfly shaped plate on the linked sets, and shorter ones on the outside. But Yamaha cheaped out here. They should have used longer screws where the throttle cable bracket attaches but didn't. You don't have that butterfly shaped plate between the carbs tying them together but you do have two throttle cable brackets. I'm not that familiar with these early sets and don't know if Yamaha used the proper longer screws there. If not, I advise getting some. They will need to be 2mm longer than the ones where there are no brackets. I switch to stainless buttonhead Allens .....


All the screws on my carbs were the same length. I do have a hardware run coming up. I’ll add 6/2 of those on the list.
I hooked up all the wire in the head.Ishtar bucket to test the lighting and everything works!. The only issue is the brake light indicator is flashing. I don’t have the switches installed yet. What could be causing that light to pulse? I also love AGM batteries for being usable in any position! I didn’t have the proper battery yet so this one will work for testing!
I didn’t have the proper battery yet so this one will work for testing!I don't know if your model has the light checker but on my '78, when I installed a LED tail light bulb, the warning light on the dash activated. I guess with it's low current draw, the light checker thought it was burned out.
I was wondering but doesn’t the brake light come on when there’s current from the switches introduced into the circuit? I don’t know why it would flash. In the pic it’s flashing.
Is your wire for the brake lining indicator hooked up on your rear brake plate?
No it’s actually rotted in pieces. I have the doner from the TX. I’ll hook that up and see.
There isn't much else to that circuit. Check your connections on your brake light switches too. Does your tail/brake light illuminate when you use the brake?
Everything is hooked up now and not getting a brake light. I might (very probable) have something hooked up wrong in the bucket or it might just be a bad bulb since I didn’t check that yet but in any case I’m just wondering what would make this flash. Turn signals appear to be hooked up correctly so I don’t think it’s the flasher doing it but what else on this bike would make something flash?
Nope, not it either, unplugged the unit, lost flashers but brake light indicator still flashing.
According to the '75 wiring diagram I have, the brake warning light has power in on a brown wire and then power out to the brake wear switch when it's activated. Along that line, power branches off to that diode that some of the early bikes have. Now, a diode is a one way filter, only letting power flow in one direction, in this case, out from the light. Maybe you have the diode hooked up backwards? Or maybe it's bad?