The tach looks similar to the SR500 with the redline and the neutral light incorporated......
-
Enjoy XS650.com? Consider making a donation to help support the site.
XS650.com receives a small share of sales from some links on this page, but direct donations have a much greater impact on keeping this site going.
You are using an out of date browser. It may not display this or other websites correctly.
You should upgrade or use an alternative browser.
You should upgrade or use an alternative browser.
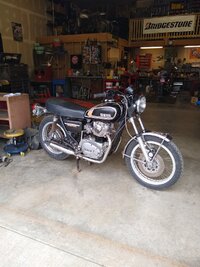
Adopting another problem child
- Thread starter Wingedwheel
- Start date
Thanks nj that’s good info
wheelsrus
XS650 Enthusiast
sometimes when i offer what i think is fair we are way off! good luck, i see we have the addiction, but somebody has to do it.
Fair to guys that get it and fair to guys that don’t are two totally different things.
bikefreakjon
XS650 Addict
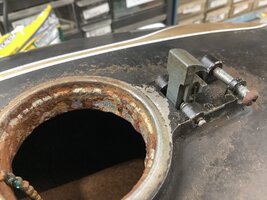
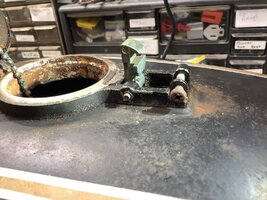
So can anybody tell me what I’m looking at? First pic is a ‘75 dash and second is mine. What is the empty hole for?

Im gonna have to replace mine as it’s broken but just curious what is missing?
Im gonna have to replace mine as it’s broken but just curious what is missing?
On my 75 it's for the rear brake wear limits on the shoes
the (missing) brushed bronze face plate covers the hole.

Are you in need of that cover plate? I may have one floating around in storage.
Your right with the plate on the right indicator is for the wear limits on rear
I am however I probably need the whole bracket as mine is broken off where the speedo goes and cracked on the tach side. I was thinking if I can’t find one perhaps I would try to make one out of some aluminum plate I have laying around and powder coat itAre you in need of that cover plate? I may have one floating around in storage.
Digging through that bucket of parts I realized I had this 
Bracket has a crack but totally fixable as it’s all there.
Bracket has a crack but totally fixable as it’s all there.
Japanese bikes have a speed warning light...........This is what the hole is forSo can anybody tell me what I’m looking at? First pic is a ‘75 dash and second is mine. What is the empty hole for?View attachment 218033
Had keys made today. Took the ignition out of the wasted dash and took it to my lock guy. Took the seat latch from the TX which he couldn’t get to work so I left it with him to work it out. Had a spare made for Patience and it worked all the locks no issues. The locks for PC however didn’t want to work either. I squirted them full of lube and left them all day. At the end of the day I was able to open the seat lock and yes there was a huge rats nest under there but that allowed me to take off the tank and tomorrow I’ll either get it to work or take it with me to the locksmith as nobody seems to know a way to pop those like the later caps. Getting under that seat and the tank off was huge. Now I can begin to work into this bike and see exactly what she’s gonna need.
Getting under that seat and the tank off was huge. Now I can begin to work into this bike and see exactly what she’s gonna need.i see a number on the tank lock, i have had several new keys made based on that number, so far they all worked with the remade key.
contact this guy if you need a key and let him know the number https://www.ebay.com/sch/i.html?_dk...ekeysonline&_oac=1&_nkw=yamaha xs650 1975 key
contact this guy if you need a key and let him know the number https://www.ebay.com/sch/i.html?_dk...ekeysonline&_oac=1&_nkw=yamaha xs650 1975 key
The same # is on all the keyed components. I think it just needs to soak in some oil. Seemed to work for the seat lock and it wouldn’t budge this morning.
yes they can get pretty stuck, when i first started on this i got keys and they still didn't work, however after some soaking they finally gave in
Wasn’t able to get the tank lock to work but was able to get the circlip off the latch pin and popped it up that way. I also found out the correct way to re install that latch pin. The tensioners on the spring have to be on the wrong side until installation. You can’t line things up with them in place.  Old gas looked like blood and gunk.lol. I think I’m gonna just buy new petcocks as the tubes on these are either shot or non existent
 I picked up 4 gal of vinegar and made sure I took before pics this time.


I’ve also noticed and may have asked it here but there are no vids or directions about popping these latches so I took the lock off and made a tool that could reach,
 it worked so now we have a reference.
I also found out the fuel cap/gauge works fine. It’s a float on a bathtub chain that was partially dissolved lol. I can’t see it being totally accurate but it’s kinda cool. I washed the tank out with lots of water and dried it out before filling it with the vinegar. Let’s take a look in a few days.

Old gas looked like blood and gunk.lol. I think I’m gonna just buy new petcocks as the tubes on these are either shot or non existent I picked up 4 gal of vinegar and made sure I took before pics this time.I’ve also noticed and may have asked it here but there are no vids or directions about popping these latches so I took the lock off and made a tool that could reach,
it worked so now we have a reference.I also found out the fuel cap/gauge works fine. It’s a float on a bathtub chain that was partially dissolved lol. I can’t see it being totally accurate but it’s kinda cool.
I washed the tank out with lots of water and dried it out before filling it with the vinegar. Let’s take a look in a few days.Attachments
Last edited:
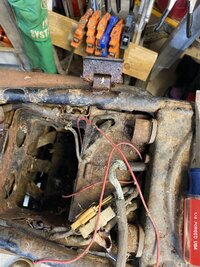
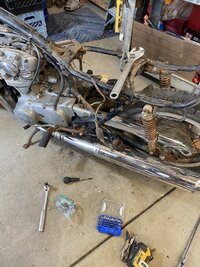
Officially wheeled her inside and began to see just how bad it’s going to be. Seat pan is shot for sure but that was expected. The battery box was totally filled with rats nest and when I got down to the bottom with my shop vac it was like a brick. I ended up peeling something out of there that resembled 47 yo roofing pitch but thanks to all the rat skank it didn’t stick to the tray.

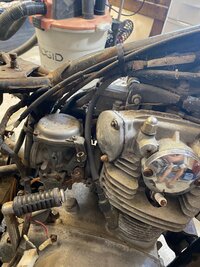
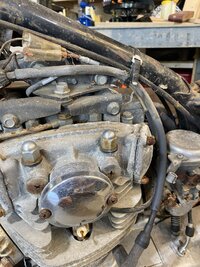
exhaust was in really good shape with some surface rust on the bottom of the left pipe but steel wool is my friend. I didn’t check the parts diagram but there was no top brace tying the carbs together. I think I may have one lying around. I did a part # comparison between the controls, gauges and a few other parts off the TX500 and the actually have the same number so it looks like I have just about everything I need in that respect, I just need to check the wiring diagram to see if the colors match but if they are using the same parts with the same leads in different bikes I feel like it should work. I bought that bike for less than what I would pay for a good headlamp bucket so no issues using it as a doner.


exhaust was in really good shape with some surface rust on the bottom of the left pipe but steel wool is my friend. I didn’t check the parts diagram but there was no top brace tying the carbs together. I think I may have one lying around. I did a part # comparison between the controls, gauges and a few other parts off the TX500 and the actually have the same number so it looks like I have just about everything I need in that respect, I just need to check the wiring diagram to see if the colors match but if they are using the same parts with the same leads in different bikes I feel like it should work. I bought that bike for less than what I would pay for a good headlamp bucket so no issues using it as a doner.
Attachments
-
 0B8B4346-93A4-46E4-AB0E-D58AC6561B65.jpeg482.7 KB · Views: 64
 -
 D3581589-42D7-44C0-AFDA-9101DDEC993D.jpeg616.5 KB · Views: 60
 -
 B5E40CC7-FA4D-4E5D-B206-A0EDB8C00A12.jpeg422.3 KB · Views: 62
 -
 38601668-7648-4361-9D02-B0918751106D.jpeg509.7 KB · Views: 56
 -
 373102C9-9E85-4562-BFF1-ABA0C37F3ABC.jpeg507.3 KB · Views: 66
I have several options depending on what I find inside the engine as I’m not 100% sure why or where it’s stuck but the oil in the crankcase isn’t bad or watery. there was some corrosion under the alternator cover but just above it the points looked new.

I also love the repair on the fork bonnets lol.
I also love the repair on the fork bonnets lol.