The front sprocket lock tab has six sides you can bend. As long as it’s there, you have a side to bend. 650 Central has the lock set for the rear or did two weeks ago.@Jim Do I need one for the rear too? This just says for front. Any other washers or secret things I wouldn't know about? I looked up instructions on how to replace online and I don't see any other weird parts but want to be sure...also didn't say anything about the lock washer so there's that
-
Enjoy XS650.com? Consider making a donation to help support the site.
XS650.com receives a small share of sales from some links on this page, but direct donations have a much greater impact on keeping this site going.
You are using an out of date browser. It may not display this or other websites correctly.
You should upgrade or use an alternative browser.
You should upgrade or use an alternative browser.
An Adventure in Firsts: '83 XS650 Heritage Special Build/Rebuild
- Thread starter MarieKaramazov
- Start date
MarieKaramazov
XS650 Addict
Alright guys, from eBay I got the 17/34 setup and the chain I linked to. Got the front and rear lock tabs Jim linked to from MikesXS. Threw a new clutch pushrod seal in there too. I almost grabbed a 36T from MikesXS too so I could try both, but I don't have time for all that. Thanks for the input and help! Hopefully everything arrives soon and I'll be able to fumble my way into getting these things on. NOT looking forward to taking off that damn muffler from hell again.
Marie, if you change your mind and want to try the 36 route without having to spend the cash I still have mine. You can have it if you want for the price of the padded envelope to ship it. No pressure, just making the option available
MarieKaramazov
XS650 Addict
Alright guys! Parts are in and today is the day for the sprocket and chain swap. Feeling a bit intimidated since it's been a bit since I really got out there and I'm in the street, but let's hope most of what I've learned so far has stuck!
I'll be referring to this post I found by @gggGary, as well as my manual. Just kidding, it looks like there is virtually nothing about this in my manual. The only thing that will help me with is setting the new chain tension. If there are any additional steps or tips, they are welcome and appreciated; pretty nervy about taking the wheel off and getting everything straight. I'll also have to take off my muffler
Hoping to get it done before the sun goes down !
Found this vid too.
If I end up being a wizard out there and have leftover time, I'll replace the pushrod seal again as well. Though I did come across post (#102 from @5twins) earlier on in this thread:
Feeling a bit intimidated since it's been a bit since I really got out there and I'm in the street, but let's hope most of what I've learned so far has stuck!I'll be referring to this post I found by @gggGary, as well as my manual. Just kidding, it looks like there is virtually nothing about this in my manual. The only thing that will help me with is setting the new chain tension. If there are any additional steps or tips, they are welcome and appreciated; pretty nervy about taking the wheel off and getting everything straight. I'll also have to take off my muffler
Hoping to get it done before the sun goes down !
Found this vid too.
If I end up being a wizard out there and have leftover time, I'll replace the pushrod seal again as well. Though I did come across post (#102 from @5twins) earlier on in this thread:
Maybe I get a new bushing?Yes, the sprocket nut needs to be very tight, something like 72-94 ft/lbs. You're trying to seal metal to metal so it has to be very tight.
Your pushrod seal may or may not take, you'll just have to try it and see. I can see in your 2nd pic that you appear to still have the original 8mm long pushrod bushing installed, and it looks a bit thin (worn). Once the bushing wears, the pushrod can wiggle around too much and sometimes even a brand new seal won't work.
Last edited:
Not sure if mentioned ..but when tightening the sprocket or other that needs higher torque -- Rear Wheel it can help have a pipe extension on the
Socket holding tool.
Length X Perpendicular force = Torque
Socket holding tool.
Length X Perpendicular force = Torque
A trick with the rear locking tabs is bend it up in three places around the bolt, and especially once it's against the bolt don't keep hammering which will make it thinner and weaker. I had a time for a while keeping my rear sprocket bolts tight. Some of them would be floppy loose. Now they're good.
I replaced the bushing in mine. I screwed a lag bolt into it and pulled it out as I recall.
The way us weaklings do it is snag it with a low speed drill slightly larger than the push rod and pull it out while it's turning. There will be a lot of push rod play even with the new bushing though, so I wonder if worn busing leading to leaks isn't a bit of a myth
MarieKaramazov
XS650 Addict
All right, you guys were right, the front sprocket bolt is a real son of a bitch to get off. Breaking out the WD now. Using the longest torque wrench I have to get it off…
Other oil options I have are penetrating oil, 3in 1..I’d go for penetrating but idk if that okay to use here…?
Other oil options I have are penetrating oil, 3in 1..I’d go for penetrating but idk if that okay to use here…?
Last edited:
It may not be corrosion that’s giving you trouble but the high torque that may have been applied to tighten it. A helper would come in handy to hold the rear brake while you use the wrench to loosen it.All right, you guys were right, the front sprocket bolt is a real son of a bitch to get off. Breaking out the WD now. Using the longest torque wrench I have to get it off…
Other oil options I have are penetrating oil, 3in 1..I’d go for penetrating but idk if that okay to use here…?
MarieKaramazov
XS650 Addict
Got it!
MarieKaramazov
XS650 Addict
Torque specs for rear sprocket bolts? I don’t see in manual…
It's famous for working itself loose, being finger tight the first time you check it on your new bike. So maybe bad rust or too much locktite. 36mm 1/2" socket and breaker bar PLUS you can go to a fencing company and get a scrap of that pipe they use 2-3 ft long to use as an extension for the breaker bar handle. Another option is impact wrench, electric are medium-duty; air ones tire changers have will get it for sureAll right, you guys were right, the front sprocket bolt is a real son of a bitch to get off. Breaking out the WD now. Using the longest torque wrench I have to get it off…
Other oil options I have are penetrating oil, 3in 1..I’d go for penetrating but idk if that okay to use here…?
Also there should be a locking tab there. After it's all cleaned up a new tab plus a drop or two of blue locktite will keep it on. The locking tab has to be put on carefully because it's got cuts that interlock like fingers, but they're not much higher than the thickness of the tab
Last edited:
MarieKaramazov
XS650 Addict
Alright, back at it today. I had to pause for work but going to do my best to finish it all today before I go back in, got about 3 hours! Right now I have everything off (though I had to half put the wheel and rear sprocket on to move the bike to a new location on street--hopefully it's okay I moved it in that state--without front sprocket and with axle mostly in haha.)
thanks for the rear sprocket nut torque specs, Jim. To bend the sides up on the new lock tabs (for both front and rear sprocket bolts) I imagine I'll just use pliers or some other weird situation I figure out.
A few questions that came up as I was working:
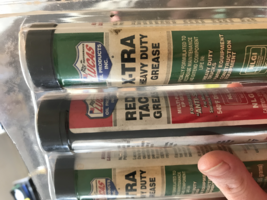
What parts am I greasing or oiling as I put them back on? Obviously I'll lube the chain before putting it back on. I imagine I should grease the whole axle rod (long rod) I pulled out and also the castle axle nut setup? Anything for the front sprocket or on rear sprocket? Maybe oil the rear sprocket bolts with 10/30 oil? For grease, I was going to use the red grease pictured below for everything unless you guys tell me otherwise.
I don't have any solvents on me to clean at the moment, so just been wiping things off the best I can with a dry towel/rag.
I've never taken the rear wheel totally off before, so I want to be sure I'm doing this right. To get the wheel off, I had to disconnect the rear brake rod and then also a rod that connected by the swingarm. Do these have a specific spec I need to tighten them back to?
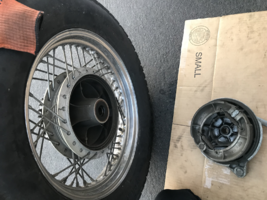
Also, when I disconnected those parts and took the rear wheel off, what I believe is the rear brake drum situation, just flopped right off (pictured below). It seems to make sense seeing as I took away what was holding it on, but I just want to make sure that's supposed to happen. Any particular way I need to put that back on or as long as the brake rod and other arm that goes to swingarm line up with it?
And getting the rear wheel back on straight...I assume it's a matter of it getting straightened out by axle nut torque being correct and then having chain tension adjusters (axle adjusters?) same on both sides..?
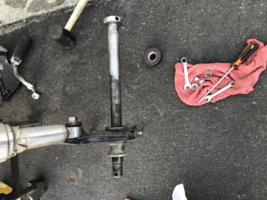
Lastly, the spacer (I think that's what it is) that's on the axle rod came off and fell. (I try to note the direction everything is in and keep it that way so I don't mess it up). It may be obvious when I go back out there, but is there a direction that needs to be facing? Grease this sucker at all?
As for torque specs, what I have in my notes here is: 80-100 ft/lbs for the front sprocket nut. Rear axle: get it to 87 and then get it as close as I can to 132ft/lbs while still having castle setup line up to cotter pin.
thanks for the rear sprocket nut torque specs, Jim. To bend the sides up on the new lock tabs (for both front and rear sprocket bolts) I imagine I'll just use pliers or some other weird situation I figure out.
A few questions that came up as I was working:
What parts am I greasing or oiling as I put them back on? Obviously I'll lube the chain before putting it back on. I imagine I should grease the whole axle rod (long rod) I pulled out and also the castle axle nut setup? Anything for the front sprocket or on rear sprocket? Maybe oil the rear sprocket bolts with 10/30 oil? For grease, I was going to use the red grease pictured below for everything unless you guys tell me otherwise.
I don't have any solvents on me to clean at the moment, so just been wiping things off the best I can with a dry towel/rag.
I've never taken the rear wheel totally off before, so I want to be sure I'm doing this right. To get the wheel off, I had to disconnect the rear brake rod and then also a rod that connected by the swingarm. Do these have a specific spec I need to tighten them back to?
Also, when I disconnected those parts and took the rear wheel off, what I believe is the rear brake drum situation, just flopped right off (pictured below). It seems to make sense seeing as I took away what was holding it on, but I just want to make sure that's supposed to happen. Any particular way I need to put that back on or as long as the brake rod and other arm that goes to swingarm line up with it?
And getting the rear wheel back on straight...I assume it's a matter of it getting straightened out by axle nut torque being correct and then having chain tension adjusters (axle adjusters?) same on both sides..?
Lastly, the spacer (I think that's what it is) that's on the axle rod came off and fell. (I try to note the direction everything is in and keep it that way so I don't mess it up). It may be obvious when I go back out there, but is there a direction that needs to be facing? Grease this sucker at all?
As for torque specs, what I have in my notes here is: 80-100 ft/lbs for the front sprocket nut. Rear axle: get it to 87 and then get it as close as I can to 132ft/lbs while still having castle setup line up to cotter pin.
Attachments
Yes to that there is Oil close there from chain and soIt may not be corrosion that’s giving you trouble but the high torque that may have been applied to tighten it. A helper would come in handy to hold the rear brake while you use the wrench to loosen it.
If I recall right you was in a Enthusiasts garage
there can be a tool like that
Alright, back at it today. I had to pause for work but going to do my best to finish it all today before I go back in, got about 3 hours! Right now I have everything off (though I had to half put the wheel and rear sprocket on to move the bike to a new location on street--hopefully it's okay I moved it in that state--without front sprocket and with axle mostly in haha.)
thanks for the rear sprocket nut torque specs, Jim. To bend the sides up on the new lock tabs (for both front and rear sprocket bolts) I imagine I'll just use pliers or some other weird situation I figure out.
A few questions that came up as I was working:
What parts am I greasing or oiling as I put them back on? Obviously I'll lube the chain before putting it back on. I imagine I should grease the whole axle rod (long rod) I pulled out and also the castle axle nut setup? Anything for the front sprocket or on rear sprocket? Maybe oil the rear sprocket bolts with 10/30 oil? For grease, I was going to use the red grease pictured below for everything unless you guys tell me otherwise.
I don't have any solvents on me to clean at the moment, so just been wiping things off the best I can with a dry towel/rag.
I've never taken the rear wheel totally off before, so I want to be sure I'm doing this right. To get the wheel off, I had to disconnect the rear brake rod and then also a rod that connected by the swingarm. Do these have a specific spec I need to tighten them back to?
Also, when I disconnected those parts and took the rear wheel off, what I believe is the rear brake drum situation, just flopped right off (pictured below). It seems to make sense seeing as I took away what was holding it on, but I just want to make sure that's supposed to happen. Any particular way I need to put that back on or as long as the brake rod and other arm that goes to swingarm line up with it?
And getting the rear wheel back on straight...I assume it's a matter of it getting straightened out by axle nut torque being correct and then having chain tension adjusters (axle adjusters?) same on both sides..?
Lastly, the spacer (I think that's what it is) that's on the axle rod came off and fell. (I try to note the direction everything is in and keep it that way so I don't mess it up). It may be obvious when I go back out there, but is there a direction that needs to be facing? Grease this sucker at all?
As for torque specs, what I have in my notes here is: 80-100 ft/lbs for the front sprocket nut. Rear axle: get it to 87 and then get it as close as I can to 132ft/lbs while still having castle setup line up to cotter pin.
I would probably use the " Heavy Duty " grease also on the picture but cant se the text
Molybdenum Disulphide Grease is good if it says there
To get the wheel straight one can measure to the swing arm on both sides at the front of the wheel 9 o clock
Adjusting with adjusters getting the right slack in the chain first and at the end the axle nut.
Seldom wrong to apply a little oil on bolts when assembling someitimes it is in instructions
Yes, smear the whole length of the axle with grease before putting it back in. You never install one dry. With all the weather a bike is exposed to, the axle can rust into the wheel and be very hard to get out. As far as what kind of grease, it doesn't really matter. The important thing is to put some kind on there. I put anti-seize compound on all my threaded fasteners. In particular, those rear sprocket bolts need it. They can seize into the hub if installed dry.
Now, a word about your chain adjusters. There is a "right" and "left" one and they differ. The outside hole on the left (sprocket) side one is smaller. It will only fit over the smaller diameter threaded end of the axle and won't slide all the way onto the larger diameter unthreaded part .....


Now, a word about your chain adjusters. There is a "right" and "left" one and they differ. The outside hole on the left (sprocket) side one is smaller. It will only fit over the smaller diameter threaded end of the axle and won't slide all the way onto the larger diameter unthreaded part .....
Grease everything (except the brakes). That's more for corrosion protection than anything else. Once everything's back together, wipe off any exposed grease that will attract dirt and grime. Any of those you have will work just fine.What parts am I greasing or oiling as I put them back on?
The brake stay just needs to be snugged up and the cotter pin replaced (if you have one) or reuse the old one if it's still serviceable..... rod that connected by the swingarm. Do these have a specific spec I need to tighten them back to?
The brake rod is tightened until you have a good "feel" on the brake pedal. We can expand on that if you don't understand.
No "direction", just needs to go back where it was. Yes, a slight smear of grease in it's hole.Lastly, the spacer (I think that's what it is) that's on the axle rod came off and fell. (I try to note the direction everything is in and keep it that way so I don't mess it up). It may be obvious when I go back out there, but is there a direction that needs to be facing? Grease this sucker at all?
As long as everything fits as it did before, you're good.Any particular way I need to put that back on or as long as the brake rod and other arm that goes to swingarm line up with it?
Those hash marks will get you close. What I do is drive down a flat, level road about 30-40mph and let go of the handlebars. The bike should continue to track straight ahead. If it doesn't, we can revisit adjustment.And getting the rear wheel back on straight...I assume it's a matter of it getting straightened out by axle nut torque being correct and then having chain tension adjusters (axle adjusters?) same on both sides..?
The thing about getting the wheel straightened out - wheel alignment. Getting the chain adjusters same both sides gets you in the right ballpark. You should check the wheel is straight, lots of methods.
I get down on the ground, behind the bike and ahead of the bike and squint along the bike past both tyres. You should be able to spot if a wheel is not aligned. Looking from the back, move your head slowly to the right till the front tyre is just coming into view. You can see a little bit of the side of the rear tyre. Now move your head to the left till the front wheel is just coming into view - you should be able to see a similar amount of the side of the rear tyre. Hard to explain but makes sense when your looking at the wheels to see if it's all straight. If necessary, re-adjust the rear wheel till it looks the same looking past on both sides. Check the chain tension is still ok. In future, you can tighten the chain by just turning the adjusters 1/6 of a turn both sides and the wheel will stay aligned.
I get down on the ground, behind the bike and ahead of the bike and squint along the bike past both tyres. You should be able to spot if a wheel is not aligned. Looking from the back, move your head slowly to the right till the front tyre is just coming into view. You can see a little bit of the side of the rear tyre. Now move your head to the left till the front wheel is just coming into view - you should be able to see a similar amount of the side of the rear tyre. Hard to explain but makes sense when your looking at the wheels to see if it's all straight. If necessary, re-adjust the rear wheel till it looks the same looking past on both sides. Check the chain tension is still ok. In future, you can tighten the chain by just turning the adjusters 1/6 of a turn both sides and the wheel will stay aligned.
I thought this was a goofy tool but it actually works well. Once the wheel is confirmed straight with the tool, later chain adjustment can be done counting the number of “turns” of the adjuster bolt. I count the flats as I move the bolt. On some bikes the chain guard gets in the way though.
