First Attempt at a Build

How much of a difference do you have there in space left and existing spacer width?

My preference would be to make a proper spacer. Spreading the axle plates is asking for binding issues. Too long a spacer, or too short a spacer, likewise will cause binding issues when the axle is tightened. I'd shoot for a spacer about .5mm less than the existing space. It might be possible to stack washers for mock-up purposes (depends on the thicknesses available and your luck).

BTW - good progress!
 
Last edited:
How much of a difference do you have there in space left and existing spacer width?

My preference would be to make a proper spacer. Spreading the axle plates is asking for binding issues. Too long a spacer, or too short a spacer, likewise will cause binding issues when the axle is tightened. I'd shoot for a spacer about .5mm less than the existing space. It might be possible to stack washers for mock-up purposes (depends on the thicknesses available and your luck).

BTW - good progress!
Exactly what I was thinking...mock it up without any stress on it, using washers for perfect alignment. Measure the stack of washers after you remove them...take to local machine shop to have a proper custom spacer made. Shouldn't be very expensive to have made.
 
Thanks for all the responses. Once I see them I usually run out to the garage so that’s why I don’t respond quickly.

I mocked everything up with washers of varying thickness then transferred that measurement to a steel bushing from Lowes and cut it to size. According to my feeler gauges I have a .025 gap. I don’t know if that considered good enough but I don’t like it.

I’m a little frustrated so I’m going to give it a rest for the day.

Tomorrows plan is to cut the stock spacer a bit larger than my measurement then ever so slowly use the bench grinder to take a little off, see if it fits, and repeat until I get it.
 
....I have a .025 gap. I don’t know if that considered good enough but I don’t like it.
If you're saying .025" (twenty five thousands of an inch) total all the way across the axle, that's more than good enough. The rear of the frame will easily suck in that much.
Hell, the paint on the frame will almost take care of that.
 
Well, I've had bikes where you had to spread the ass end apart a smidge to fit the wheel and spacers in there... and I've had bikes where there was a slight gap that got sucked up when you tightened the axle.
None of them fell apart or were otherwise unusable. My opinion is a .025" gap.... about as much as 2 credit cards ain't gonna hurt a thing. The tubing back there is more than capable of flexing that much.
.... and changing tires will be much easier. ;)
 
I haven't had to post here asking questions in a while....the search feature works wonders. Seems like every issue I've run into, someone else somewhere had the same issue. I guess I'm not as special as my mom said. But, I couldn't find a great answer for this one.

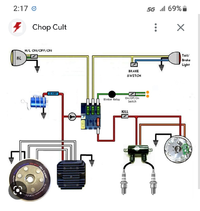
I bought the Hugh's Handbuilt complete ignition system, and am just about ready to start wiring it up. It came with instructions that I think are pretty clear as well as a wiring diagram. Only thing is, I will also be wiring up my lights and there isn't anything in the instructions about tying it into the lights. So, below I attached a wiring diagram which I put together after looking at others in the tech section that seemed close to what I was trying to do. My goal is to be able to turn the key to "on" and be able to start the bike without power going to the lights. I'd like the key switch to also act as the kill switch. Then, turn the key to "accessory" and have the lights come on. I plan on only running a headlight with Hi/Low Beam and a brake/taillight. FYI, I haven't a clue about electricity other than reading about it online and watching YouTube videos, so please explain things like I'm a toddler if you can.
Also, in this diagram, everything below the horizontal dotted line is the way Hugh instructs it to be wired up (I don't really understand how the key switch cuts power though), and everything above is my half-baked idea. Any thoughts on whether this will work, or how to achieve what I'm after?

IMG_3890.jpg
 
Funny you mention this, I was just looking at this one to run battery-less with a Hughs CDI.

Its a little different because its a PMA in the diagram, but same principle I think.

1679625071855.png

Original poster wrote: "I always use this one when doing a kick only, pma and capacitor. Fuse block is available at a napa. Just add another cir unit from the fuse block if needed".
 
Ok, I’m new to this, so I’m going to repeat that back to you to make sure I got it right. Hope I'm not getting annoying, I just want to get this right. I really do appreciate all the help I'm getting here.

Put an 8” piece of pipe between the axel plates, with a 3/8 threaded rod through it and washers/nuts on each side. (I'm guessing so I have something to represent the axel and something to measure to, with the rod/nuts holding it tightly in place)

Put the hardtail in place with the plug (plug being the piece that inserts into the vertical tube and rests on the cross member of the hardtail?) and clamp in place (not sure how to clamp it since the c clamps keep slipping off but I'll figure something out)

Shim the frame so the sprocket is plumb (a bubble level on the face of the sprocket should be sufficient?)

Now ensure the pipe between the axel plates is level. (I can foresee this not being level, that’d be my luck but I'll cross that bridge later)

Measure from inside of left axel plate out 7/8” onto the pipe and mark that.

Now here’s where I really want to clarify this: I’m going to tie off a string somewhere in front of the sprocket, I’m guessing to anything heavy like a cinder block and weave it through one of the teeth on the sprocket (to keep it tight to the sprocket?) then pull it back to my pipe between the axels. Starting from the left while keeping the string taut, gradually move the string toward my mark on the pipe until it barely touches the sprocket. Once it touches the sprocket see where the string lands in relation to the mark previously put on the pipe, and keep my fingers crossed that its within 1/8” of the mark. If it does, then weld that sucker up?

You mention axel spacing, is that something to worry about after the hardtail is on?
My instructions for the hardtail from TC Bros suggests the pipe spacer between axle plates should be 8.5”. In these posts I see 8” recommended. I have a 1979 xs650. Should I use an 8” spacer pipe or an 8.5” spacer pipe? Many thanks.
 
The critical part of getting the rear wheel right is lining up the sprockets. I'd rather have too much room to play with than not enough... I'd stick to the recommended 8.5"
If that turns out to be too big, you can get/make spacers for a good fit.
If 8" turns out to be too small, you're pretty much screwed.... the wheel just won't fit.
 
I'd be tempted to just measure the spacing of the swingarm and shoot for that.

And like Jim said, spacers are a cinch to make if you got a lathe. Or even a buddy that works in a machine shop that has a 3-jaw chuck bolted to the table of his CNC mill. :thumbsup:
 
Back
Top