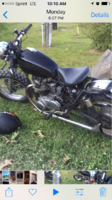
First bike 81 xs650 bobber. Flat power at high rpm

TheXSCafe.com is a great xs650 site. Interestingly, his last post is on the Charging system............He used to be INXS on here. You will see a lot of the early tech Menu posts were by him
Here is a link from the site with downloadable Manuals , (get a paper one when you can). The 81H is a supplementary due to the earlier 78/79 Specials being basically the same............82SJ manual is better visually. The only real difference is the 82/83 models had extra relays for the side-stand and clutch
Manuals
 
Last edited:
View attachment 125403 View attachment 125402
Not sure what I'm looking at here. But I think these are the pics you requested nj1639

Hi Gavin,
yeah, that's the photos Jim wanted and like he sez, that's the ignition pickup alternator & empty
cam covers for a TCI (Transistor Controlled Ignition) which brings us to the next question
"Where did the dreaded PO put the ignition's control module?"
If it's rubber mounted someplace it'll be OK but if it's bolted down hard, perhaps underneath your bike's
welded-in battery carrier, it'll soon get vibrated to death.
The photos I'd like to see would be of the complete bike.
 
IMG_1467.PNG
IMG_1465.PNG
IMG_1466.PNG

Alright, got the Unipods in the mail today. Should I install those and see what happens? If the stock ignition/ charging system is still in place and in working condition, but the problem persists, where to from there ? Also has anyone else rejetted only the main jets of the carburetor and had success with the unipods or should I try a few different pilot jets and needle heights ? Also had a guy from a motorcycle shop tell me today "if you want it to run right put the stock air box back in" which I found to be kind of ironic coming from someone who restores motorcycles :umm:
 

Attachments

  • IMG_1464.PNG
    IMG_1464.PNG
    1.4 MB · Views: 220
Just change one thing at a time, or you'll create more problems than you fix. See how it runs (through all ranges and loads) with the Uni-pods before you change anything else. The "Carb Guide" is a must-read before you start re-jetting. And those fish tails!!!!..... You've got so much potential there!
 
Got the unipods on today, performance has certainly improved, high RPM is still a little flat towards the top but I'd say say it's reaching 85-95% of each gear now as opposed to what felt like 60-70% before. Obviously speculation without a tacometer. Had to jump it again today to get it going and see how it ran with the unipods. Buying a multimeter tomorrow to test battery power.
 
Need to listen to what has been said .:whistle:...............Running a bike with a poorly charged battery will damage the charging system....Especially if you don't know if the charging system is working properly.:doh:.
 
Need to listen to what has been said .:whistle:...............Running a bike with a poorly charged battery will damage the charging system....Especially if you don't know if the charging system is working properly.:doh:.
I know :bike: can ya blame me though ? First bike, any time on that thing is the highlight of my day haha. I'll be back to diagnosing tomorrow. It did start every time when I first got it. Hopefully just need to charge the battery. Into the tech menu I go


Reading through the "charging system problems" all last night and this morning, learned how to do a slap test, so I do have the magnetic field in the rotor. Reading through the tech menu just kinda confused me because i was unable to identify parts just by reading about them. These two video links from YouTube helped me be able to see what I was looking at. Regulator, rectifier, starter relay, stator, rotor etc..

Got the battery on a trickle charger right now to get it up to proper voltage. Then gonna run some tests from the tech menu to see if the charging system is actually working. Any input is appreciated! And feel free to call if you want 207-450-9160
 
Alright guys, battery charged, so far has been holding. Tested voltage of positive brush terminal, same as battery so no loss there. Cleaned up the rotor a bit (small amount of black dust)

Started the bike at 11.6 volts, went for a 2 minute ride on my street and came home. Tested the battery again and I'm at 12.08 volts. Also did the revving of the engine test with the headlight, which does get brighter as I get on the throttle.

Correct me if I'm wrong but does this mean the charging system is working ?

On that short ride I did experience the sputtering/ no power at low-mid rpms now. But the high is great, it's really pulling forward how I thought it should.

Thinking of moving on to pilot jets/ needle heights but I'll wait for your input ;)
 
You appear to be charging but to verify that, do the simple charging test. Check the voltage at your battery at idle and then with the bike revved up to about 3K. You should see about 12 volts, maybe a bit more maybe a bit less, at idle but that should increase up to around 14 volts when you rev it. This will verify that your charging system is working as it should. Sometimes you will only find a very small increase in voltage when revved. That indicates a problem with one or more of the charging system components. Your alternator uses carbon brushes and they wear shorter over time. Once they get too short, charging output will decrease or stop completely. That's usually the first thing to check if charging issues arise. The brushes are cheap and easy to replace.
 
IMG_1506.JPG
IMG_1507.JPG
IMG_1487.JPG
IMG_1483.JPG

IMG_1508.JPG

Alright checking in again after pushing her back down the street to my house a few times haha.

I just took the carbs apart mostly to verify where certain jets are and give it another look over for imperfections. I've got 135 pilot air jets, was thinking of trying one bigger and one smaller size on those, test run.

Next check would be possibly shimming the needles up a bit to see if that changes the low RPM issue now.

But I also noticed tonight the needle slide diaphragm has these small tears in them in the top, should I be concerned about this affecting the vacuum it creates ? Obviously I wish there weren't tears in them, but looking closely, the rips would be under the top covers on the carb where it's sealed. So I'm not sure if it is leaking or not. And as requested few pictures of the full bike. Minus carburetor
 
diaphragm has these small tears in them in the top, should I be concerned about this affecting the vacuum it creates ? Obviously I wish there weren't tears in them, but looking closely, the rips would be under the top covers on the carb where it's sealed. So I'm not sure if it is leaking or not.
There's a test for that. Go to the "Tech" section and scroll down to the carb section. First article has a carb guide in it.
 
Look a bit suspect, that d-laminate could be right at the edge of the carb body lip.

Simple procedure to check for diaphragm holes.........Carbs assembled.........from the inlet side using your finger, lift the slide up a far as it will travel and hold...........using your other hand and while holding the carb body, (if carb is off the bike), wet/lick your thumb and cover the oblong vent at the top of the inlet........It is critical to have a good seal................Let the slide drop, it should initially drop quickly just a small way, then very slow from then on....Slow is as slow as you start to think it is more fun watching grass grow............If it drops quickly all the way it is an indication the diaphragm has a hole in it...........if it drops quickly do the procedure again, It is easy to not get the seal properly when first doing this, so do it until your confident of a good seal


Might be worth while investing in a Rev counter.:yikes:.......I know it's not the look:whistle:..........but, it will be a handy tool for diagnosing your charging system, (as per 5wtins explanation), checking charging at idle and 3000 revs. Also handy for setting the correct idle speed when setting up the bike initially. Easy enough to remove it for those rides later.
 
Last edited:
This may be a dumb question but I can't find a direct answer on this anywhere.

if the pilot jets are plugged which I've read over and over again, they have to be, does the size of the pilot jet affect anything above the plug ?

What I'm asking is even though it's plugged with that rubber stop, does changing its size affect the idle/ low rpm range like it says it does ?
 
What I'm asking is even though it's plugged with that rubber stop, does changing its size affect the idle/ low rpm range like it says it does ?
There's a hole between the main and pilot jets. The bottoms plugged 'cause the pilot is fed from the main. Short answer...... yes.
 
This may be a dumb question but I can't find a direct answer on this anywhere.

if the pilot jets are plugged which I've read over and over again, they have to be, does the size of the pilot jet affect anything above the plug ?

What I'm asking is even though it's plugged with that rubber stop, does changing its size affect the idle/ low rpm range like it says it does ?
Yes the plug just covers the access hole so you can remove it. Those are not stock diaphragms. They look like toast to me. Assemble and do the drop test. Cover the large port top of intake with your thumb raise slide let it drop it should go down SLOWLY. not flop down. Your chokes need to be closed and sealing for this test to work right.
 
Ooook, thank you guys, Jim, Gary. Just wasn't sure why everyone says it needs to be plugged, but rejetting/ needle heights will affect the pilot jets :umm: haha

Just passed the slide drop test. I also read that a bit of nail polish will close those small tears, so I did two coats and did the test again. Seems like they were "ok" dropping slowly. But now with the nail polish on there, it's like watching grass grow waiting for them to go down :thumbsup:
 
I also read that a bit of nail polish will close those small tears, so I did two coats and did the test again. Seems like they were "ok" dropping slowly. But now with the nail polish on there, it's like watching grass grow waiting for them to go down :thumbsup:
Never heard of the nail polish thing... seems a little counter-intuitive to me, as nail polish will eventually harden.... losing it's flexibility. I'd use red (fuel resistant) RTV if it were me. Stays flexible.
 
Back
Top