Yes, many cycle shops will have these on the shelf. They're kinda the standard of the plug cap industry. They're cheap (about $3 each) and last darn near forever. Although I never tried it, maybe an auto parts store could even get them for you. Most do carry NGK plugs after all.
-
Enjoy XS650.com? Consider making a donation to help support the site.
XS650.com receives a small share of sales from some links on this page, but direct donations have a much greater impact on keeping this site going.
You are using an out of date browser. It may not display this or other websites correctly.
You should upgrade or use an alternative browser.
You should upgrade or use an alternative browser.
FixThe's 1981 XS650SH
- Thread starter fixthe
- Start date
Replacing the plug caps is one of the first things I do on any one of these I get or work on. It's just cheap insurance against spark issues, either in the future or currently happening (as in your case). I also like to replace the plug wires but unfortunately in your case, you can't. They are molded into your factory coil. But, sometime down the road, you may consider replacing your stock coil with one that has plug wires you can change. A very good candidate is the MP08 coil from a Honda. They're very dependable and can be had quite cheap off eBay.


I'll put that on my potential to-do listReplacing the plug caps is one of the first things I do on any one of these I get or work on. It's just cheap insurance against spark issues, either in the future or currently happening (as in your case). I also like to replace the plug wires but unfortunately in your case, you can't. They are molded into your factory coil. But, sometime down the road, you may consider replacing your stock coil with one that has plug wires you can change. A very good candidate is the MP08 coil from a Honda. They're very dependable and can be had quite cheap off eBay.


Just noticed that those caps have a resistor, so id still be using the same hard to find plugs. I'll see if they have non-resistor caps when I get there but if not I'll grab these. They're cheap so it's not a big deal to swap again in a bit
Replacing the plug caps is one of the first things I do on any one of these I get or work on. It's just cheap insurance against spark issues, either in the future or currently happening (as in your case). I also like to replace the plug wires but unfortunately in your case, you can't. They are molded into your factory coil. But, sometime down the road, you may consider replacing your stock coil with one that has plug wires you can change. A very good candidate is the MP08 coil from a Honda. They're very dependable and can be had quite cheap off eBay.


1+ on that. For 20 bucks on Ebay I picked up 2 MP08 coils. One went on my SG, the other's in the tool kit as a spare.
Looks like I've got some stuff to do. Grabbed the resistor caps, and they also got in my oil filter in earlier this week but didn't give me a call.
Order of what's up next
* Put on new spark plug caps
* Check/set valve clearances
* Check carb balance again
* Oil change (have new filter and sump filter)
* Reroute that one cable pointed out to me
* Put on new headlight bucket
This weekend I'm not sure what I've got going on, but next week I have a five day weekend so I should be able to bang everything out by then.
Doesn't look like I have a tonne of spark wire to spare, but I should be able to trim a bit. I'll put on the new plugs for now then maybe in the off season pickup that coil, run new wire and get the non-resistor plugs.
Bought two caps so I could replace them both - one was good, the other was missing the boot that goes on the back. I'll have to go back to the shop tomorrow, but I replaced the one trouble cap then went for an hour and a half ride through the country.
Happy to report absolutely no problems, the bike feels great. There was a pretty crazy wind for the first 45 minutes or so and most of the time I was going straight into it. It was hard to maintain a steady 100 km/h without feeling sketchy, but once the wind died down it was easy. Cruising at 110 km/h was no problem at all either, then for a bit I brought it up to 120 and from there it still accelerated to 130 with a twist of the wrist. The highway limits here are 100 or 110, with everybody almost always doing 10 over, then out west it goes up to 120. I wanted to see what the bike could comfortably do so I don't put myself in a situation and find out too late the bike can't hack it, but it seems like it can keep up anywhere I'd want to take it.
Happy to report absolutely no problems, the bike feels great. There was a pretty crazy wind for the first 45 minutes or so and most of the time I was going straight into it. It was hard to maintain a steady 100 km/h without feeling sketchy, but once the wind died down it was easy. Cruising at 110 km/h was no problem at all either, then for a bit I brought it up to 120 and from there it still accelerated to 130 with a twist of the wrist. The highway limits here are 100 or 110, with everybody almost always doing 10 over, then out west it goes up to 120. I wanted to see what the bike could comfortably do so I don't put myself in a situation and find out too late the bike can't hack it, but it seems like it can keep up anywhere I'd want to take it.
Attachments
I'd call that a win.Bought two caps so I could replace them both - one was good, the other was missing the boot that goes on the back. I'll have to go back to the shop tomorrow, but I replaced the one trouble cap then went for an hour and a half ride through the country.
Happy to report absolutely no problems, the bike feels great. There was a pretty crazy wind for the first 45 minutes or so and most of the time I was going straight into it. It was hard to maintain a steady 100 km/h without feeling sketchy, but once the wind died down it was easy. Cruising at 110 km/h was no problem at all either, then for a bit I brought it up to 120 and from there it still accelerated to 130 with a twist of the wrist. The highway limits here are 100 or 110, with everybody almost always doing 10 over, then out west it goes up to 120. I wanted to see what the bike could comfortably do so I don't put myself in a situation and find out too late the bike can't hack it, but it seems like it can keep up anywhere I'd want to take it.
Pretty thrilled. Think I'm going to have lots of fun with this bike. I'm so used to the sound and feel of my old bike, a few times I thought I was maxed out then realized I still had another gear. That out a smile on my face.I'd call that a win.
Today played a game called "how much can I get done while my baby sleeps." The answer is...not much. Just got all the covers off for valve adjustments then she was up. Got my parents to take her for a half hour so I finished up valve clearances and took off the oil bolts and let that all drain while I ate lunch, fed the baby then put her in her stroller back to sleep while I finished working, taking pretty frequent breaks to rock her whenever she woke up.
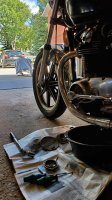
So where we are now - valves are done, oil is drained, new filter and sump filter are in. Haven't put oil back in yet though, as one of the sump filter bolts was missing a washer (yes, I double checked to make sure it wasn't just stuck on the metal plate). One of the drain bolts was missing a crush washer too, but I had those on hand.
Oh yeah, also one of the spark plug caps I picked up yesterday was missing the back boot in the box. So as soon as my wife is up I'll pass off the baby, go back down to the bike shop to get a new boot and washer, then I'll come back home, fill the bike back up with oil and put on the new spark plug cap.
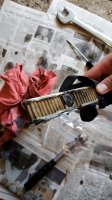
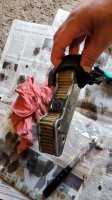
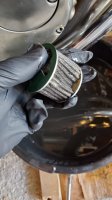
Old sump filter didn't look too bad to be, but I don't really know what I'm looking for. Main filter had a big dent in it. Didn't seem to be any plastic in the oil, but I haven't dumped it yet - might filter to double check, depending on what I've got for time.
Attachments
The three sump filter to cover bolts just use a common split ring lock washer. The six bolts holding the sump filter plate into the engine block have no washer at all.
As long as there's no tears in the screening, all you do is wash these filters in solvent and re-use them. Your sump filter is an aftermarket one, I can tell because of the round magnets. Originals have slightly bigger square magnets. Your little round side filter is toast, lol. I don't know how it got dented like that but it looks like that broke the screening away from the glue along the edge.
As you've probably read here, the sump filter screening is prone to tearing. The spot to watch is that point that juts out next to the magnet on the right end. That's where they usually tear. It's not a deal breaker when they do, you can patch them up with JB Weld .....

So, if you do ever discover a torn filter, don't toss it, clean it up and patch it. We figure the most likely cause for them tearing is running too hard shortly after starting while the oil is still cold and thick. Try to take it easy and keep the revs down until the oil warms up some and you shouldn't have too many torn filter issues.
As long as there's no tears in the screening, all you do is wash these filters in solvent and re-use them. Your sump filter is an aftermarket one, I can tell because of the round magnets. Originals have slightly bigger square magnets. Your little round side filter is toast, lol. I don't know how it got dented like that but it looks like that broke the screening away from the glue along the edge.
As you've probably read here, the sump filter screening is prone to tearing. The spot to watch is that point that juts out next to the magnet on the right end. That's where they usually tear. It's not a deal breaker when they do, you can patch them up with JB Weld .....
So, if you do ever discover a torn filter, don't toss it, clean it up and patch it. We figure the most likely cause for them tearing is running too hard shortly after starting while the oil is still cold and thick. Try to take it easy and keep the revs down until the oil warms up some and you shouldn't have too many torn filter issues.
Screens look good (normal) to me. But yeah the separated side filter should be replaced.
I replaced them both - for the price of the sump filter I'd rather just have a new one in there so I know when it was done and can keep tabs on things. Also, I had already done it by the time you guys responded. Oh well.
All nine bolts - the three sump-to-covers and the six sump-plate-to-engine had solid copper washers on them (minus the one missing). Is that a potential issue? Should I drain the oil, grab three split washers and remove the other six?
Got the other spark plug cap on and old bucket off. Later tonight or tomorrow morning I'll get the other bucket on then that'll probably be it for this weekend!
You should be fine until your next oil change. At that time you can correct all this stuff. Here's a parts diagram that shows how it should be - plain split ring washers on the 3 filter bolts, nothing on the 6 plate bolts. Don't buy the washers from Yamaha. $2.65 is a bit ridiculous for one plain old lock washer, lol. Any M6 split ring lock washer will work, it doesn't even need to be plated. It'll be constantly bathed in oil so it can't rust .....
https://www.partzilla.com/catalog/yamaha/motorcycle/1981/xs650sh/oil-pump
Bookmark that Partzilla site, the parts diagrams are a big help when working on your bike.
Save those copper washers that are on there now. There are places they should go, just not any of the spots you've got them, lol. Here's a drawing for the right side cover. You should have the copper washers on the 4 lowest cover screws because they sit under the oil level. They don't go on that little round oil filter cover although you often find them there. I've never used them there and that area never leaks a drop.
Beauty! Thanks for the pictures and link. I usually look at parts diagrams before doing anything but this one seemed pretty obvious to me. Six bolts, five washers - makes more sense to grab one than toss five. *eye roll*You should be fine until your next oil change. At that time you can correct all this stuff. Here's a parts diagram that shows how it should be - plain split ring washers on the 3 filter bolts, nothing on the 6 plate bolts. Don't buy the washers from Yamaha. $2.65 is a bit ridiculous for one plain old lock washer, lol. Any M6 split ring lock washer will work, it doesn't even need to be plated. It'll be constantly bathed in oil so it can't rust .....
https://www.partzilla.com/catalog/yamaha/motorcycle/1981/xs650sh/oil-pump
Bookmark that Partzilla site, the parts diagrams are a big help when working on your bike.
Save those copper washers that are on there now. There are places they should go, just not any of the spots you've got them, lol. Here's a drawing for the right side cover. You should have the copper washers on the 4 lowest cover screws because they sit under the oil level. They don't go on that little round oil filter cover although you often find them there. I've never used them there and that area never leaks a drop.

And yeah. The Yamaha washer price is insane. I grabbed it because I didn't want to have to stop somewhere else but my jaw nearly hit the floor when he told me
As you can see from my pic above, I've acquired extra filters and sump plates over the years, mostly off eBay. These are handy to have. When it comes time for an oil change, you've got a clean filter and plate assembly you can swap right in. Then you can clean the one you removed at your leisure and have it ready for the next oil change. If you watch eBay, you can usually find the plates, many times with an old, torn filter (that you can patch) still attached, for about $20, often less.
Yeah, good call. I actually thought of that last night and grabbed the old one out of the garbage. Not sure how long these things are supposed to take to dry off after cleaning, would be good to have two I can rotate.As you can see from my pic above, I've acquired extra filters and sump plates over the years, mostly off eBay. These are handy to have. When it comes time for an oil change, you've got a clean filter and plate assembly you can swap right in. Then you can clean the one you removed at your leisure and have it ready for the next oil change. If you watch eBay, you can usually find the plates, many times with an old, torn filter (that you can patch) still attached, for about $20, often less.
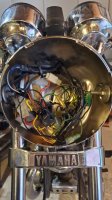
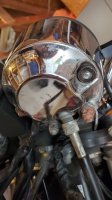
Finished up with the bucket. Might not look like it, but this is way tidier than it was before. I could have spent a lot more time on it but really I just wanted the big stuff out of the dead centre behind the bulb, and for all the wires to not be crossing over and under eachother.
But, mistakes were made. I took photos before unhooking all the wires, but apparently not enough-or at least not the right ones. This took a couple hours longer than it should have because I was left with a handful of wires that I wasn't entirely sure where they went and I had to do some searching. Got it all sorted now though and everything is working as it should be.
Also my speedometer and tach are both a bit loose so I was going to tighten them up while I had the extra space of the bucket off. First one I barely touched and it sheered off. Eff.
Attachments
Yes, that's a stepped, threaded stud pressed into the bottom of the instrument housing. I'm not sure it can be replaced. When the instruments get loose, it's not usually because the nuts holding them are loose, it's because the rubber bushings they fit into have worn. You can buy new ones but they're quite expensive. I just shim them with o-rings or rubber washers.
Yes, you don't throw these oil filters away (unless they're really trashed like your side one), you re-use them. Especially that large lower sump filter. It costs near $40 so using a new one at every oil change (1000 to 1500 miles) would put you in the poor house, lol. That little round side filter usually never goes bad. Yours is one of the first bad ones I've seen and it probably got that way due to "user error", lol.
Yes, you don't throw these oil filters away (unless they're really trashed like your side one), you re-use them. Especially that large lower sump filter. It costs near $40 so using a new one at every oil change (1000 to 1500 miles) would put you in the poor house, lol. That little round side filter usually never goes bad. Yours is one of the first bad ones I've seen and it probably got that way due to "user error", lol.


