Gear selector forks removal?

GeorgeOC

XS650 Junkie
Messages
513
Reaction score
118
Points
43
Location
California
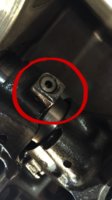
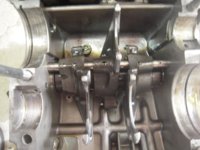
Thanks in advance out there... I am in the process of an engine rebuild. The cases are split, and will be sent to the hot tank to remove some pretty nasty oily grime... My last hurdle is the gear selector forks. According to the Clymer manual, there are 2 pieces that retain the forks, in addition to their cotter pin. I am removing so that any contaminants from the bath, or cleaning don't remain lodged in or between the forks and the carriers, seals or axles.

Might anyone know if these pieces are threaded, pressed in? Or better yet, how you may have removed them?

Thanks again folks!
 

Attachments

  • IMG_7221 (2).jpg
    IMG_7221 (2).jpg
    84.8 KB · Views: 296
IF I remember correctly,there are some cotter pins that should go through them, you can see the hole on the side there in that pic. They just push fit in, so get some strong neodymium magnets, or carefully pick them out with a tool of some sort.

Take pics of the forks before you do this so you know how they go back in,and also number them as they are different.

PITA to get those pins back in afterwards! This I DO remember!!
 
Thanks Airwolfe, yes completely agree on the cotter pin re-install. I can foresee that being bear, given the removal was tough from dexterity POV. Thanks for the tip. If they are not threaded etc, I may try to use a appropriately sized dowel or something an back them out.
 
Hi,

I did this a little over a month ago. The cotter pins go over the top of the pins when they're installed. The rare earth magnet is a good trick that Airwolfie mentions. Two of mine came out pretty easy. For the one that didn't, I flicked the fork back and forth quickly to work it out of the bore. Gummy oil was keeping it in.

The middle one, in the bottom of my picture was the hardest to get back in. I have some long needle nose pliers that are bent on the ends and used those. I levered the cotter pins closed with a straight bladed screwdriver.

This is the only picture I have and a little fuzzy. The top two cotter pins go in from the top and the middle from the left side.
 

Attachments

  • DSCN4669.jpg
    DSCN4669.jpg
    169.5 KB · Views: 372
Hi,

I did this a little over a month ago. The cotter pins go over the top of the pins when they're installed. The rare earth magnet is a good trick that Airwolfie mentions. Two of mine came out pretty easy. For the one that didn't, I flicked the fork back and forth quickly to work it out of the bore. Gummy oil was keeping it in.

The middle one, in the bottom of my picture was the hardest to get back in. I have some long needle nose pliers that are bent on the ends and used those. I levered the cotter pins closed with a straight bladed screwdriver.

This is the only picture I have and a little fuzzy. The top two cotter pins go in from the top and the middle from the left side.

Glenn, thanks! great photo and tip on the pliers/cotter pin tricks. Curious, did you remove the shift drum needle bearing? I am still at a loss how to press that baby out...
 
Hi,

Glad to help. No I didn't remove it. The condition of my drum and pin grooves was great and no problem with the bearings. Heat would help to remove them in my opinion.
 
Back
Top