• It's time to vote for the bikes you want to see in the 2025 XS650 Calendar! Vote here!

Help with Caliper Rebuild

SinisterMatti

XS650 Enthusiast
Messages
55
Reaction score
3
Points
6
Location
Great Falls, MT
I was wondering if anyone could point me to a caliper rebuild how to for a 1978 xs650. My front brakes stopped releasing out of the blue. Tried cleaning out the reservoir and flushing the brake system without results, so my next step will be to try and rebuild the caliper. I've used the search feature on the forum, searched google, and youtube and no one seems to have done a how to that I can find. I don't want to buy the rebuild kit and take everything apart only to discover I'm missing some essential tool or part. I've never disassembled a caliper before and don't want to go into it blind.

Thanks in advance!
 
Often no parts are needed, the piston will have some corrosion, you will have to decide if it needs replacing.
Cover any nearby paint with rags, plastic. Brake fluid really gets around.

To start loosen master cylinder reservoir cover screws, they are often corroded. Loosen, use a hand impact wrench before you round out the phillips slots, if the screw binds at ALL as you back it out; stop, spray some lube, tighten back down a bit, now loosen again, repeat as many times as needed to remove the screw, patience! If all else fails you can drill off the heads remove the cover then you can attempt to remove the remainder by grabbing with a visegrips.
OK back to caliper rebuild..
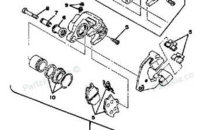
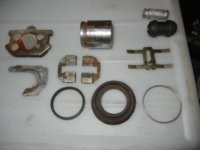
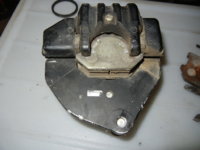
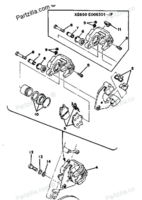
diagram and photo of the parts

77-84 caliper.png


late caliper rebuild 008.JPG


Note: brake cleaner is for metal parts, do NOT spray, or soak rubber parts in brake cleaner, they will swell and turn to junk.

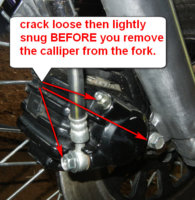
late caliper rebuild 001.JPG


Crack the brake line banjo bolt, just loose, now retighten, loosen then resnug the bleeder, it's 8mm (Makes it easier to remove these later when the caliper is off the fork.)
If the brake works AT ALL, Do NOT remove the brake line yet!
You do not not need to remove the carrier from the fork tube, the caliper can be unbolted from the carrier and brake pads by removing the bolt at the rh side of the pic above, and the phillips head (JIS #2) screw from the back side. The caliper will now slid up off the brake pads which stay on the carrier tabs.
If you want ot remove the carrier that' fine also. Loosen bolt #6 between two bolts #12 then the remove the 2) bolts #12, remove caliper with carrier from fork tube and rotor.
Rock twist the caliper a bit to help retract the piston to aid removal of caliper. If it 's really stuck a thin pry bar may help, don't abuse the rotor.

late caliper rebuild 009.JPG


Remove screw #5 from back of caliper.
take pictures or notes of where everything fits.
remove bolt #6
The pads will come out, and the caliper separates from the carrier.
Some years have partial shims behind the pads, note position for re-installation.
Pads that have soaked in fork oil are junk and cannot be "cleaned up". Buy new pads.
The pressed steel pad locator you see now that the pads are out, has a prong holding it in, pry back a bit with a screwdriver to release the prong from under the piston on the caliper.
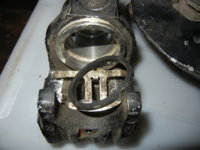
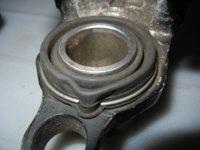
The prong (already released) is seen inside the rubber ring at the top here;
late caliper rebuild 011.JPG


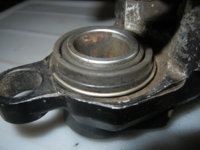
Remove the rubber piston dust cover and it's steel retaining ring. if the dust cover isn't gummy , distorted or torn it usually is reuseable.
Leaky fork seals often swell, ruin the dust cover seal.
Stretched dust cover, this one will not seal well and will let in water/dust, sometimes they get huge.

late caliper rebuild 013.JPG


Here's why you left the brake line attached. Use the handle bar lever and pump the piston out. If it doesn't want to move, it helps to push the piston back in a bit with a large c-clamp, then finish pumping it out. You might need to add fluid to the reservoir. If brake line is already off or pumping doesn't work; put some rag in the gap between the piston and caliper body. This can be dangerous; air line pressure can send that piston into the far shop wall or lop off a wayward finger. Put an air blow gun in the brake line hole give it a short, light burst of air. piston should pop out. repeat if needed. if it doesn't come right out use the C-clamp, push piston back a bit. try the air again. Really badly stuck pistons can be forced out with a grease gun.
Now sop suck brake fluid out of the reservoir, the caliper, and everywhere else it has gotten to. Remove the brake line from the caliper.

Hint; with the brake line removed from the caliper, brake fluid should dribble from the line until the reservoir is empty. If not you have problems upstream.

Carefully prize out the black rubber seal from the caliper. There is a bunch of gunk behind it, do not ignore this step. this is why the piston doesn't retract like it should. I like a piece of stiff copper wire bent to a 90 with a square end to scrape out the gunk stuck in there.
The caliper is soft aluminum and can easily be gouged. Check the piston and bore, remove any deposits, decide if you can live with the piston pitting. Minor pitting is usually near the outside where it doesn't affect the seal. If the pitting is extensive replace the piston. Most new ones are now made of stainless steel and should outlive the bike.
If needed use VERY fine paper like 1000 grit or finer, on small piston pits, smooth any rough edges on pits, if needed lightly touch up the caliper bore with the fine paper. clean, dry all parts. Try the piston in the caliper without the seal, it should easily slide in and out.

Check the slider #7 inside the rubber boot on the caliper, it should push in and out with small effort. if it doesn't, pop the rubber boot #6 from the grooves in the slider and push the pin out, clean and lightly coat with synthetic brake grease. reinstall pin.

Reassemble, wipe a bit of brake fluid on seal, install, use bit of brake fluid on piston, install, push it all the way in. Install the dust cover then the metal ring, use no tools, just your fingers, this may take a few tries to get it right, don't worry the rubber is very tough, repeat til it's in place and smooth.

late caliper rebuild 015.JPG


Old brake lines are crap and need to be replaced. A one piece stainless line is good
Take it to the bank: The master cylinder MUST be completely overhauled or replaced.
put it all together and bleed per littlebill's how to thread.

77-84 caliper.png 77-84 caliper detail.JPG

late caliper rebuild 001.JPG late caliper rebuild 008.JPG

late caliper rebuild 011.JPG late caliper rebuild 009.JPG

late caliper rebuild 013.JPG late caliper rebuild 015.JPG

Sorry I just used old parts from the bins for pics.

You don't HAVE TO remove the bracket from the fork leg; caliper can easily be removed from the bracket for pad changes etc. Loosen 1 bolt, 1 screw to remove.
DSCN3780.JPG
 
Last edited:
I am still editing the how to post, call out any needed corrections.

Pics added, We're getting close.

Late caliper 35mm overhaul rebuild repair how to brake pad piston seal dust rubber bleed reassemble master cylinder fluid dot carrier lh rh bleeder
 
Sinistermatti the sudden "stopped releasing" may be a plugged tiny second port in the master cylinder. If plugged it can slowly "apply" the brakes when riding! See the MC overhaul thread.
I've had this happen a few times on old bikes.
One time on a CB1100 shake down ride it had the rear rotor smoking hot before I figured out the "lack of engine power" LOL

When it happened I just went to use the brakes as normal and it wouldn't release, so I'm hoping it's not a mc issue. I cleaned out the reservoir and flushed the brake lines. From all the how to threads i've seen for MC rebuilds it looks like there are some tools I would need which I don't have, so I'm going to try the caliper rebuild first. Thanks for all the great information you've added!
 
I wouldn't be buying rebuild kits until I got things apart and saw what I had. I've never needed to use a rebuild kit, just thoroughly clean and re-use original parts. Yes, replace the line. That one Gary linked to is a good choice. The machine it was originally intended for doesn't matter. What does is the length and the 10mm banjo fittings.

So Gary, that 32" length works well? Is that with stock Standard bars or lower ones?
 
Thanks, and I kinda did that rfeng! I added this thread as link in littlebill31 s brake bleeding thread.

5twins I measured and the 79 pictured with euro bars and a master cylinder from a TW200 has a 34" that's a bit long. I think the the 32 would be just long enough for that set up. It wouldn't reach to the OE standard handlebar MC location.
 
Two weeks ago; the MC guts of a new to me, garage kept 9,400 mile 79 XS650 standard.

mc guts.jpg


mc guts.jpg

Notice the wad of spooge on the piston. Reservoir was loaded with crap also. Was I glad I stripped down this low miles "brake works fine" front brake system?
YOU BET I WAS. I have never pulled a XS650 brake apart and said oh it was fine inside.

This is a TYPICAL MC inside!

1654048622720.png


seriously; this is what you normally will find.
 
Last edited:
Your pic is half of what I found in the last one I worked on. Honestly, I couldn't see where there was room for any brake fluid, lol.

I did a rough measure on my bike and the 32" looks like the one for the Euro bars. I'm using a "freebie" of about 36". It's fine with some routing of the extra length to the left side .....

C5BTfLY.jpg


I think I will be buying a couple of these, for the "parts stash". Thank you Gary for the tip.
 
Last edited:
Thanks again for all the work you put into this write up gary. It rained on and off all day today and I don't have a garage to work in, so no progress yet. I'm going to take apart the mc and caliper tomorrow weather permitting and figure out what parts I need to order before monday. If this thread does get stickied feel free to have admins delete any of my posts or change the thread name. Really glad this information is available.
 
I know this is an old thread but just wanted to post in it to say it's an awesome thread!!!!

I have a new master cylinder, new brake line and last night I discovered the caliper is frozen and thanks to this thread I now know what i'm doing tonight!

Posted via Mobile
 
I thought I'd add a couple updates here. I recently installed one of those 32" lines on a Special with Euro bars. It worked but really could have been a few inches longer. I wasn't able to route the line between the headlight brackets behind the light as usual. I had to run it down the side outside the trees .....

DtHrdiq.jpg


I think the problem was the Special headlight ears. They attach higher than the Standard ones (see mine 3 posts up) which doesn't give as much room between them and behind the headlight for cable routing. So, a line a few inches longer would probably be better, at least on a Special.

Well, I found one, and the deal is so good I almost thought it might be a scam. But I took a chance and ordered one anyway. It came and it is very nice, even vinyl coated. And the price is just down right amazing - $5.99 !!

http://www.banggood.com/90cm-Braide...orcycle-Motorbike-ATV-Pit-Bike-p-1048321.html

The 90cm length is about 35.4", a few inches longer and should be ideal. Another "plus" is the banjo fittings are attached 90° to one another so you don't have to put a twist in the line when mounting.
 
Last edited:
Back
Top